Editing the videos in DaVinci Resolve does come with its benefits. But, sometimes this video editing app can throw up error messages like “Unsupported GPU Processing Mode” at the app startup. Usually, if there are some issues with the GPU DaVinci Resolve can’t recognize it. Follow these solutions so that you can edit the videos in the DaVinci Resolve app.
Fix 1 – Rollback the driver
If everything was working just fine before a graphics update, you should consider rolling back the GPU driver.
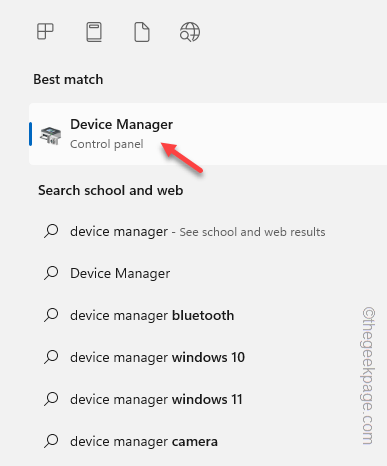
Step 1 – To do this, you have to open the Device Manager. Write “device” in the box.
Step 2 – Next, tap “Device Manager” to open it up.
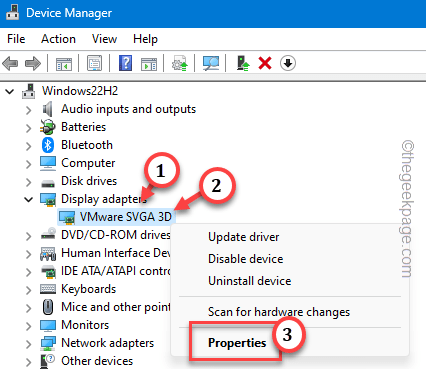
Step 3 – After accessing the Device Manager screen, expand the “Display adapters“.
Step 4 – Next, right-click the display adapter and click “Properties“.
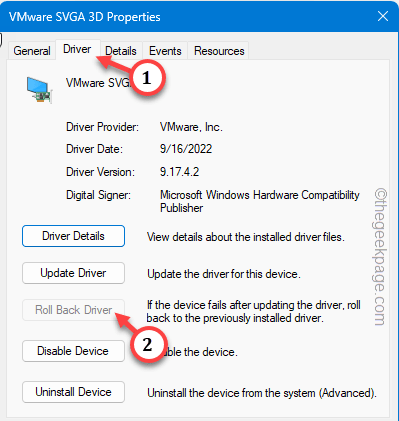
Step 5 – Go to the “Driver” tab.
Step 6 – After this, choose the “Rollback driver” to roll back the driver.
Step 7 – Choose any reason for rolling back the driver and click “Yes“.
Windows will now roll back the graphics driver. During this process, it will automatically restart the machine.
When the machine restarts, open the DaVinci Resolve app and test it out.
Fix 2 – Manually adjust the GPU config
Configure the GPU in the DaVinci Resolve app.
Step 1 – Load the app. Don’t open the old project if you are getting the error there.
Step 2 – After opening DaVinci Resolve, tap the “DaVinci Resolve” menu.
Step 3 – Tap “Preferences” to open that.
Step 3 –This time, uncheck the “Auto” box for the GPU processing mode. Now, choose the “CUDA” or “OpenCL” from the drop-down option.
Step 4 – Now, tap “Save” to save this setting in DaVinci Resolve.
This may restart the DaVinci Resolve app automatically. You won’t face the issue again.
Fix 3 – Update the graphics driver
If you still see the same error message, update the graphics driver of your system to the latest version.
Way 1 – Use the Device Manager
You should use the Device Manager to update the display adapter to their latest version.
Step 1 – To do this, you have to press the Win+R keys together.
Step 2 – Then, paste this in the box and hit Enter.
devmgmt.msc
Step 3 – Next, expand the “Display adapters“.
Step 4 – Simply, right-click the display adapter and use the “Update driver” function to update the driver.
Step 5 – You have to choose the “Search automatically for drivers” option.
Allow a few seconds for Windows to discover the latest version of the GPU driver and install that.
If Windows prompts you with this message,
The best drivers for your device are already installed.
do this –
Step 6 – Tap the “Search for updated drivers on Windows Update” option.
This should redirect you to the Windows Update page. Check whether you can find any new updates or not.
Way 2 – Use the dedicated GPU app
Most of the DaVinci Resolve users have a dedicated GPU card in their systems. So, use the associated app (GeForce Experience for NVIDIA, AMD Adrenalin for AMD).
Step 1 – Search and open the GeForce Experience.
Step 2 – Then, go straight to the “DRIVERS” tab.
Step 3 – Wait a bit for it to fetch the latest GPU driver information. Now, go to the “DRIVERS” tab.
Step 4 – Tap “Download” to download the listed version of the driver.
Wait patiently till the downloading process completes.
Step 5 – Click the “Express Installation” option so that the installer installs the GPU driver accordingly.
Wait until the GeForce Experience completes the installation process. After installing the new GPU driver, you must restart the computer once before using DaVinci Resolve.
So, do that and test.
Fix 4 – Remove the CUDA variable
Remove the CUDA variables from your system and check.
Step 1 – Quickly, hold the Win+R keys for a few seconds.
Step 2 – Paste this there. Hit Enter.
sysdm.cpl
Step 3 – Go to the “Advanced” tab.
Step 4 – There, click “Environment Variables…“.
Step 5 – Look whether you can find the “CUDA_VISIBLR_DEVICES” value. Select that and tap “Delete” to remove that.
After removing the environment variable, close all the remaining windows and restart your device.
Fix 5 – Check for DaVinci Resolve updates
The problem can occur due to a bug as well. So, check for the latest updates and upgrade to the latest version.
Step 1 – After opening the DaVinci Resolve, tap the “DaVinci Resolve” in the top menu bar.
Step 2 – Next, tap “Check for updates“.
Step 3 – If it detects an update package, tap “Download” to download and install the update packages.
You won’t see the “Unsupported GPU Processing Mode” message again.
Fix 6 – Uninstall & reinstall the DaVinci Resolve
Uninstall the DaVinci Resolve from your device and reinstall the latest version of the video editor.
Step 1 – Quickly press the Win+R keys at once.
Step 2 – Input “appwiz.cpl” there and click “OK“.
Step 3 – Find the “DaVinci Resolve” app in the list and click “Uninstall“.
Just follow the on-screen wizard and completely remove the DaVinci Resolve.
Step 4 – Uninstall the “DaVinci Resolve Control Panels” app as well.
After uninstalling the DaVinci Resolve app, download the latest version of the app.
Installing the latest version of the app will reinstall all the necessary peripherals as well. Check if this helps.


