Is the DaVinci Resolve on your system rendering zero-byte files when you are trying to export your edited video? When you are trying to access the final, rendered video output, it is appearing to be a zero byte size file, which is impossible. So, what can you do? Luckily, there are some things you can check and try to get the correct rendered footage from Davinci Resolve. Usually, this is just a simple mistake of wrong codec selection.
Fix 1 – Check whether the destination has enough free space
Check whether the output drive has enough free space so that it can actually contain the rendered video output. There should be a minimum of 30GB of free space available on your SSD to operate DaVinci Resolve properly. When it doesn’t have enough space, it will produce zero-byte size output files.
Selecting the proper output drive is also very important. Additionally, make sure this output drive has the proper permission to read/write files on it. Otherwise, DaVinci Resolve won’t be able to store the rendered output.
Fix 2 – Delete the Render cache
Existing Render cache can cause this problem. Thus clearing the render cache should fix the issue.
Step 1 – After opening DaVinci Resolve, tap “Playback” settings.
Step 2 – There you will see the option called “Delete Render Cache” in the menu.
Step 3 – Now here are two options to choose from. If you have a lot of unused render cache associated to the project, you may select “Unused” option.
Otherwise, select “All” to clean sweep the render cache of the project.
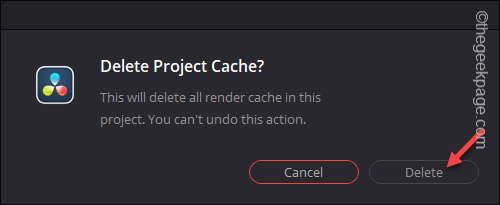
Step 4 – Now, tap “Delete” to assert to this process.
Now, try to render the video footage again in DaVinci Resolve. Check if this works.
Fix 3 – Select the correct codec, render settings
Selection of proper codecs, video format, framerate, aspect ratio and various other video specifications is very important rendering a video in DaVinci Resolve. If you have chosen wrong codecs and if it crosses the machine’s capability to render, you will get zero-byte file size output. Configuring the export settings correctly should fix the issue.
Fix 4 – Disable the hardware acceleration
Hardware Acceleration is set to On by default in DaVinci Resolve. Turning it off should help you resolve the rendering zero-byte output issue. Wrong GPU mode selection usually leads to this error.
NOTE – DaVinci Resolve, the free version of the software doesn’t have the support to GPU-based decoding. So, you can’t enable or disable the hardware acceleration feature here.
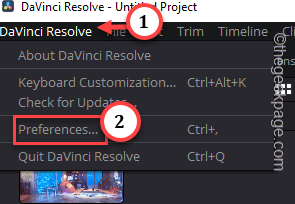
Step 1 – On the main DaVinci Resolve menu page, click “DaVinci Resolve” on the menu-bar.
Step 2 – Then, tap “Preferences” to access DaVinci Resolve preferences.
Step 3 – Go to the “Media and GPU” tab.
Step 4 – Just uncheck the “GPU processing mode” and “GPU selection” both modes on the right-hand side.
Step 5 – Tap “Save“.
Close DaVinci Resolve once and relaunch it further. Try to render the same RAW video file again.
This time, you will get the proper output.
Fix 5 – Choose another output location
Working with DaVinci Resolve you will understand better why selection of proper output location matters the most. If you have mounted an external SSD and using it as the main output drive, revert the output location to your system drive, which is internally connected.
Make sure that you are using proper render settings along with correct output drive should solve this zero-byte file size issue.
Fix 6 – Check for DaVinci updates
Haven’t updated DaVinci Resolve for a while? DaVinci updates are free forever. So, check and install the latest DaVinci updates.
Step 1 – Open DaVinci Resolve.
Step 2 – Then, tap “DaVinci Resolve” on the menu bar. Next, click “Check for updates” to find all the latest DaVinci updates.
Wait for DaVinci Resolve to download and install the updates. Once the updates are installed, restart the app and check.
Fix 7 – Uninstall & reinstall DaVinci Resolve
The final solution on our list is to uninstall the DaVinci Resolve and install the latest version of it.
Step 1 – Type “appwiz.cpl” in the search box.
Step 2 – Then, tap “appwiz.cpl” to open it up.
Step 3 – When Programs & Feature window appears, find “DaVinci Resolve“.
Step 4 – Then, right-click the app and tap “Uninstall” to start the uninstallation process.
Go through the process and DaVinci Resolve should be gone within a minute.
Step 5 – After head to the BlackMagic Design page. Then, tap the Download icon to download the compressed setup file.
Step 6 – Extract and run the setup file to install DaVinci Resolve.
Now you can use the new DaVinci Resolve and you can start exporting the video file. It will render successfully. Check if this works.


