The one particular settings that Windows 10 always lacked was the lack of proper disk management tools in the Windows Settings. Windows 11 fills that gap with the proper disk management tools built into the Settings. Now, you can analyze the storage drive and manage the storage without leaving the Settings window.
How to manage the disk and drives in Windows 11
Simply follow these detailed instructions on how to manage the disk and drives storage settings in Windows 11.
ExPLoRING the Storage devices
1. First of all, press the Windows key+I keys together.
2. In the Settings window, click on the “System” settings.
3. On the left-hand side, tap on the “Storage” settings.

4. Then, click on the “Advanced storage settings”.
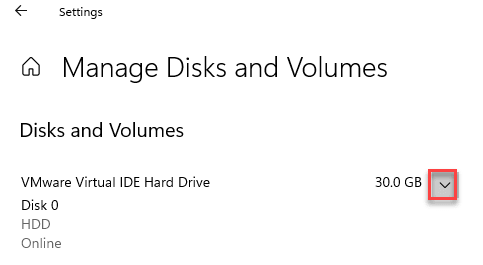
5. Now, on the right-hand pane, scroll down and click on the “Disk & volumes” to analyze the storage devices.

You will see all the drives (including the external media storage) on your computer.
From the Settings window itself, you can explore the storage devices connected to your computer.
5. Just click on the drop-down icon of the drive you want to explore.

6. Then, select the particular drive you want to access. You will two options there.
7. Just, click on the “Explore“.

This will open up the particular portion of the drive in the File Explorer to access it. You can access the drive as you want.

Changing the label of the DriVE
Follow these steps to alter the drive letter of a particular drive.
1. Open the Settings.
2. Then, tap on the “System” settings.
3. In the System Settings, click on the “Storage” on the left-hand pane.

4. Then, tap on the “Advanced storage settings” on the right pane.
5. On the right-hand side, just tap on the “Disk & volumes“.

5. Then, click on the drop-down icon of the drive that you want to rename.
6. You will be all the distinct partitions of the drives. Tap on the partition with the maximum size.
7. Once the partition is highlighted, click on the “Properties“.

8. Next, you will see the ‘Volume Data’ section.
9. Just, click on the “Change label“.

10. Just type a new drive letter for the drive.
12. Then, click on “OK” to set the drive letter for the drive.

[
NOTE –
1. You have to type a unique drive letter that no other drive is currently using. If you are not sure, take a look –
a. Press the Windows key+E keys together.
b. Now, click on the “This PC“.
You will notice all the drives connected to your computer at this place.

c. Carefully notice which drive letters are being used by the drives, partitions.
We suggest not changing the Local Disk (C:) label as it is the default Windows directory.
]
This way, you can change the drive letter of the particular drive on your computer.
Increase/decrease the partition size
You can increase or decrease the partition size of your drives using similar settings.
1. Open the Settings window.
2. Then, open the ‘Manage Disks and Volumes’ window following the same way we have mentioned before.
3. Now, select the drive you want to increase the size. It will show you the partition of the drive.
4. Again, click on the partition you want to increase and tap on the “Properties“.

5. Then, click on the “Change size“.

6. The ‘Change size’ pane will appear. Set the new size of the disk in MB.
Suppose the older partition holds only 30 GB storage. So, if you want the new partition to contain 60 GB of storage, you have to enter this –
60*1024 = 61,440 MB
So, the partition will have 60 GB.
7. Then, click on “OK“.

This process will take a while depending upon the size you have increased.
Viewing the usage of the drive
You can view the usage of the drive more efficiently. This helps you to get more insight into what folders are containing more space.
1. Open the Settings window.
2. Then, again open the Manage disks and Volumes settings, following the process mentioned before.
3. Again, click on the “Properties” to check it out.

4. Then, scroll down through the settings, and click on the “View usage“.

5. Now, you will see the list of all the folders on the drive, along with the amount of storage the folders are currently using.
6. Further, you may click on the particular folders and check which app/files are stored in that particular folder.

This feature enhances the usage of Settings quite significantly.
Delete/format the partition
You can delete/format the partition within the Settings. Before you delete/format partition, back it up so there are no unnecessary data losses.
1. Open the Settings.
2. Then, access the ‘Manage disks and Volumes’ settings, following the process mentioned before.
3. Again, click on the “Properties” to check it out.

4. Now, scroll down to the bottom of the settings, tap on “Delete” to delete the partition.

This will start deleting the drive from your computer. Follow the on-screen instructions and complete the deletion process.
5. If you want to format the drive, just tap on the “Format” to start formatting the drive.

Following the same way as before, just follow the instructions to complete the formatting process.
This process takes time, depending upon the partition size you are trying to format.
That’s it! These are the various disk management operation that you can directly perform from the Settings.