Any Microsoft Office application that is running on your computer has its own Product ID that needs to be either on a subscription basis or purchased by you. Many users have reported seeing an error stating the license cannot be found for this application when they try to open any Microsoft Office application. The complete error message displayed to the user is
Microsoft Office can’t find your license for this application. A repair attempt was unsuccessful or was cancelled. Microsoft Office will now exit.
In case you are one of those users seeing this same error, then read this article to find some solutions that can help you fix this issue with Microsoft Office on your computer.
Fix 1 – Force Start sppsvc.exe
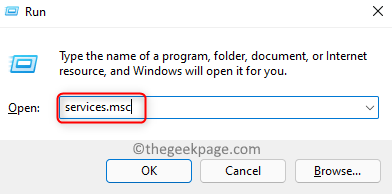
1. Open Run dialog using the Windows and R key combination.
2. Type services.msc and hit Enter to open Services window.
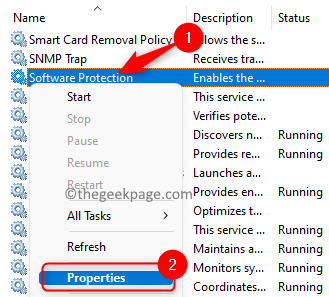
3. Locate the service named Software Protection in the list of services.
4. Right-click on it and choose Properties.
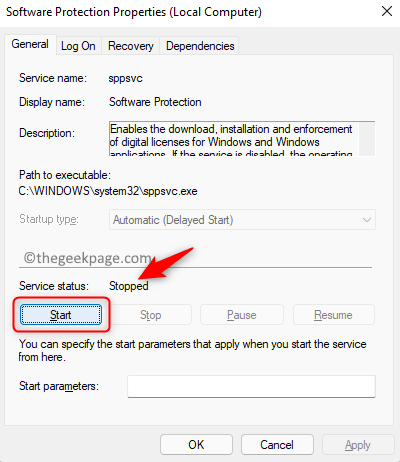
5. In Software Protection Properties, click on the Start button if the Service status is Stopped.
6. Exit all the open windows and check if you are able to overcome the error while opening the Office application.
It has been noticed that sometimes the button to start the service will be disabled (grey). In such cases, you need to use the Registry and change the permission rights of the service. Follow the steps given below.
Note: Before making any changes to the Registry make sure that you have a backup of it.
1. Check that you are using the system with an administrator account.
2. Just use the Windows and R key combination to open Run.
3. Type regedit and click on OK to open the Registry. Click on Yes when prompted by UAC.
4. Copy paste the location below into the navigation bar of the Registry.
HKEY_LOCAL_MACHINE\SOFTWARE\Microsoft\Windows NT\CurrentVersion\SoftwareProtectionPlatform
5. Right-click on the SoftwareProtectionPlatform key and choose Permissions…
6. In the Group or user names section, select the user sppsvc.
7. Now check the box associated with Full control permissions in the Allow column.
8. Click on Apply and then on OK to exit.
9. Reboot the PC. Check if you are now able to start the sppsvc process from Services to fix this issue.
Fix 2 – Use the Registry Editor to Start the sppsvc Process
If you are not able to start the sppsvc process using Fix 1, then you need to modify certain values in the registry in order to forcefully start the process.
Note: Take care before making changes to the Registry as it can have adverse effects on the working of your PC. So create a backup that can be used to restore the registry if you face any issues later.
1. Just hold the Windows and R keys simultaneously to open the Run dialog.
2. To open Registry Editor, type regedit and click on OK.
3. Copy and paste the below location into the Registry’s navigation bar.
HKEY_LOCAL_MACHINE\SYSTEM\CurrentControlSet\Services\sppsvc
4. Once the sppsvc folder is selected, move over to the right side and look for DelayedAutoStart key.
5. Double-click on DelayedAutoStart to change its value.
6. In the window that opens, set the Value data field to 0. Click on OK.
Note: The value 0 here indicates that whenever the system boots, the process will begin without any lag.
7. Locate the Start key in the list. Double-click on it to modify the value.
8. Change the Value data field to 2. Click on OK.
9. In the same list on the right side, look for Type. Double-click on it to open the Edit window.
10. Set the Value data field of Type to 20. Click on OK.
11. Reboot your PC. Check to see if the Office app launches without any error.
Fix 3 – Disable Compatibility Mode
1. Find the location of the Office installation on your PC.
2. Right-click on the Office applications executable that was giving the error and choose Properties.
3. Go to the Compatibility tab.
4. Make sure that you uncheck the option Run this program in compatibility mode for in the Compatibility mode section.
5. Click on Apply and then OK.
See if you are able to open the Office app without any error message
Fix 4 – Perform a System Restore
1. Press Windows + R and type rstrui to open System Restore.
2. Select the option Choose a different restore point and click on Next.
3. In the window that appears next, check the box associated with Show more restore points.
4. Select a restore point that was saved previously from the list being displayed.
5. Click on Next.
6. Check the details of the restoration process and click on Finish to start the system restore.
7. Once the process completes, your system will revert to a state in which it was working properly.
8. Check if the issue with the Office application is resolved.
Fix 5 – Update MS Office
1. First restart your system and launch Office.
2. Office will open and you will be able to get over the error being displayed.
3. Select the File menu.
4. Click on Account in the left pane.
5. On the right side, click on Update Options to open the dropdown menu.
6. Choose the option Update Now to start the update process.
7. In case the application closes, then try the above Steps 3 – 6 using Microsoft Outlook.
8. If you are not able to overcome the error when opening the Office application, then press Windows key + X on your keyboard.
9. Click on Apps & Features.
10. Locate your Office installation in the list of apps. Click on the three vertical dots associated with Office and choose Modify.
11. When prompted by User Account Control, click on Yes.
12. In the Office Repair window, choose the option Online Repair. Then, click on the Repair button.
Note: Make sure you have an active internet connection.
13. Click on the Repair button in the confirmation window to start the repair process.
14. Wait for the repair process to complete. This process updates Microsoft Office while repairing it. Check if the problem is fixed.
15. If the process above doesn’t work and Office is not updated, open the Run dialog using the Windows and R keys.
16. Type the path below and hit Enter.
C:\Program Files\Common Files\microsoft shared\ClickToRun\OfficeC2RClient.exe /update user
17. The command will be executed in the background to update MS Office.
18. Check if the problem is resolved.
Thanks for reading.
The error regarding the license not being found for the Microsoft Office application must be resolved now. Comment and let us know the fix that helped you overcome this issue on your Windows PC.


