Apart from displaying the date and time, the Date and Time app of your Windows 10 PC also helps a lot of other services to run perfectly and hence, the time and date should be set correctly. While the Automatic clock synchronization feature of the Windows allows it to manage the Date and Time settings based on the time zone, it may sometimes fail to sync with time.windows.com and that’s when you come across an error “An Error Occurred While Windows Was Synchronizing With time.windows.com”. This error occurs when the Windows Time service is not functioning properly. This is quite a common error and the good news is, it can be fixed. Let’s see how.
Method 1: Change Windows Time Service to Automatic
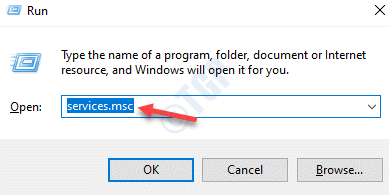
Step 1: Right-click on Start menu and select Run to open the Run command window.

Step 2: In the search box, type services.msc and hit Enter to open the Services window.

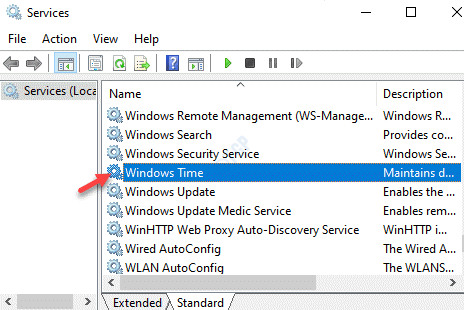
Step 3: In the Service manager window, go to the right side of the pane and under the Names column look for the Windows Time service.
Double-click to open its Properties window.

Step 4: In the Properties window, under the General tab, go to the Startup type field.
Set the field to Automatic.

Step 5: Now, go to the Service status section and check if it’s running.
If not, then press the Start button.

Press Apply and then OK to save the changes and return to the Service window.
Exit the Services window and check if the error is gone.
Method 2: Download and run nist internet time service
1. Just go to this link from nist.gov to download NISTIME-32bit.exe
2. Press CTRL + F in the webpage and type NISTIME-32bit.exe to find it.
3. Now, once you locate the download link for NIST-32bit.exe , just download it.
Right click on the downloaded file and choose run as administrator.

Run it on your PC directly, as its a portable file and do not require installation
Method 3: Register the Win32time Components
Step 1: Press the Win + X hotkey and select Run. This will open the Run command window.

Step 2: In the search box, type cmd and press the Ctrl + Shift + Enter shortcut key to launch Command Prompt with administrator rights.

Step 3: Type the below commands one after another in the Command Prompt (admin) window and hit Enter after each one:
net stop w32time
w32tm /unregister
w32tm /register
Once completed, close Command Prompt and reboot your PC. You should not encounter the error anymore.
Method 4: Edit the Registry Editor
Step 1: Right-click on the Start menu and click on Run in the menu.
Step 2: In the Run command window that opens, write regedit and press OK to open the Registry Editor window.
Step 3: In the Registry Editor window, navigate to the below path:
HKEY_LOCAL_MACHINE\SYSTEM\CurrentControlSet\services\TapiSrv
Now, go to the right side of the pane and double-click on ImagePath to open its Edit String dialogue box.

Step 4: In the Edit String dialogue box, copy and paste the below path in the Value data field:
%SystemRoot%\System32\svchost.exe -k NetworkService
Press OK to save changes and exit.

*Note – Before making any changes to the Registry Editor, make sure you create a back up of the registry data, so that, in case you lose any data during the process, it can be recovered.
Close the Registry Editor, reboot your PC and you should not encounter the internet time sync error again.
Method 5: Update Internet Time Settings
Step 1: Press the Win + R shortcut key on your keyboard to launch Run command.
Step 2: Write control panel in the search box and press OK to open the Control Panel window.

Step 3: In the Control Panel window, go to the View by field and set it to Large icons.
From the list, select Date and Time.

Step 4: In the Date and Time window, select the Internet Time tab and press the Change settings button.

Step 5: It opens the Internet Time Settings window.
Here, check the box next to Synchronize with an Internet time server.
From the drop-down, select time.nist.gov and press the Update now button next to it.

Press OK to save the changes and exit.
Now, go back and check if the error is gone.
Method 6: Add More Time Servers Using Registry Editor
Step 1: Press the Win + X keys together on your keyboard and select Run from the menu.

Step 2: In the Run command window, type regedit and hit Enter.

Step 3: This will open the Registry Editor window.
Copy and paste the below path in the Registry Editor address bar and press Enter:
HKEY_LOCAL_MACHINE\SOFTWARE\Microsoft\Windows\CurrentVersion\DateTime\Servers
Now, go to the right side of the window and right-click on an empty area. Select New and then String Value.

Step 4: Rename the new String Value based on the time servers you already have.
For example, here we renamed the new String Value as 3 since it already has 1 and 2. If you have more, rename it accordingly.

Step 5: Now, right-click on the new String Value and select Modify.

Step 6: In the Edit String Value window that opens, go to the Value data field and add the below text:
tick.usno.navy.mi
Press OK to save the changes and exit.

*Note – Before you proceed to edit the Registry Editor, create a back up of the registry settings, so that, in case of any data loss, it can be recovered.
Close Registry Editor and restart your PC. The internet time sync error should be fixed now.
Method 7: Activate the Time Synchronization feature
Step 1: Navigate to the Start icon on the bottom left your PC screen and click on it. Select Run to open the Run command window.

Step 2: Type, taskschd.msc on the search field and hit Enter to open the Task Scheduler.

Step 3: In the Task Scheduler window, on the extreme left side of the pane, under Task Scheduler (Local), expand the Task Scheduler Library folder > Microsoft > Windows.

Step 4: Now, select Time Synchronization from the list of folders.

Step 5: Now, go to the middle-section of the window and under the Name column, right-click on SynchronizeTime and select Enable.

Now, close the Task Scheduler and restart your PC for the changes to be effective. This should fix the internet time sync issue in your Windows 10 PC.
Method 8: Add RealTimeIsUniversal DWORD in Registry Editor
Step 1: Press the Win + R keys together to open Run command.
Step 2: In the Run command window, type cmd and press the Ctrl + Shift + Enter keys on your keyboard to open Command Prompt with admin rights.

Step 3: In the Command Prompt (admin) window, run the below commands one by one and hit Enter after each command:
ntpdate pool.ntp.org
hwclock –systohc –utc
Step 4: Now, exit command prompt and right-click on Start menu and click on Run.

Step 5: In the Run command window that opens, write regedit and press OK.
This will open the Registry Editor window.

Step 6: In the Registry Editor window, navigate to the below path:
HKEY_LOCAL_MACHINE\SYSTEM\CurrentControlSet\Control\TimeZoneInformation
Now, navigate to the right side of the window and right-click on an empty space. Select New and then DWORD (32-bit) Value.

Step 7: Rename this new DWORD value to RealTimeIsUniversal and double-click on it.

Step 8: In the DWORD (32-bit) Value dialogue box, set the Value data field to 1.
Press OK to save changes and exit.

*Note – Before you edit the Registry Editor, make sure to create a back up of the registry data. This will help you recover any lost data during the process.
Exit the Registry Editor window, reboot your PC and you should not come across the error any further.
Method 3: Run SFC Scannow Command
Step 1: Press the Win + R keys together on your keyboard to launch the Run command box.
Step 2: In the Run command search field, write cmd and press the Ctrl + Shift + Enter keys together to open Command Prompt in elevated mode.

Step 3: In the Command Prompt (admin) window, run the below command and hit Enter:
sfc /scannow

Windows will scan the system files and this process takes a while. So, wait for sometime and once it’s over, exit Command Prompt. Restart your PC and the internet time sync error should be resolved now.
Method 9: Update Outdated BIOS
Before you proceed with the method, check the BIOS version as shown in this article.
Step 1: Now, to check the motherboard model, right-click on Start and select Run to launch Run command.

Step 2: Write msinfo32 in the search box and hit Enter to open the System Information window.

Step 3: In the System Information window, go to the right side of the pane, and check the System Model (motherboard model).

Step 3: Now, open your browser and visit the motherboard company website to download and extract the latest BIOS version.
Now, go to BIOS (follow the readme.txt file for guidance) or you can use a Windows app to update BIOS.
Alternatively, you can create a bootable DOS USB drive for BIOS update.

Now, restart your PC and the you should not see the error again.
Alternatively, you can temporarily change the time zone through the Settings app and check if it resolves the internet time sync issue. If that doesn’t work, you can check if there any pending Windows update to be downloaded and installed. If there is, download and install the update, and then restart your PC to check if it corrects the time issue on your Windows 10 PC. Sometimes, the issue can arise due to your computer battery. If the BIOS is corrupted, it can create the time and date settings issue. To check if you battery is an issue, enter BIOS (refer to this article on how to enter BIOS). If there’s an issue with the battery, you would need to replace it. However, if this method also fails, check if the CMOS battery needs to be replaced. Make sure you seek help from a technician for the CMOS battery replacement.