Just like any other application, your Internet Explorer also stores your browser-related info (like – bookmarks, favorites, cookies, etc ) in a temporary location on your computer. Some users are complaining about seeing an error message ‘Temporary Internet Files Location Has Changed’. This problem usually occurs if the user has interfered with the temporary storage or uninstalled the Internet Explorer recently.
Normally, the Internet Explorer temporary files are located at –
C:\Users\%username%\AppData\Local\Microsoft\Windows\INetCache.
Fix 1 – Adjust the Registry
You have to modify the registry on your computer to fix this issue.
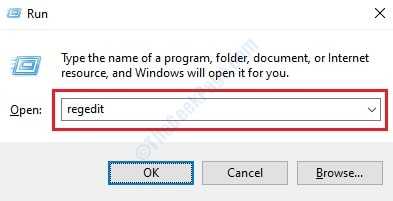
1. Press the Windows key+R. Here, write “regedit“.
2. After that, press the ‘Enter‘ key from your keyboard.

Important– You have to careful making any change in the registry editor. Before going further altering the registry, we urge you to make a backup of the registry on your system. It is very simple –
After opening the Registry Editor, click on “File“. Then click on “Export” to make a new backup on your computer.

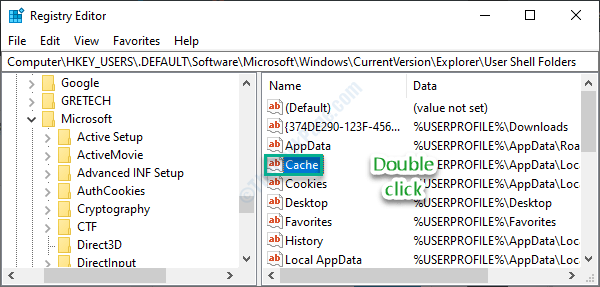
3. After taking the backup, go to this location-
HKEY_USERS\.DEFAULT\Software\Microsoft\Windows\CurrentVersion\Explorer\User Shell Folders
4. Now, on the right-hand side, check out the “Cache” key.
5. After that, double click on the “Cache” key.

6. Here, paste this location and click on “OK“.
%USERPROFILE%\AppData\Local\Microsoft\Windows\INetCache

7. Next, go to this place in the same window-
HKEY_CURRENT_USER\Software\Microsoft\Windows\CurrentVersion\Explorer\User Shell Folders
8. Just as the same, double click on the “Cache” key.

9. Type or copy-paste this initial location value and click on “OK“.
%USERPROFILE%\AppData\Local\Microsoft\Windows\INetCache

Once you have done this, close the Registry Editor window.
Restart the computer system. After that, check if the error is still there or not.
Fix 2 – Modify Explorer settings
If modifying the registry didn’t work out, you can adjust the explorer settings manually.
1. Press Windows key+R to open the Run window.
2. In the Run window, write “inetcpl.cpl“. Click on “OK“.

The Internet Properties window will open.
3. When the Internet Properties window appears, go to the “General” tab.
4. Then, click on “Settings“.

5. As the next step, click on “Move folder…” to adjust the folder location.

6. In the Browse for Folder window, navigate to this location –
C:\Users\%username%\AppData\Local\Microsoft\Windows\iNetCache\
7. Click on “OK” to save the settings.

When you have done this, reboot your machine. The problem should be solved.
Fix 3 – Uninstall antivirus
For some users, the problem was fixed once they uninstalled the third-party antivirus from their computers.
1. At first, press the Windows key+R keys together.
2. Then, type “appwiz.cpl” and hit the Enter key.

This will open the Programs and Features window.
3. You have to scroll down to find the antivirus on your system.
4. Right-click on the antivirus and click on “Uninstall“.

Now, follow the on-screen steps to uninstall the antivirus from your system.
Restart the system to complete the process.
Fix 4 – Empty the Temp folder
Try emptying the Temp folder on your computer.
1. Right-click on the Windows icon and then click on “Run“.
2. Then, write this code and click on “OK” to access the Temp folder.
%temp%

4. Once the Temp folder appears, press ‘Ctrl+A‘ to select all the contents.
5. After selecting the files press the ‘Delete‘ key to clear everything from the Temp folder.

After emptying the Temp folder, close the File Explorer.
Fix 5 – Run SFC, DISM scans
1. Press the Windows key+R.
2. Then, type this code and hit CTRL + Shift + Enter keys together.
cmd

3. Simply copy this command and paste it into the CMD window. Thereafter, hit Enter to run the scan.
sfc /scannow

4. Now you have to do run a DISM scan. Type this code in the terminal and hit Enter.
DISM.exe /Online /Cleanup-image /Restorehealth

Once all these checks are complete, close the terminal and restart your device.