Some NVIDIA users are facing an annoying error message on their windows 11 and windows 10 PC, stating ‘NVIDIA Container stopped working‘. This is a problem of NVIDIA driver corruption. There may be a recent driver update or any third-party software installation that may have triggered this issue. Don’t worry if you see this error message out of the blue, just follow these fixes to solve the problem.
Fix 1 – Restart Nvidia Display Container service
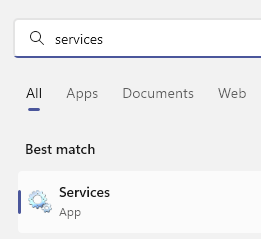
1 – Search services in windows search box located in taskbar
2 -Click on services to open service manager

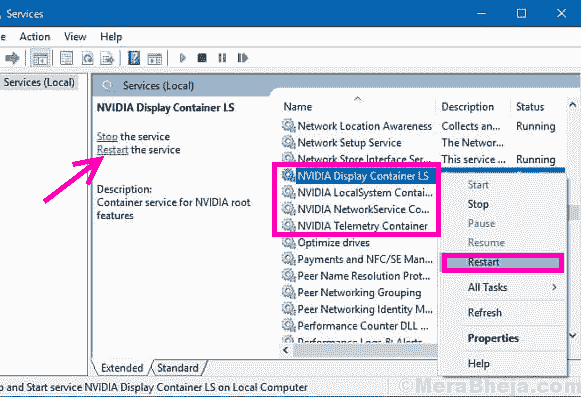
3 – Now, Locate Nvidia Display Container Ls service from the list
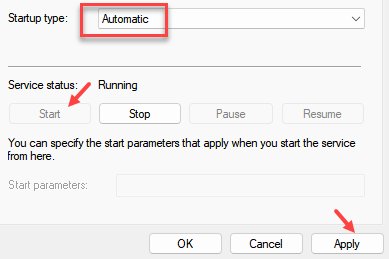
5 -Double click on the service and set startup type to automatic.
6 – If it is not running , then click on start to start it.

4 – If it is already running, Right click and choose restart.

Fix 2 -Edit PCI express power settings
1 – Search Edit Power Plan in windows search box.
2 -Now, Click on Edit Power plan.

3 – Now, click on Change advanced power settings

4 – Nowl expand PCI Express
5 – Now, expand Link state Power management
6 – Set the setting to OFF. (For laptop user, turn off for both on battery and Plugged in option)
7 -Click on Apply and OK

Fix 3 – Uninstall graphics driver and reboot
1. Press Windows key+X keys together from your keyboard.
2. Just click on the “Device Manager” to access the utility.

3. When you see the list of drivers, expand the “Display adapters“.
4. Right-click on the driver and click on the “Uninstall device” to uninstall it from your computer.

5. If you see a prompt for confirmation to uninstall the graphics driver, just click on “Uninstall“.

After uninstalling the driver, just reboot your computer.
Fix 4 – Use DDU to reinstall the graphics driver
The graphics driver on your computer may be corrupted.
PROCESS 1 – Download the DDU and turn oFF THE automatic updates
1. What you need to do at first is to download DDU.zip on your computer
2. Once you have downloaded it, unzip the contents anywhere you want.

2. Right-click on the Windows icon and click on the “Run“.
3. Here you have to write “control printers” and click on “OK“.

Device and Printers settings will open.
4. Here, right-click on your computer name and click on “Device installation settings“.

5. Here, tick the “No (your device might not work as“ expected)” option.
6. To save this change, click on “Save Changes“.

7. Go to the NVIDIA driver website.
8. Put particular settings in the appropriate section (like ‘Product type’, your ‘Operating System’, etc).
9. Then, click on the “Search” to search for the latest driver.

10. Here, click on the “Download” to download the driver on your system.

Just remember the location where you are saving the installer.
Close the browser window after downloading the driver.
Level 2 – Boot into Safe Mode and uninstall the graphics driver
Case 1 – For Windows 10 Users
1. Open the Settings window and click on “Update and Security“.

2. Then, click on “Recovery“,
3. After that, under ‘Advanced Startup’, click on “Restart Now“.

Case 1 – For Windows 11 Users
1 – Press Windows key + I together to open settings.
2 – Now, click on System from the left menu.
3- Now, Click on Recovery from the right side.

4 – Click on Restart now located in the right of Advanced startup.

Now, follow the steps given below.
4. Your device will boot into the Windows Recovery Environment.
Once it does, simply click on “Advanced options“.

5. Then you have to click on the “Startup Settings“.

6. Then, click on “Restart“.

7. Once you are in the Startup settings, press the F4 key to “Enable Safe Mode“.

8. Go to the location where you have extracted the DDU.zip.
9. You have to go to the extracted folder, and then double click on the “Display Driver Installer“.

11. When the Display Driver Uninstaller screen opens up, on the left-hand side, click on the drop-down beside “Select device type” and click “GPU”
12. Here you have to finally click on “Clean and Restart“.

DDU will uninstall the existing NVIDIA driver from your system. Your computer will reboot.
Level 3 – Install the graphics driver manually
Once your computer restarts, follow these easy instructions install the graphics driver.
1. Go to the location where the driver is on your computer.
2. You have to double click on the offline installer to launch it.
![]()
3. When the NVIDIA Graphics Driver window appears, click on “NVIDIA Graphics Driver and GeForce Experience”
4. After that, Click on “Agree and continue“.

5. Here, select the “Custom installation” option to try it out.
6. Click on “Next“.

7. Finally, click on the “Perform a clean installation” box.
8. A click on “Next” and the installation process will start.

9. Once the installation is done, click on “Close” to close the NVIDIA Graphics Driver Installer window.

Restart your computer to let the installation process complete.
LEVEL 4 – ENABLE AUTOMATIC UPDATES
All that is left is to re-enable the automatic update of your devices.
1. Once you have rebooted your device, right-click on the Windows icon and click on “Run“.
2. Type this code and click on “OK“.
control printers

3. Here, you need to right-click on your computer and click on “Device installation settings“.

4. Simply tick the “Yes (recommended)” option and then click on “Save Changes“.

This should have fixed the issue on your computer. Open a game and press ‘Alt+Z‘ to check if this works.
This should fix the problem with your computer.