Screenshot or Screen clipping is the tool available in Microsoft Word, PowerPoint and Excel. The screenshot or Screen clipping tool is used for ease of adding Screenshots or Screen clippings so that the readability of the documents can be increased. The screenshot or Screen clipping tool also reduces back-and-forth between different screens and programs, by capturing the screenshots of programs or screens that are open, making the documenting process easy.
Steps To Use Screenshot or Screen Clipping Tool:
The screenshot or Screen clipping tool is present in different places in MS Word, PowerPoint and Excel.
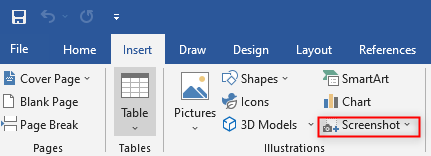
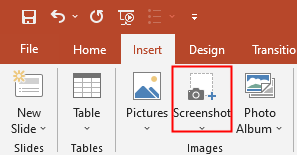
In MS Word and PowerPoint, The screenshot or Screen clipping tool is present on the Insert tab, in Illustration Group.
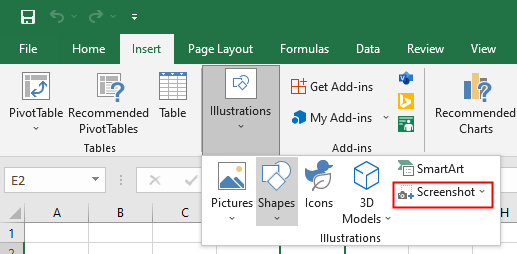
In MS Excel, The screenshot or Screen clipping tool is present on the Insert tab, in ImagesGroup.
Screenshots are used to capture the entire window and ScrrenClipping is used to capture the portion of the window.
Steps To Use screenshot :
-
- Click on the document where you want to add a screenshot or screen slipping.
- Note different steps for word excel and PowerPoint.
- To use the screenshot or Screen Clipping tool in Microsoft Word and PowerPoint, click on the Insert tab, then click on Screenshot.

Open Screenshots in MS Words 
Open Screenshots in MS Powerpoint 2. To use the screenshot or Screen Clipping tool in Microsoft Excel, Click on the Insert tab, then click on Illustration, then click on Screenshot

Open Screenshot in MS Excel
- To use the screenshot or Screen Clipping tool in Microsoft Word and PowerPoint, click on the Insert tab, then click on Screenshot.
- Available windows will open showing all the programs which are open.

Available Windows Screen - Select one of the thumbnails from the Available windows, which you want to add as the screenshot.
- The screenshot will be added to the document.
Steps To Use Screen Clipping :
- Go to the screen from where you want to take the screen clipping before starting the process.
- Follow the 1 and 2 from earlier(To Use screenshot).
- Click on Screen Shipping.

Open Screen clipping This will take you to the screen from where you want to take a screen clipping. The entire screen will become opaque.
4. Press and drag your mouse to take the clipping of the required part from the screen. The captured part will be automatically added to the document.
After taking the screenshot or screen clipping and inserting it into documents we can use the Picture tools to edit images. Picture tools can be Used to crop and add styles to the Screenshots or screen clippings.
Steps To Use Crop the Images:
- Right-click on the image, and we will be able to see crop and style options.
- Click on the Crop.
 Black lines will appear around the corner of the images.
- Press and move the back line to crop the images.
Above Mentioned steps can be used to add as many screenshots as you want and edit them using the picture tool. This not only makes adding the screenshots/screen clipping easy but also increases the readability of the documents and decreases the time required to create a good quality document.