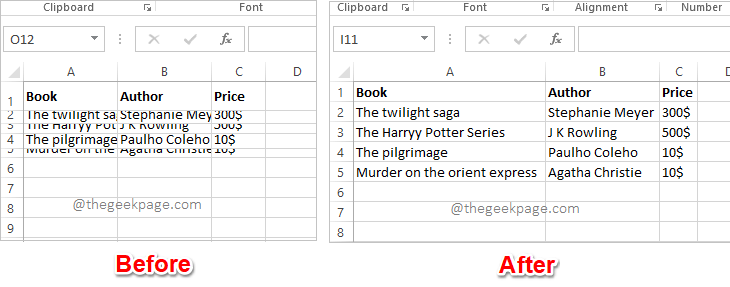
You have a tight deadline and you are about to submit your work and that’s when you noticed that your Excel sheet is not tidy. The rows and the columns are of varying heights and widths, mostly data is overlapping, making it impossible to view the data perfectly. Manually adjusting the heights and widths of rows and columns according to the contents is indeed going to take a huge amount of time and it, of course, is not recommended. By the way, why do you even want to think about doing it manually when you can automate the whole thing with some simple clicks or key presses?
In this article, we explain in detail how you can easily autofit row height or column width in your Excel sheet by following 3 different solutions. You can pick your favorite solution and be a master at your Excel tasks from now on!
Solution 1: By Using AutoFit Functionality from Format Options
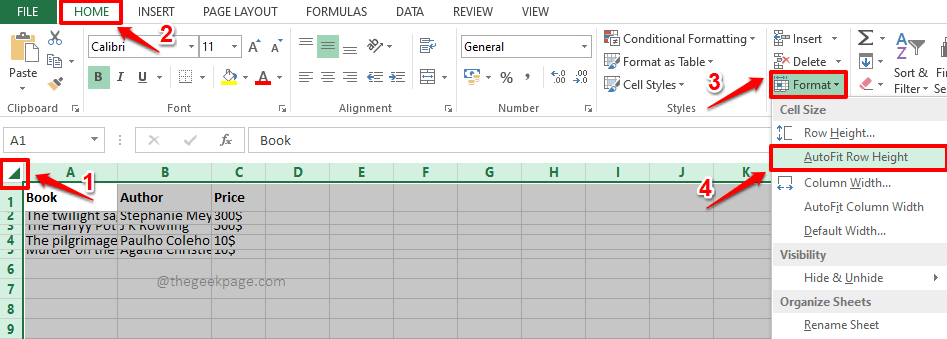
Step 1: Open the worksheet that you want to format. Click on the Select All button located at the intersection of row labels and column labels.
Once the entire worksheet is selected, click on the HOME tab at the top. Under the HOME options, click on the dropdown menu named Format. From the Format options, click on AutoFit Row Height.
Step 2: If you now look at the Excel sheet, you can see that the heights of the rows are auto-formatted to fit the contents inside.
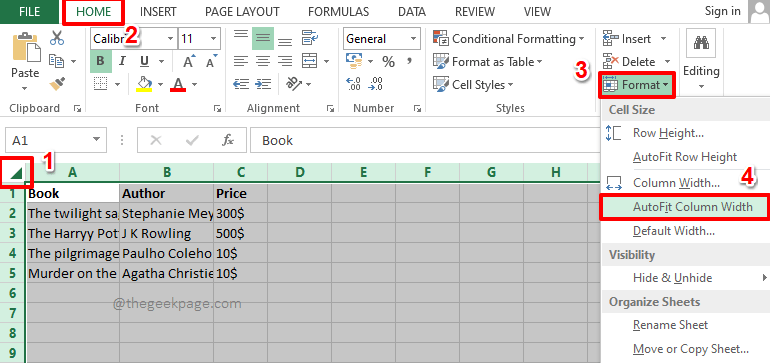
Now, let’s go ahead and do the same with columns. For that, once again select the entire Excel worksheet by clicking on the Select All button at the intersection of row labels and column labels.
Make sure you are at the HOME tab and then click on the Format dropdown menu to choose AutoFit Column Width option from the list of options available.
Step 3: If you look at the Excel sheet now, you can see that the AutoFit formatting is applied to both rows and columns. Enjoy!
Solution 2: By Using Keyboard Shortcuts
This method uses the same steps as in the previous solution. But instead of using mouse clicks, you can use keyboard shortcuts.
Step 1: Firstly, select the entire worksheet to format. You can either click on the Select All button at the beginning of the Excel sheet as shown in the screenshot below, or you can simply press the keys CTRL + A together to select the whole sheet.
Once the sheet is selected, hit the ALT + H keys at the same time to view the shortcut options available.
Now you will see a lot of alphabets on your Excel sheet. These are all shortcut options. Against each functionality, there is a shortcut assigned. Since we need to view the Format options, we need to press the shortcut key O, that is assigned to it. So, on your keyboard, press the letter O.
Step 2: The Format dropdown menu would now be visible before you. Again, you will see some alphabets against each option available in the Format options.
From this menu, to autofit the row height, we need to choose the AutoFit Row Height option. So on your keyboard, press the shortcut key assigned to it, which is A.
Step 3: That’s it. AutoFit formatting would now be applied to your rows.
As next, let’s apply the AutoFit formatting to your columns. For that, select the sheet once again, by pressing the CTRL + A keys together or by pressing the Select All button at the top.
Now, press the ALT + H keys together to view the shortcuts available.
Press the key O to expand the Format dropdown menu.
Step 4: Finally, press the key I to autofit column height.
That’s it. Your columns also should now be formatted.
Solution 3: By Double Clicking on Column / Row Borders
If you have to autofit multiple columns or rows or both, it’s always recommended to follow one of the 2 solutions listed above. But if you have only a couple of rows or columns to autofit, then you can follow the method listed in this section for faster results.
Step 1: To autofit a column, double click on the column header border that you want to autofit. This will instantly do the job.
Step 2: Similarly, if you want to autofit a row, you can double click on the row header border to autofit the row height. Yes, it works perfectly if only a couple of rows or columns are in the picture, not when you have to format the entire worksheet.
Hope you could successfully autofit your Excel sheet following our article. Please tell us in the comments section which method is your favorite.
Thank you for reading.


