There are many instances when you may want to increase your microphone volume on your Windows 10/11. For instance, while communicating with friends or colleagues on Skype, while having a team meet on Microsoft Teams or while using any other app that may require the use of your system’s microphone. Sometimes, while using these apps, the microphone volume may fall and that’s when you may want to make your microphone louder.
In such cases, you must increase the volume to improve the sound quality and communicate normally while on an online meet. There are two methods to boost the low microphone volume and have a better audio experience. Let’s see how:
Method 1: Through the Sound Control Panel
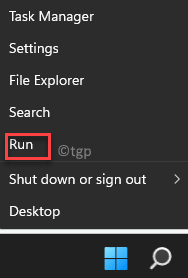
Step 1: Right-click on Start and select Run from the context menu.
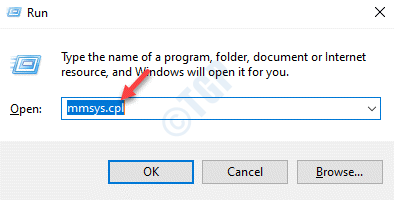
Step 2: In the Run command window, type mmsys.cpl and hit Enter to open the Sound control panel.
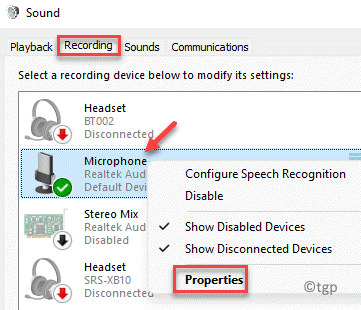
Step 3: In the Sound dialogue box, go to the Recording tab.
Now, check if the correct Microphone is selected here.
Next, right-click on it and select Properties.
Step 4: In the Microphone Properties dialogue box, go to the Levels tab and adjust the Microphone volume.
You can also increase the Microphone Boost (if available) to a comfortable level.
Step 5: Once you have increased the levels, go to the Listen tab to check the volume.
Check the box next to Listen to this device, press Apply and then OK.
Now, the system will play a test sound to help you analyze the volume.
Step 6: But if it doesn’t work, then select the Advanced tab and select an audio format from the Default Format drop-down.
Then press Apply and OK again to listen to this device.
This should help you increase the microphone volume as per your requirement.
Method 2: Through the Equalizer APO Tool
If the above method fails to make the microphone louder on your Windows 10/11 PC, you can use the Equalizer APO tool to enhance the volume levels. Let’s see how:
Step 1: Go to your browser and type Equalizer APO in the search engine and hit Enter.
Click to open the first link or copy and pates the below link in the browser to open it directly:
https://sourceforge.net/projects/equalizerapo/
Step 2: On the homepage, click on the Download button in green.
Step 3: Once downloaded, click to open the .exe file.
Step 4: Follow the on-screen instructions in the setup wizard to continue with the installation process.
Step 5: Once done, the Configurator window opens.
Here, select the Capture devices tab and select your Microphone from the list.
Step 6: Click on OK in the confirmation prompt.
Step 7: Next, back in the setup wizard, select Reboot now and click on Finish in the setup wizard.
This will reboot your PC.
Step 8: Next, press the Win + E shortcut keys on your keyboard to open the File Explore.
Now, navigate to the below path:
File Explorer > C drive (C:) > Program Files > Equalizer APO > Editor.
*Note – If you have chosen to create a shortcut, you can simply click on the shortcut to open the editor.
Step 9: Click Yes in the confirmation prompt – APO not installed to device.
Step 10: In the Configurator window, click on Capture devices tab again and select your device Microphone again.
Step 11: Now, turn on the Preamplification option at the top by pressing the switch next to it and adjust the volume by moving the circle next to it using the mouse.
You have successfully increased the microphone volume on your Windows 10/11 PC.
Method 3: Through the Settings App
Alternatively, you can also boost the microphone volume of your computer using the Settings app. Let’s see how:
Step 1: Press the Win + I keys together on your keyboard to open the Settings app.
Step 2: In the Settings window, click on System on the left.
Step 3: Now, go to the right side and click on Sounds.
Step 4: In the next screen, on the right side, scroll down and under the Input section, click on your Microphone.
Step 5: Now, in the Properties screen, scroll down and under the Input settings section, adjust the Input volume to increase the Microphone volume.
The Microphone volume is now increased on your Windows 10/11 PC.


