Though Google Chrome is one of the most widely used web browsers in the world, many users get a heart attack when they see the number of processes running for Chrome through their Task Manager. Google Chrome runs a process each for all its tabs, windows, extensions, subframes etc. Hence the number of processes used by Chrome grows quite large and can eat up a lot of your system resources.
In this article, we explain through some simple methods how you can easily prevent Chrome from running multiple processes and thus save your valuable system resources.
Method 1: End Processes from Chrome Task Manager
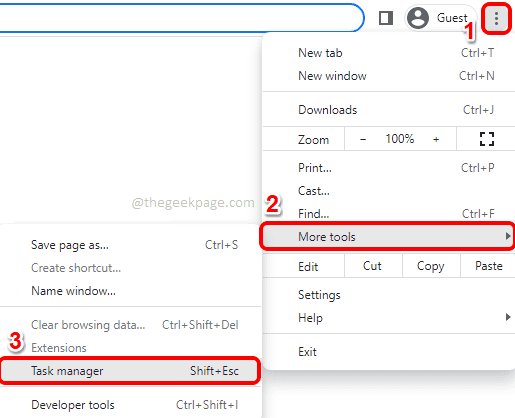
Step 1: Launch Google Chrome first and then click on the 3 vertical dots icon at the top right corner of the Chrome window.
From the Settings menu, click on the More tools option and then click on the Task manager option.
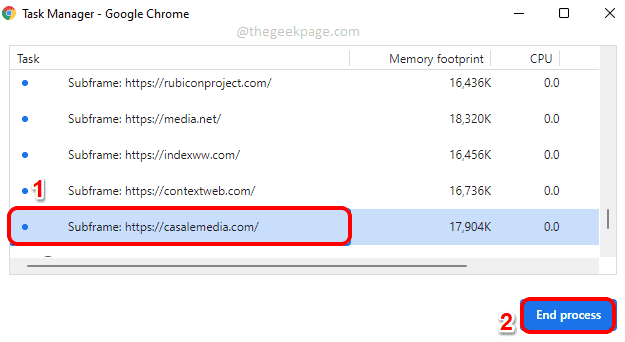
Step 2: Once the Google Chrome Task Manager launches open, click on the Task that you want to end and then click on the End process button at the bottom.
Repeat this step for all the processes that you want to end.
Method 2: Stop Running Apps or Processes in Background When Chrome is Closed
Step 1: Firstly, launch Google Chrome.
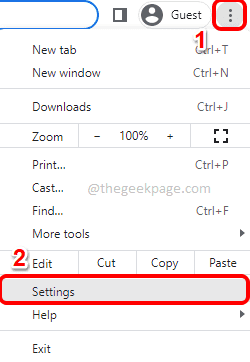
Click on the 3 vertical dots icon at the top right corner of the page and then click on the Settings option.
Step 2: In the Settings window, on the left window pane, click on Advanced tab to expand it.
As next, click on the System sub tab under Advanced tab.
Now in the right window pane, turn the toggle button to Off state for the option Continue running background apps when Google Chrome is closed.
Method 3: Limit the Number of Processes Per Site through Chrome Properties
Step 1: Go to Desktop and right click on the Google Chrome shortcut icon. As next, click on Properties.
Step 2: In the Google Chrome Properties window, click on the Shortcut tab.
Now click on the text field Target and then go to the end of the line.
At the end, put a space and then copy and paste the parameter –-process-per-site.
Hit Apply button and then the OK button.
Note: It has been observed that this method doesn’t work for all users. Please tell us in the comments section if this method didn’t work for you.
Method 4: By Disabling or Removing Extensions
Installing extensions are easy. But each of these extensions require a background process each, despite the fact that they are being used or not. So, if you see a lot of background processes running, you sure can try removing some of the extensions installed.
Step 1: Launch Google Chrome and click on the Extensions icon at the top right corner of the page.
Step 2: From the menu that expands out, click on the option Manage extensions.
Step 3: On the Extensions page, click on the Remove button associated with the extension that you want to remove.
You can remove all the unwanted extensions from your Chrome.
One of the methods listed here should definitely work for you.
Stay tuned for more tips, tricks, fixes and how to articles!


