Windows 10 is a stable operating system in which users rarely witness consequent problems with the essential services ( main input/output services like sound, display, etc). But some Windows 10 users are reporting about a particular type of problem they are having with the sound system on their device. ‘Volume control is not working in Windows 10’ is the problem they are facing on their device. Along with this particular problem, some users are also complaining about these following problems related to Volume control-
1. Volume control is not showing in Taskbar- Volume icon is not present in the Taskbar.
2. Windows 10 volume slider is not working – If you are trying to control volume from the Taskbar but it is not working at all.
3. Volume mixer won’t open – You are unable to open Volume Mixer.
4. The volume icon is not working – You can not change the volume by clicking on the Volume icon.
5. Volume control with multimedia keys is not functioning – If you are unable to increase or decrease directly with the multimedia keys from your keyboard.
6. Volume control is not opening – You can not access the Volume control directly by clicking on the Volume icon.
7. The Volume control program is not installed – When you are trying to change the Volume, there is an error message stating ‘Volume Control Program is not installed’.
8. Volume control grayed (disabled) –If the Volume control icon is grayed (disabled) you will not be able to access the Volume controller.
If you are facing any of these above problems, go for these fixes. These fixes will help you out. But before going ahead for the fixes, attempt these initial workarounds-
Initial Workarounds-
1. Restart your computer and check if your sound device is working without the error.
2. If you are using an external speaker, check the connection of the speaker. It’s better to unplug the speaker and connect it with the computer again. If it is possible, check your speaker by plugging it to another computer. Check if your problem has solved.
3. Temporarily disable your antivirus and check if your volume control is working properly or not.
If these initial workarounds didn’t work out for you go for these fixes-
Fix-1 Restart the Windows Audio service-
You can set the Windows Audio service to start automatically.
1. Press Windows key and type “services“.
2. Then, click on the “Services” in the elevated search result.
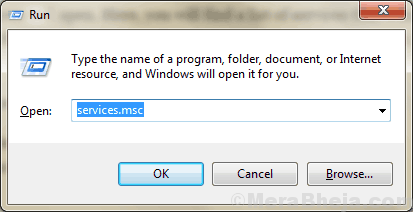
3. Now, scroll down and double click on the “Windows Audio” service.
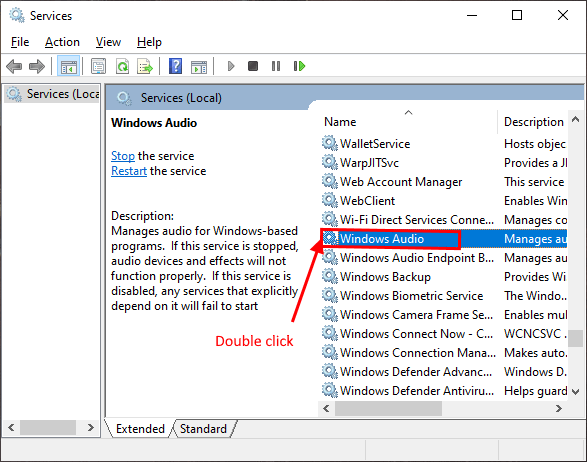
4. In the Windows Audio Properties window, click on “Stop” to stop the windows audio service temporarily and then click on “Start” to start the service again.
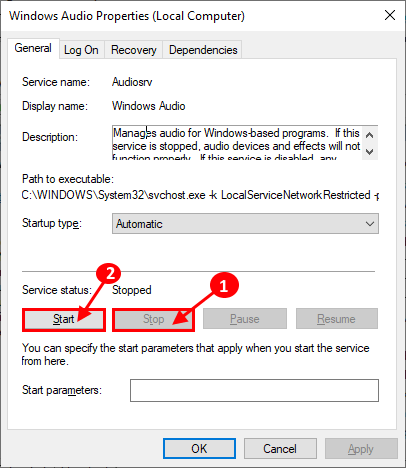
5. Now, in the Windows Audio Properties window, click on the drop-down of the “Startup type:” and select “Automatic“.
6. Now, click on “Apply” and “OK” to save the changes.

Now, close the Services window.
7 – Now, in service manager window, locate Windows Audio Endpoint Builder and repeat the same thing again.

Reboot your computer and check if you are still facing the same problem with your Volume control or not.
Fix 1- Restart windows explorer
1. Press CTRL + SHIFT + Esc keys together to open task manager.
2. Right click on Windows explorer and choose restart.

If explorer is not showing up , then just open any folder in your PC, then try to locate Windows explorer.
Fix-3 Change the Font size on your system-
According to some users, there is a very peculiar solution which has fixed the problem for them. They changed the font size on their computer and the problem is fixed. You can try this on your device.
1. Press Windows key+I to open the Settings window. Then, click on “System“.

2. Now, on the right side of the Settings window, under the “Scale and layout” option, click on “Change the size of text, apps and other items” and choose any of the size other than the present one.

Now, restart your computer. After rebooting, volume control on your device should be working fine again.
For Windows 11
1 – Press Windows and I key together from your laptop to open settings.
2 – Click on System from the left menu and then click on Display from the right side.

3 – Change the scale to a different one (From the current settings)

Try again and check if your issue is resolved
Fix 4 – Update your sound card driver
Updating the sound card driver can fix your problem. Follow these steps to update your sound card driver-
1. Press the Windows key and type “Device Manager” in the search box.
2. Then, you have to click on the “Device Manager“.
3. Now, right-click on the driver you are using as your current sound system and click on “Update driver“.

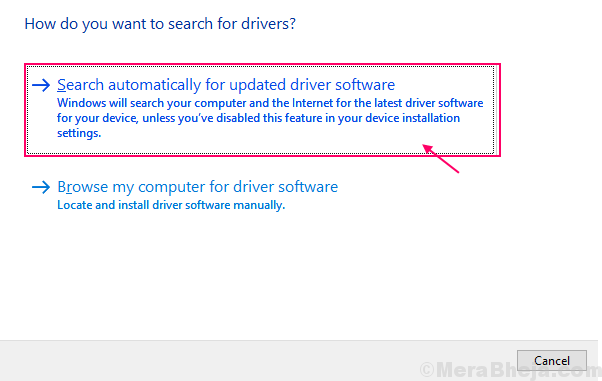
3. Click on the option “Search automatically for updated driver software“.
Reboot your computer.
Check if updating the sound driver has solved your problem or not. Go for the next fix if your problem continues.
Fix-5 Kill SndVol.exe process from Task Manager-
You can end the process SndVol.exe in the Task Manager and restart your computer. This will restart your SndVol.exe process on your computer.
1. Press Ctrl+Shift+Enter to open the Task Manager window.
2. Now, find “SndVol.exe” in the list of the processes running on your device, right-click on it and click on “End Task“.

Close Task Manager window. Now, reboot your computer. After rebooting check if the problem with Volume Control persists or not. If the problem is still there, go for the fix.
Fix-6 Uninstall and Reinstall sound card driver
Follow these easy steps first to uninstall the sound card driver-
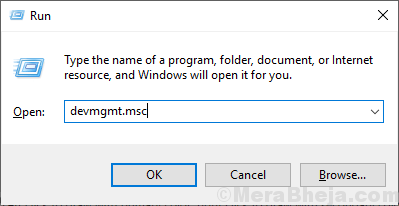
1. Simply by pressing the Windows key and the ‘R‘ key you can open the Run window.
2. Now, type “devmgmt.msc” and then click on “OK“.

3. In the Device Manager utility window, click on the section “Sound, video and game controllers“.
4. Right-click on the sound card driver you are using, click on “Uninstall device“.

The sound card driver will be uninstalled from your computer.
Method 1 –
1. At first, you have to shut down your computer.
2. Unplug the power cable from your computer.
3. Then, you need to press the power button for 30 seconds on your cabinet.
4. After that, connect the power cable to the computer, and then switch it ON.
Windows will install the uninstalled driver itself during the booting process. You will have your sound card driver working fine again.
Method 2 –
Install the sound card driver manually-
1. Open the Device Manager.
2. In the Device Manager window, click on the “Action” and then click on the “Scan for hardware changes“.

Try to check for the sound card driver.
Method 3-
Sometimes the driver may be hidden in the Device Manager.
1. Click on “View” of the Device Manager.
2. Then click on “Show hidden device“.

Check if you can find the sound card driver.
Restart your computer to save the changes. Check if you are facing the same problem again or not.
Fix -7 Enable the Startup of the Audio drivers-
Windows has a feature with which you can be selective about which drivers to enable at the startup of your computer. Now, you can manage the startup of the audio services with Task Manager.
1. Press Ctrl+Shift+Enter to open the Task Manager window.
2. Then, go to the “Startup” tab.

3. Now, in the list of items, find “Audio Manager” (for our system it is “Realtek Audio Manager“. Your device may be using another audio manager).
4. Check “Status” of the Audio Manager. If it is “Enabled” then you can skip this fix.

If you notice the “Status” is “Disabled” then, right-click on it and click on “Enable“.

Now, Close the Task Manager window. Now, reboot your computer.
After rebooting check if the problem with Volume control persists or not. If the problem is still there, go for the fix.
Fix-8 Run Troubleshooter-
If your problem remains unsolved, follow these steps to run the “Playing Audio” troubleshooter which will find any kind of problem-related to Bluetooth driver.
1. Press Windows Key+ I to open the Settings window. Click on the “Update & Security“.

2. Now, click on “Troubleshoot” on the left pane and then on the right pane click on “Playing Audio“.

3. Now, the troubleshooter will try to find errors and attempt fixes to solve your problem related to the audio driver, volume control.
After troubleshooting, reboot your computer.
If still your problem is not fixed, then go for the next fix.
Fix-9 Perform SFC scan on your computer-
Sometimes some corrupt files or system errors on the hard drive can the problem you are facing with Volume Checker. To check for the corrupt Windows files and system errors on the hard drive, you can use System File Checker to perform a scan on your system. Follow these steps-
1. You have to open the Run window. To do so, press Windows key+R.
2. Now, type “cmd” and then you have to press the ‘Enter‘ key from your keyboard.

2. Type “sfc /scannow” and hit Enter.

Wait till the process is complete.
After rebooting your computer, check if the error is still appearing or not. If the problem is still appearing, then go for the next fix.