After receiving the recent updates on Windows 11 devices, a handful of users seem to be experiencing Error Code 0xc0000135 while opening or running apps. This Error Code 0xc0000135 signifies that the associated app has failed to initiate due to the absence of a dependency file or component. This error occurs due to the .NET Framework system. So, make sure the.NET Framework is enabled on your computer.
Fix 1 – Enable the .NET Framework
You have to enable the .NET Framework 3.5 with Windows Foundation HTTP Activation protocols.
Step 1 – Activate the .NET Framework
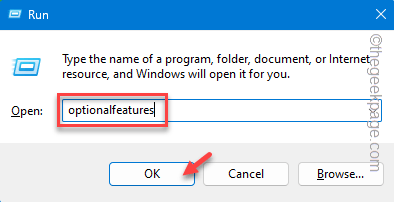
Step 1 – Directly open a Run dialog box, simultaneously pressing the Windows and the R key.
Step 2 – Then, type down this word in the blank box. Click “OK” to directly open Optional Features.
optionalfeatures
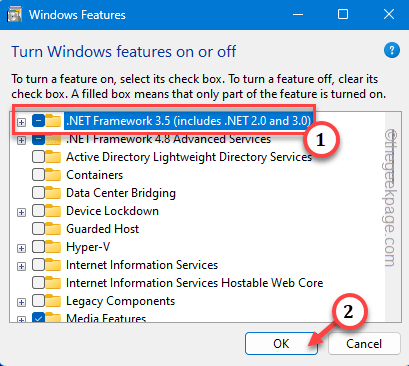
Step 3 – Find the “.NET Framework 3.5 (includes .NET 2.0 and 3.0)“. Check that box.
Step 4 – Now, scroll down through the same page, and look for these two features –
Windows Communication Foundation HTTP Activation
Windows Communication Foundation Non-HTTP Activation
Step 5 – Then, click “OK” to activate all these features.
Just hold for a few minutes as Windows downloads and install these features.
Windows will show the prompt to restart your computer. So, reboot the system.
Step 2 – Re-enable .NET from CMD
After restarting the system, make sure to follow the following step
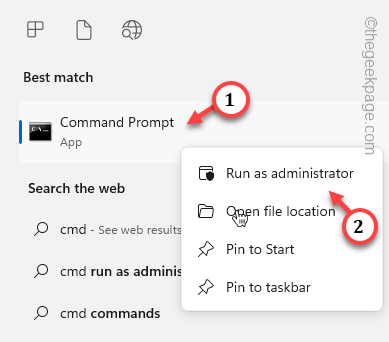
Step 1 – Click the Windows Start button in the bottom left corner of your screen. In the search bar, type “cmd“.
Step 2 – Right-tap “Command Prompt” and tap “Run as administrator” on the drop-down menu.
Step 3 – We are going to use DISM to enable the .NET and HTTP activation feature for all users. So, paste these commands, and use the Enter key to run it.
dism /online /enable-feature /featurename:netfx3 /all
dism /online /enable-feature /featurename:WCF-HTTP-Activation
dism /online /enable-feature /featurename:WCF-NonHTTP-Activation
Once you have enabled all these features, go ahead and exit the terminal. Then, restart your computer.
Try to launch the problematic app again.
Fix 2 – Run Windows Apps Troubleshooter
Step 1 – Directly begin to write “troubleshoot” after clicking on the Windows Start icon.
Step 2 – Now, click “Troubleshoot” in the same search results to open that up.
Step 3 – Now, tap “Other troubleshooters” to open it.
Step 4 – As this 0xc0000135 is related to the app, locate the “Windows Store apps” troubleshooter. Click “Run” to initiate the troubleshooting.
Wait until it scans, identify the issue with the particular program, and solve it.
Fix 3 – Reset the Store
Sometimes the corrupted cache of the Store can contribute towards the Error Code 0xc0000135 at program initialization.
Step 1 – This is a very simple process. So, write “wsreset“.
Step 2 – Then, tap “wsreset” run the Windows Store reset code.
Wait for the Windows Store cache to be reset. Then, try to open the application once again. Check if this works.
Fix 4 – Re-register all the Store apps
If you are facing the 0xc0000135 while using a Store app, try re-registering all the Store apps to fix the issue.
Step 1 – You can right-click the Start button on the taskbar and tap “Windows Terminal (Admin)” to open that up.
It will open a PowerShell terminal.
Step 2 – Then, input this code and hit Enter to re-register all the Store apps at once.
Get-AppXPackage -AllUsers | Foreach {Add-AppxPackage -DisableDevelopmentMode -Register "$($_.InstallLocation)\AppXManifest.xml"}
Exit the PowerShell terminal. This won’t reboot the computer. Launch after you have logged in. Check if this helps.
Fix 5 – Uninstall and reinstall the same app
If nothing so far has worked for you, there might be some problem with the app package itself. Just uninstall and reinstall the app to overcome the issue.
Step 1 – Using the Win+X shortcut keys, call upon the Power User menu.
Step 2 – Then, tap the first option “Installed apps” in the elevated panel.
Step 3 – Now, just identify the application and uninstall it from your computer.
Later download the same application and test whether this fixes the issues.


