Visual Studio Code most often called VS Code is one of the tools used by developers for coding. Intellisense is a feature that is included in VS Code to make the coder’s life easy. It gives suggestions or tool tips for writing code. This is one such extension a developer would prefer. When IntelliSense does not work, people who are used to it will find it difficult to code. Are you one among them? If so, go through this article to find different solutions to solve the IntelliSense not working in VS code issue.
Intellisense looks like the below. It gives suggestions when you code.
It is always good to check the basic things first. What I meant with basic things is to check if the IntelliSense is mistakenly uninstalled, and check by reloading the VS code. Also, remember that if suppose you have installed IntelliSense for python then it will work only for python and not for other languages. If you are using multiple programming languages you need to install it for each of them separately.
Method 1: Reload The VS Code
If the IntelliSense is installed and still not working then most of the time restarting/reloading the program will solve the issue. So give it a try.
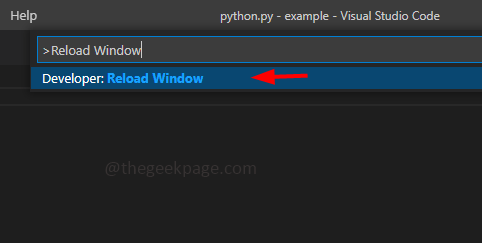
Step 1: To restart VS Code open VS Code and press Ctrl + Shift + P keys together to open the command palette and type Reload Window in the search.
Step 2: Click on Developer: Reload Window. This will reload the VS Code.
Method 2: Check If IntelliSense Is Installed
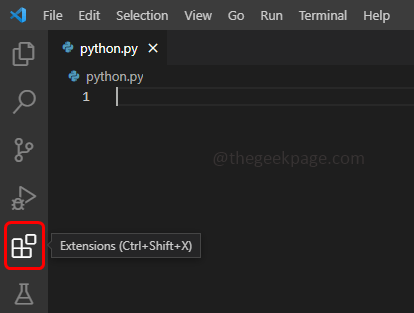
Step 1: Open the Visual Studio Code and on the left, there are different options hover on those to know what they are.
Step 2: Use Ctrl + Shift + X keys together to open extensions tab. Or you can hover on the options and click on Extensions.
Step 3: In the search bar type the programming language you want the IntelliSense for and give a space then type IntelliSense. For example, suppose you need IntelliSense for python so type python IntelliSense
Step 4: A list of extensions will appear, select the one that is the best fit. When the extension is selected you can see what are the different features included in that particular extension on the right side.
Step 5: If the selected extension is already installed you cannot see an install button in it.
Step 6: If it is not installed there will be an option saying install. Click on it to install. You can see the difference between the installed extension and the extensions that are not installed in the below image. The installed extension shows the settings symbol and the other one which is not installed shows the install button.
Step 7: If you get the reload option Reload the IDE else follow the steps mentioned in Method 1 to reload.
Method 3: Restart And Update VS Code
Step 1: Restart your system by clicking on the start button at the bottom left corner.
Step 2: Click on the Power button and click on the Restart option.
Step 3: Check if the IntelliSense works, if not update the VS Code.
Step 4: To update VS Code, open VS Code and click on Settings which is at the bottom left corner of the VS Code.
Step 5: From the appeared list click on Check for Updates. This will check if there are any updates, if so it will install the updates. After installing the updates restart the VS Code.
Step 6: If updates are not available it will show up in a dialog box saying there are currently no updates available. Click on OK.
Method 4: Re-install VS Code
If none of the above methods work then the last option would be to re-install the VS Code. I know it is frustrating but since you have tried all the above methods and didn’t find it working, re-installing the VS Code will resolve the IntelliSense issue.
Step 1: To uninstall the VS code open Run prompt by clicking Windows + R key together and type appwiz.cpl
Step 2: This will open Programs and Features. Scroll down to find Visual Studio Code.
Step 3: Right-click on Microsoft Visual Studio Code and click on Uninstall.
Step 4: To download the VS Code, go to the manufacturer’s website and click on which operating system you are using. For example, here I am using Windows so click on the Windows button to download the Setup(.exe) file.
Step 5: Once the download is complete click on the downloaded .exe file and follow the on-screen instructions to install it.
Step 6: Open the VS Code and now since it is a fresh installation it will not have IntelliSense extensions. To install the IntelliSense follow Method 2.
This will solve the issue and you can easily start to code.
That’s it! Hope this article helped you. Comment which of the above methods worked for you. Thank you!


