It’s natural for us to shut down our PC completely before we go to sleep. When you want to turn it on in the morning, you need to press the power button. But, what if you want your computer to turn on automatically, say for completing a full virus scan or a Windows update?
Well, Windows allows you to do that with a function using which you can set your Windows 10 PC to wake up from sleep automatically. This is like setting an alarm to wake up your computer at a scheduled time via the Task Scheduler. Let’s see how.
How to Schedule your Windows 10 PC to Wake Up Automatically using Task Scheduler
Step 1: Press the Windows key and type Task Scheduler in the search box. Click on the result to open the Task Scheduler window.

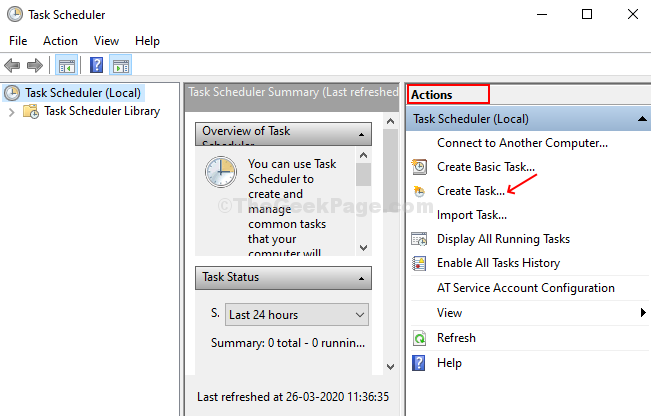
Step 2: In the Task Scheduler window go to the extreme right side of the pane, and click on Create Task located under Actions.

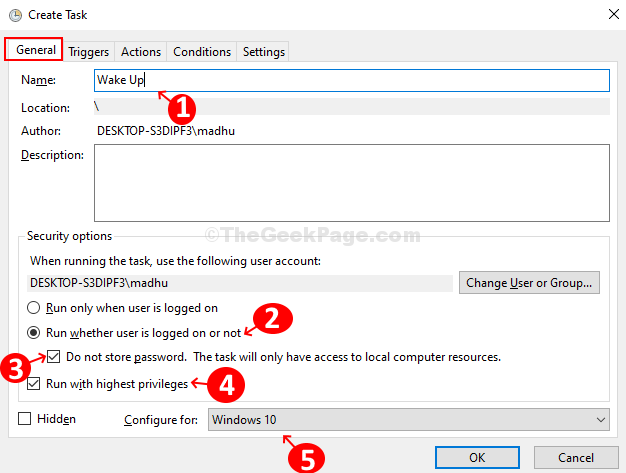
Step 3: In the Create Task window, under the General tab, name the task as something like Wake Up or anything that’s easily recognizable. Now, select the radio button for Run whether user is logged or not > check the box next to Do not store password > check the box next to Run with highest privileges > and, select the Configure option as Windows 10.

Step 4: Go to the Triggers tab, click the New button to create a new trigger. Click the radio button for Daily under Settings and set the Recur every field to the number of days you prefer.
Under the Advanced settings option, tick the box for Stop task if it runs longer than and set it to 30 minutes. Tick the box for Enabled and hit OK.

Step 5: Go to the Actions tab, set the Action field to Start a program, type cmd.exe in the Program/script field under Settings, and enter /c “exit” in the Add arguments (optional) field. Hit OK to open the Command Prompt which in turn will ask it to run the command exit instantly. This will shut down the command immediately while leaving the computer on.

Step 6: Go to the Conditions tab and tick the option Wake the computer to run this task and disable all the other options.

Step 7: Go to the Settings tab > tick the box for Allow task to be run on demand (this will ensure that the task won’t restart if the task fails or the schedule is missed) > tick the box for Stop the task if it runs longer than > set it to 30 minutes. Now leave the rest as it is and press OK to save the changes.

Step 8: Next, configure the power plan to finish the set up to wake up your computer automatically. Click on the Windows icon > type Control Panel to open the Control Panel window > set it to view by Large icons > click on Power Options > under Selected plan option on the right, click on Change plan settings > now click on Change advanced power settings > in the Advanced settings dialog box, scroll down to Sleep > expand it and now expand the option Allow wake timers > enable both the On battery and Plugged in options under it. Click Apply and OK to save the changes.

Step 9: Now, we will make sure that wake timers are enabled , because this method will not work, until wake timers are enabled on your PC.
To enable, wake timers:-
Press windows key + S to open windows search box.
Step 10 – Now, search edit power plan and click on search result obtained.

Step 11 – Click on change advanced power settings

Step 12 – Expand sleep.
Step 13 – Expand Allow wake timers
Step 14 – Now, select enable for everything in the list.

Your computer is now all set to automatically wake up as per your set schedule.