When you open the Power options menu on your Windows PC, the options that are visible are Restart, Sleep, and Shut down. Windows provides the Sleep option to its users which retains the last used programs and in turn saves the battery power. When your PC is in sleep mode, it is neither shut down nor fully functional and can be made functional by using the mouse and the keyboard. Recently, many users have reported the Sleep option missing from the power menu on their Windows PC. This can be frustrating to the user as they won’t be able to put their system to sleep and save the battery.
Are you one such user troubled by this sleep option missing issue? Then, read this article to find some troubleshooting methods that can help you restore the sleep option on your system.
Fix 1 – Restore Default Power Options
1. Click on the Windows button (four squares) on your taskbar.
In the Windows search box, type the text command prompt.
Right-click on Command Prompt in the search result and select the option Run as administrator.
Click on Yes when prompted by User Account Control for permissions.
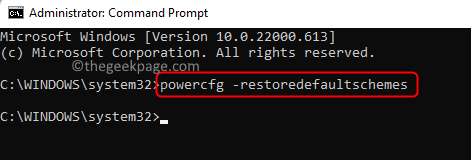
2. Once the command prompt is open, copy-paste or type the command given below and hit Enter.
powercfg –restoredefaultschemes
3. Restart your computer after the command execution is complete.
Check if you are able to see the sleep option after system startup.
Fix 2 – Run the Power Troubleshooter
1. Open the Run dialog using the Windows + R key combination on your keyboard.
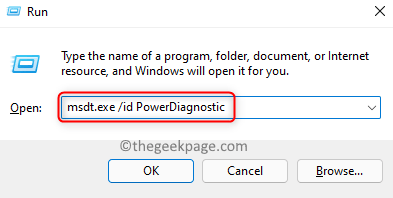
Copy and paste the command mentioned below in the Run box and click on OK to execute it.
msdt.exe /id PowerDiagnostic
2. The Power troubleshooter window opens up to find and fix problems related to the computer’s power settings.
Here, click on Next.
3. Wait for the troubleshooter to run and detect any issues related to the power settings of your computer.
After the troubleshooting process is complete, apply the fix mentioned.
4. Close the troubleshooter window.
Restart your PC and check if the problem is fixed.
Fix 3 – Enable Sleep in Power Options
1. Press the Windows logo key + R shortcut on your keyboard to open Run.
Type powercfg.cpl and hit the Enter key to go to the Power Options in the Control Panel.
2. In the Power Options window, click on the link Choose what the power button does in the left pane.
3. On this page you will see that Shutdown settings will be greyed out.
In order to make changes to these settings, click on Change settings that are currently unavailable.
4. Scroll down to the Shutdown settings.
Make sure that the box next to the Sleep option is checked so that it is visible in the Power menu.
If this option is already checked, then uncheck it and check it back again.
Then, click on the Save changes button at the bottom of the screen.
5. Reboot your system. Check if the sleep option is available.
Fix 4 – Enable Sleep Mode Via Local Group Policy Editor
1. Just press the Windows and R keys simultaneously to open the Run box.
Type gpedit.msc and hit Enter to open the Local Group Policy Editor.
2. In the Local Group Policy Editor window that opens, select Computer Configuration.
Within Computer Configuration, click on Administrative Templates to expand it.
Now, choose Windows Components –> File Explorer.
3. Once you select File Explorer, on the right side look for the option Show sleep in the power options menu and double-click on it to open its settings.
In the window that opens up, choose either the option Enabled or Not Configured.
Then, click on Apply and then on OK to confirm and save these changes to the settings.
4. Open the power menu and check if the missing sleep option problem is resolved.
Fix 5 – Perform a Clean Boot
1. Click on the Windows (four blue squares) button on your taskbar.
Type msconfig in the Windows search bar that appears.
In the search result listed, click on System Configuration.
2. In the System Configuration window, go to the Services tab.
Check the box next to Hide all Microsoft services at the bottom.
Then, click on Disable all button at the bottom right corner.
3. Now, select the Startup tab.
Here, click on the link Open task Manager.
4. You will be in the Task Manager’s Startup tab.
Disable all the programs that are enabled. To do so, right-click on the program and choose the option Disable.
Close the Task Manager.
5. Back in the System Configuration window, click on Apply and then on OK.
In the window that pops up asking for a restart to apply the changes, click on the Restart button.
6. After the system restarts check if the problem with the missing sleep option is resolved.
If the problem is solved after the clean boot, then try enabling the programs one at a time to check which was interfering. After you have found the program that was the reason for this issue, make changes in the System Configuration to start normally.
Fix 6 – Update Graphics Drivers
1. Press the Windows logo + X key on your keyboard.
In the menu that pops up, select Device Manager.
2. In the Device Manager, click on the small arrow next to Display adapters to expand it.
Right-click on your graphics card and choose the option Update driver.
3. This opens the Update drivers window for the graphics card chosen.
Here, click on Search automatically for drivers.
4. Windows will search for any new updates to the driver and install them if any are found.
Once this process completes, restart your computer.
5. Check if the issue is fixed.
If the issue still persists, try updating the drivers for the other graphics cards that are present on your system. If the problem is not resolved even after this, then you can also try updating the driver from the graphics card manufacturer’s website.
Intel: https://www.intel.in/content/www/in/en/support/detect.html
Nvidia: https://www.nvidia.in/Download/index.aspx?lang=en-in
AMD: https://www.amd.com/en/support
Fix 7 – Check for Windows Update
1. Press Windows + R to open Run.
Type ms-settings:windowsupdate and hit the Enter key to open the Windows Update page in Settings.
2. On the window that opens up, click on the Check for updates button.
As soon as you do this, Windows starts checking for any updates to Windows.
If any updates are found, you can download and install them.
3. Restart your PC after Windows is updated to the latest version.
Check if you are able to view the sleep option in the power menu.
That’s it!
The sleep option must be visible in the power menu after following the fixes mentioned in this article. Did you find this article informative enough in resolving the missing sleep option in Windows? Comment and let us know the fix that worked in your case.


