Irrespective of the internet connection you are using on your device, it’s normal for you to worry about the data usage, especially, if other devices are also using the same connection at home. So, for instance, if you are using the Wi-Fi connection on your device, chances are, that even others in your family may be using the same Wi-Fi network on their mobile device or laptops. In such cases, you may want to check and set the data usage limit on your Windows 11 PC.
You may also want to remove the data usage limit if only a single device is used or you may want to reset the data usage limit. The data usage option was quite limited in the previous versions of Windows, especially in the versions before the Windows 10 1803 with no option to set the data usage limit for WiFi or Ethernet networks, despite setting them up as metered connections. Till then, the option to set the data usage limit was restricted to only mobile networks.
However, from the Windows version 1803 and later, users could set the data usage limit for all networks, without exception. Which means, it’s applicable for Windows 11 as well and you can set the data usage limit for Wifi, Ethernet and also the mobile networks. This features helps you to ensure that you do not surpass the data limit offered by your internet provider. However, if and when it does, you will see a Windows notification, alerting you of the same.
Moreover, it also allows you to limit the background data usage by the Windows built-in features and apps, that is, if you are within 10% of the data usage limit. So, let’s see how to check data usage, set, reset and remove the data usage limit in Windows 11.
How to Check the Data Usage limit in Windows 11
Step 1: Press the Win + I keys together on your keyboard to open the Settings app.
Step 2: In the Settings window, click on Network & internet option on the left.
Step 3: Now, navigate to the right side and you should see the Data usage details on the upper right side of the pane.

Step 4: click on the Data usage option on the upper right and it will take you to the Data usage screen.
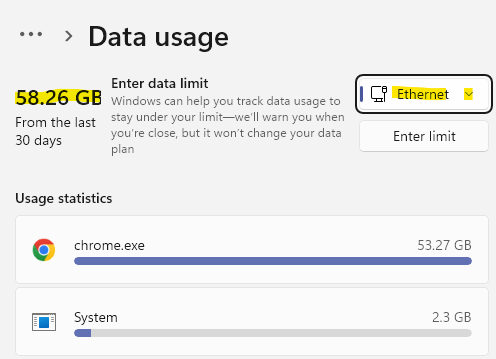
Step 5: Here, you can click on the drop-down located at the upper right side and select the network for which you want to check the data usage for the selected connection.

If you simply want to check the data usage for a specific connection, this method will be useful for the same.
How to Set the Data Usage Limit in Windows 11
Step 1: Right-click on Start and select Settings from the context menu.
Step 2: In the Settings window, go to the left side of the pane and click on Network & internet.
Step 3: Next, on the right side of the window, scroll down and click on the Advanced network settings option.

Step 4: Now, go to the right side of the pane, scroll down and under the More settings section, click on Data usage.

Step 5: In the Data usage window, go to the upper right corner and select the connection from the drop-down list for which you want to set the limit.
Now, click on the Enter limit button below.

Step 6: In the Set data limit window, select the Limit type from the list – Monthly/One time/Unlimited.
You can also change the reset data for every month by selecting from the Monthly reset data field.

Step 7: Now, go to the Data limit field, type the limit and select the Unit (MB/GB) from the drop-down next to it.
Press Save to apply the changes and exit.
You have now successfully set the data usage limit for your select connection.
How to Reset the Data Usage Limit in Windows 11
Step 1: Press the Win + I keys together on your keyboard to open the Settings app.
Step 2: In the Settings window, click on Network & internet option on the left.
Step 3: Now, navigate to the right side and you should see the Data usage details on the upper right side of the pane.

Step 4: In the Data usage screen, scroll down till the end, go to the Reset usage stats section and click on Reset.

Step 5: In the Reset usage stats pop up window, click on Reset again to confirm.
The Reset usage stats have been added in the later versions of Windows 10 and it helps you to reset your data usage limit to what it was earlier, Once done, the data usage limit reverts to what it was originally.
How to Remove the Data Usage Limit in Windows 11
However, if you want to remove the data cap completely, follow the below instructions:
Step 1: Press the Win + X keys together on your keyboard to open the context menu and click on Network Connections option.
Step 2: Now, in the Network & internet settings window, go to the right side and click on Data usage located at the top right.
Step 3: Here, in the Data usage window, on upper right side, under the drop-down list, click on the Remove limit button.
Step 4: In the Remove data limit? pop up window, click on the Remove button to confirm the action.
This will remove the cap that you have set earlier, completely.