While working on your computer, does it ask you to restart suddenly? What we have always wished for is the ability to resume the opened files and programs on our computer. So want to restart your computer while keeping all of your windows open? Use the tips and tricks given below in this article to save and restore your windows session.
How to save and restore your Windows session
1. Hibernate PC
Putting your PC in hibernate mode is the best and simple method to save and restore your previous session. You can use this method when you need a break from your work.
Hibernation is a state in which all the open windows sessions are stored to your hard disc and the system goes into power-saving sleep mode. Let us see how we can Hibernate
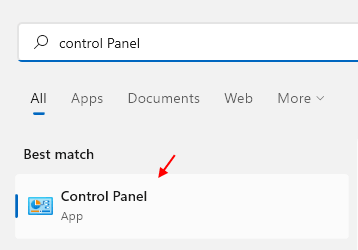
Step 1: In the search tab, type Control panel to open it.

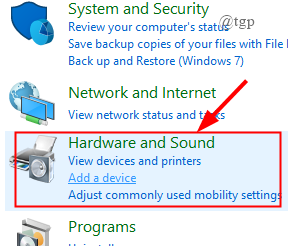
Step 2: Now, click on Hardware and Sound.

Step 3: Click on Power Options.

Step 4: Now, click on Choose what the power buttons does.

Step 5: Click on the “Change settings that are currently unavailable” option.

Step 6: Now, under the shutdown settings, tick the box against Hibernate mode and click on Save Changes.

This way the hibernate mode is added to the Start Menu’s Power Options. If hibernation is not the appropriate option get down below to other methods.
2. Use sign-in info to open the apps after the restart
Step 1: Press ” Win+I” and open Accounts.

Step 2: Now, click on the Sign-in options.

Step 3: Scroll down to ON the toggle switch under ” Privacy”

NOTE: This feature is present only in Windows 10.
By using this you can reopen only the applications that have the Register Application Restart capability like Google Chrome or Edge browser windows, calculators, and the apps that can register to Application Restart Process in Windows 10.
3. Allow Important Stuff to Startup after the system restarts
There will be some files and applications that need to be opened every time you restart the system. Let us see how to schedule them once you start the system.
Step 1: Press ” Win+R”, and type “shell:startup”.

Step 2: Once the startup folder opens, right-click anywhere to create a new Shortcut.

Step 3: Click on Browse and select the application you wish to start after the system restarts.

Step 4: Next, Click on Finish and the shortcut will be created.

Step 5: In a similar way create the apps you wish to start.
Do not overload the Startup folder with many apps. This causes the startup to slow down particularly systems that have low memory space. There are ways to rectify this problem.
1. You can use a third-party tool Startup Delayer to launch the apps in a staggered way. This is free open-source software that you can download and install in your system. To download it click here https://www.r2.com.au/page/products/show/startup-delayer/
2. You can simply create a batch file that can launch multiple programs at one go. Here i am creating a batch file to open Google Chrome and notepad.
Step 1: Click on the Start menu and select the program you want, right-click on the program and click on ” Open file location”.

Step 2: File Explorer window opens, right-click on the program to select Properties.

Step 3: Now click on the Shortcut tab, select Target filed, and copy the location of the program.

Step 4: Now, open the notepad and paste it. ( Here both the program’s target location is copied and pasted).

Step 5: Repeat the above 1-4 steps for the programs you wish to open.
Step 6: Now create a code as shown below.
@echo off

cd "%windir%\system32\notepad"
start notepad.exe


cd "C:\Program Files\Mozilla Firefox\firefox"
start firefox.exe

exit
Look at the changes that need to be made while writing the code in the notepad.
- Write @echooff at the start.
- Remove the “.exe” from the location address.
- Add cd in front of the location address.
- Write ” start program name.exe” under the location address.
- Leave one line gap and write exit.

Step 7: Now Save the file as.bat and select All Files.

Step 8: Once you restart the system you can simply click on the file to launch the programs you wish.
4. Restore folders at startup automatically
If at all you wish to open only the previous windows sessions (folder windows), you can use this method. To enable this feature go through the steps below,
Step 1: Type the control panel in the search tab to open it.

Step 2: Now, in the search tab present on the top-right corner of the window, type ” File Explorer Options” and click on it.

Step 3: click on the “View Tab”. Scroll down to tick the box against ” Restore previous folder windows at logon”, and click Apply.

5. Use a Specialized software
While the above-mentioned methods are handy, downloading and using specialized software is the most elegant approach to recover your windows sessions after reboot. Two of the most widely-used software’s are listed below.
CacheMyWork
It is easy-to-use software. It’s available on the internet for free. you can download and use it. You can download it from here https://www.softpedia.com/get/Tweak/System-Tweak/Cache-My-Work.shtml
NOTE: While installing the Software, it may ask you to install “.net framework 2.0.50727”, Download and install it.
Now, let’s see how to work with it.
Step 1: Click on the Start menu to select CacheMyWork.

Step 2: Once it opens, it will show all the programs that are running presently on the system. Select the program that you wish to open once the system restarts.

Step 3: Now, click on Tools > Options and tick the box against the” Restore previous Explorer windows at next logon”, and click OK.

Step 4: With this, the previous session is saved and will open after the restart.
2. SmartClose
This software first takes a snapshot of the system before shutting down all the open programs. After that, you can refer to this snapshot to restore all the programs. Make sure you customize the settings before taking the snapshot or else you may also close some important running applications as well. This is mostly used to close all the programs. It is also free software easily available on the internet.
You can download it from here https://download.cnet.com/SmartClose/3000-2094_4-10784165.html.
The software Twinsplay is a paid version. If you are someone who needs to restore the previous sessions more often, you can invest in it, as this has the advantage of restoring everything.
6. Use a Virtual Environment
The last comprehensive solution we can use to restore your windows session is using a virtual environment. Virtual Machine is a technique of simulating an operating system on your computer, this is nothing but a virtual machine running on your actual computer.