Many Windows users have noticed that a lot of their system’s RAM is eaten up by the System process. This issue is even seen when the PC is in an idle state.
First, let us understand what causes this behavior. This behavior is because of SuperFetch or Sys main service. SuperFetch service is used to improve the performance of the system by pre-loading the frequently used applications to the RAM. But when the system has a small RAm, this might cause a problem, as most of the RAM is pre-loaded with application data.
Also, there was a known bug with the Superfetch service. However, it has been fixed in the latest Windows build.
In this article, we have curated a list of fixes that can help you solve the problem.
Method 1: Update your Windows to the latest build
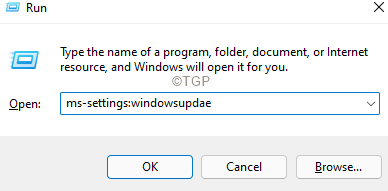
Step 1: Open Run Window using the keys Windows+R.
Step 2: Type the below command and hit Enter.
ms-settings:windowsupdate
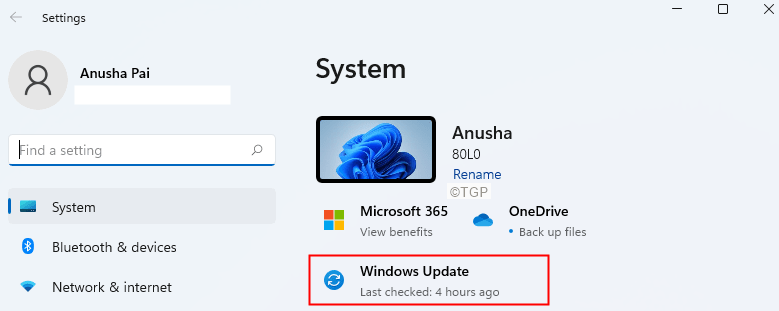
Step 2: In the appearing window, click on the Windows Update.
Step 3: In the opening window, click on Check for updates.
Step 4: The system will check for updates and you will be notified when the new updates are found.
Step 5: Install them and Restart your System.
Method 2: Disable Sysmain(Superfetch)
Disable Sysmain from Command Prompt
Step 1: Open the Run Terminal using Windows and R
Step 2: Type cmd and hold the keys Ctrl+Shift+Enter to open the Command Prompt in Admin mode.

Step 3: If you see a UAC window showing up, click on Yes.
Step 4: Type the below commands one after the other. Make it a point to hit Enter after every command
sc stop "SysMain"
sc config "SysMain" start=disabled
Disable Sysmain from Services
Step 1: Open Run Dialog (Windows+r)
Step 2: Type services.msc and hit OK

Step 3: In the Services window, scroll down to find SysMain
Step 4: Right-click on SysMain service and choose Properties.
Step 5: In the Properties window, choose Disabled from the Startup type.
Step 6: Click on the Stop button.
Step 7: Finally, click on Apply and then click on OK.
Method 3: Repair Install Windows in your System
NOTE: You should have the Windows bootable installation DVD ready
Step 1: Insert the Windows bootable installation DVD
Step 2: You will be asked if you want to continue booting from CD or DVD. Press Enter
Step 3: Choose your Language Preference and hit the Next button
Step 4: In the bottom left corner of the window, click on Repair your computer

Step 5: In the blue window that you see, click on Troubleshoot

Step 6: Now, click on Advanced options

Step 7: Finally, click on Automatic Repair or Startup Repair

Step 8: Sit back and wait patiently till the Automatic Repair finishes.
Step 9: Restart the System.
That’s it.
If none of the above methods work try to reset windows, for details, refer to the article How to reset windows 10 without losing files
We hope this has been informative. Thank you for Reading.
Kindly comment and let us know the fix that helped you solve the problem.


