So in a hurry you composed your email and hit the Send button right after you were done with it, without properly reading it. Well, the mail is gone and you have some major corrections too. Of course, under normal circumstances, you are in trouble. But we are here to make your circumstances better and we have a perfect solution right here for you.
In this article, we explain in detail how you can delete an email from the recipient’s inbox without letting them know about it. We also have covered the case where you might want to delete the email from the recipient’s inbox and replace it with another one. It’s all easy as long as the criteria for the same are met. So, in the first section, we explain which all conditions are to be met for you to recall or replace a sent email on your MS Outlook. Then in the sections that follow, we have covered the recall, replace and resend functionalities of MS Outlook in detail. Hope you find the article useful.
Section 1: Requirements to Recall or Replace a Sent Email
Not all emails sent on Outlook can be recalled. There are some requirements that are to be met for emails to be recalled or to be replaced. Following are the conditions.
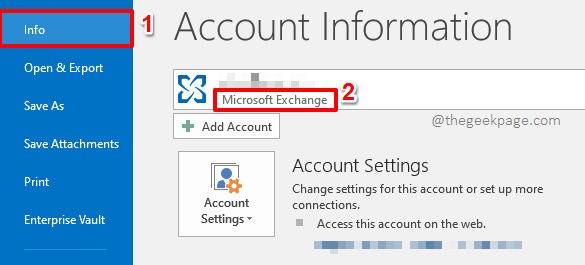
Both the sender and the recipient should be using a Microsoft 365 account or a Microsoft Exchange account. To find out which type of account you are using, launch Outlook and then click on the File tab at the top. Make sure you are at the Info tab and under the Account Information section, you will be able to see the type of your account.
So if you send an email from your Outlook to a Gmail account, and if you would like to recall it, it’s not possible.
Also, even if both the sender and receiver accounts are of type Microsoft Exchange or Microsoft 365, it is not guaranteed that your recall request will be successfully processed. If the receiver has opened the mail, then the recall will be a failure.
With these conditions well stated, let’s now go ahead and see how you can successfully recall, resend or replace emails sent on Outlook.
Section 2: How to Recall a Sent Email
This section explains in detail how you can recall a mail on MS Outlook. Recalling a mail means deleting a mail that you sent, from the recipient’s inbox before they read the mail. This method doesn’t work all the time and the cases where this method wouldn’t work are detailed in Section 1.
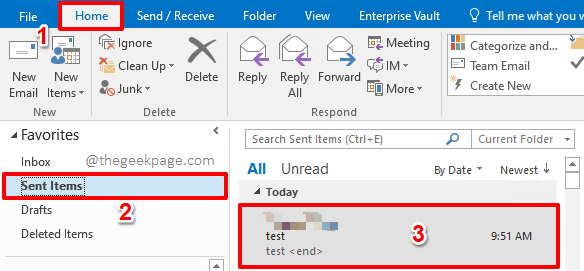
Step 1: Firstly, launch the Outlook application and then click on the Home tab from the top ribbon.
As next, click on the Sent Items option from the left pane of the window.
On the right side, double click on the sent mail that you want to recall.
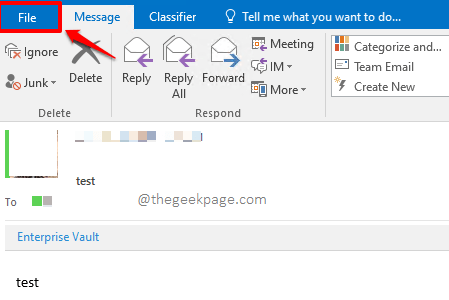
Step 2: When the mail opens in a new window, click on the File tab from the top ribbon.
Step 3: On the left pane of the window, click on the Info tab.
Now on the right side, you will be able to see a dropdown button by the name Resend or Recall. Click on it.
From the dropdown options available, click on the one that says Recall This Message.
Step 4: On the Recall This Message window, click on the radio button corresponding to the option Delete unread copies of this message.
As next, tick the checkbox corresponding to the option Tell me if recall succeeds or fails for each recipient. You can leave this checkbox unticked as well. But if you tick this checkbox, you will get a report on whether your mail recall attempt was a success or failure. So it is recommended to leave this checkbox ticked.
Once you are all done, hit the OK button.
Step 5: That’s it. If all the criteria required for recalling the message are met, the email would be recalled successfully. That is, the email would be deleted from the recipient’s inbox if she/he hasn’t read it yet.
Also, you will get a notification informing you that your recall attempt was successful. You can see the new message in your inbox by clicking on the Home tab from the top ribbon, then by clicking on the Inbox folder on the left window pane.
Step 6: Also, if for some reason your email recall attempt was not a success, you will get a failure report, instead of a success report, right in your inbox.
Section 3: How to Replace a Sent Email
Now let’s say you want to recall a message and replace it with a different message, say with a different body. In that case, you can use the Replace option instead of the Recall option. Let’s see how this can be done.
Note: Again, all the criteria that are to be met for recalling a message need to be met for replacing a message too.
Step 1: Once again, hit the Home tab from the top ribbon and then choose the Sent Item folder from the left pane of the window.
On the right side, click on the sent email that you want to be replaced with a new message.
Step 2: When the mail opens in a new window, click on the File tab from the top ribbon.
Step 3: As next, make sure you are at the Info tab on the left pane of the window.
On the right window pane, click on the Resend or Recall dropdown button and then choose the option Recall This Message once again.
Step 4: On the Recall This Message window, choose the radio button corresponding to the option Delete unread copies and replace with a new message.
Also, check the checkbox Tell me if recall succeeds or fails for each recipient.
Once you are all set to go, hit the OK button.
Step 5: Now your sent email would be open in a new window again. Here you can make as many edits as you want.
Once all the edits are made, just hit the Send button.
If the replace attempt is successful, the old email would be deleted from the recipient’s inbox and the new email would be put in place of it. Enjoy!
Section 4: How to Resend a Sent Email
Let’s say you want to resend a sent email by changing some of its contents, but you do not want to recall or replace the old email. In that case, you can go for the resend option. This option works perfectly if your recall or replace attempt fails.
Step 1: Click on the Home tab from the top ribbon and click on the Sent Items folder from the left navigation menu.
Double click on the email that you want to resend.
Step 2: Once it opens up, click on the File tab from the top ribbon.
Step 3: As next, click on the Info tab from the left pane.
On the right pane, click on the dropdown button Resend or Recall.
From the options that get expanded out, click on the one that says Resend This Message.
Step 4: You can now make all the edits and then hit the Send button to resend your email. That’s it.
Note: Though recalling/replacing a message is a great feature, it’s risky to solely rely on this feature to fix your mail sending mistakes as recalling or replacing messages is not guaranteed to be a success always. So we would suggest you delay sending your emails every time a mail leaves your Outbox. You can refer to our article How to Delay or Schedule Sending Emails in MS Outlook for more details.
Please tell us in the comments section if you have any concerns regarding any of the steps. We would be more than happy to help.
Stay tuned for more mind-boggling tips, tricks, how-tos, and hacks! Happy Geeking!


