Windows 11 is been an amazing experience for all its users. Microsoft has come up with new features, look and feel, and has included various changes to Windows 11. Most features like browser, settings, task bar options, etc have changed for ease of use and it has become simpler to work on Windows 11. One such feature we will discuss in this article is Notifications. As the name suggests notifications help you remind things and gives you information on what is running in your system and what is that which requires your attention. Lots of notifications sometimes might be annoying so Windows 11 has the feature to turn off notifications as well. One can also prioritize the notifications as Top, High, and Normal in Windows 11 so that it will be easy to pay attention to the one which requires immediate action. Let us see how can we do it.
Categorize/Prioritize The Notifications in Windows 11
Notifications can be prioritized in different ways. There is 3 category Top, High and Normal. So Top means show the notifications at the top of the action center. High means show the notifications above the normal priority messages. Normal means show the notifications below the high-priority messages.
Method 1: Change The Priority From Notification Center
Notification Center is the one where you will have options to change the settings of your notification. So let us see how to do it.
Step 1: Open Settings by clicking on the Windows icon and I (Win + I) simultaneously or you can also click on the Start button and then click on Settings.
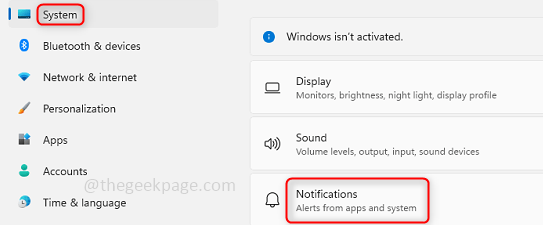
Step 2: Click on System which is on the left pane and click on Notifications which is present on the right pane.
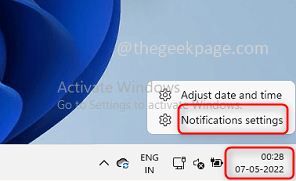
Step 3: You can also reach the settings by a right click on the date and time, which is present at the bottom right corner of the taskbar. Here you get two options, click on Notification settings.
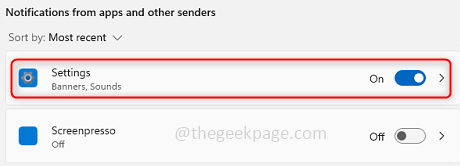
Step 4: Click on the App for which you want to change the notifications settings. Here I have selected the application Settings.
Step 5: Once you click the app, at the bottom you can see the priorities of notification Top, High, and Normal. Select as per your need, here I have selected Normal so notifications of that particular application will be below High priority messages.
Step 6: Now the priority would be changed for that particular application.
Method 2: Change The Priority Navigating From Notification Banner
The changes can also be made from the alerts you get which are called notification banners.
Step 1: Click on the Date and Time which is present at the bottom right corner of your window.
Step 2: It not only shows the date and time but also shows the notification banners. Now click on the three dots of the application you want to change.
Step 3: There comes 3 options, if you do not want notifications you can select Turn off all notifications for that particular application. If you want the notifications of a particular app as a priority then you can select Make Settings high priority. If you need to do other changes then select Go to notification settings. Here I will select Go to notification settings.
Note: These changes are only applicable for a particular app that you have selected. Here I have selected Settings as an application.
Step 4: Now you can change the priority of notifications. This is the same as we discussed in the above method.
Method 3: Change the Priority Using Focus Assist
Focus assist helps you to choose the notifications only for which you would like to see and stay focused on what you do.
Step 1: Open the Notification settings by a right click on data and time at the bottom of the window. Click on notification settings.
Step 2: Click on Focus assist. Here there are options to manage the notifications.
Step 3: You can click on the Priority only option to stay focused and check on certain messages only.
Step 4: You can customize the priority by clicking on Customize priority list.
Step 5: Here you will find different options to manage the notifications like Calls and reminders, it also has options to select the notifications from the people you choose.
Step 6: Under Focus assist, you also have a few Automatic rules.
Step 7: You can also stop the notifications for a specific time period and when the time is elapsed the notifications will resume. For this, you can search for Automatic rules under Focus assist and click on During these times.
Step 8: You can provide the timings when you wish not to get the notifications. You can also choose the frequency of the time whether daily and only at weekends or weekdays.
That’s it! Isn’t it a useful feature? This feature definitely helps in our day-to-day work so I’m sure this article helped you. Thank you and Happy Reading!!


