Taskbar is undoubtedly one of the most useful features as it allows you to launch applications directly, without needing you to go to its location to open it. However, you may sometimes want to hide the taskbar if you want to play games in full screen or watch movies hassle-free. In such cases, you may not want the taskbar to be always on top. But, sometimes the taskbar simply remains on top and especially after a Windows 10 update, it just doesn’t budge. So, how do you fix the Windows 10 taskbar always on top issues? Let’s see how.
Method 1: By Unpinning and repinning any Applications on Taskbar
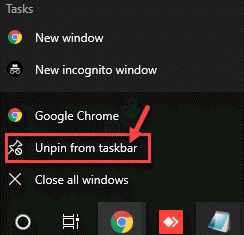
Many users have found that most of the times, the taskbar always on top issue is due to certain or all applications pinned on the taskbar. Therefore, unpin any application or folder on taskbar and then Pin it again.
Step 1: Right-click on the pinned applications on taskbar and select Unpin from taskbar.

Now, your taskbar always on top issue should be gone.
Step 2 – Now, Pin it back again on Taskbar
If it does not work try to hit Alt + Space from keyboard and see if it works or not.
Method 2: By Restarting the Windows Explorer through Task Manager
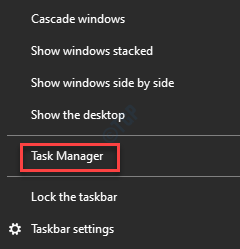
Step 1: Right-click on the Taskbar and click on Task Manager.

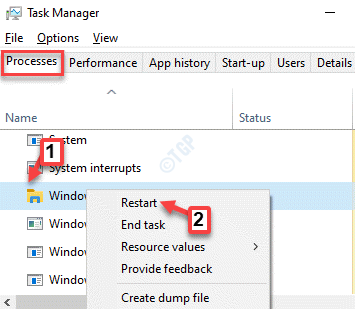
Step 2: In the Task Manager window, under the Processes tab, go to the Windows processes section and look for Windows Explorer.
Right-click on it and select Restart.

Now, exit Task Manager and you can now view videos and play games in full screen back again, without the Taskbar on top.
Method 2: By Enabling the “Automatically Hide the Taskbar in Desktop” Mode in Settings
Step 1: Press the Win + I keys together on your keyboard to open the Settings window.
Step 2: In the Settings window, click on Personalisation.

Step 3: In the next window, click on Taskbar on the left side of the pane.

Step 4: Now, go to the right side of the window and turn on both Automatically hide the taskbar in desktop mode and Automatically hide the taskbar in tablet mode options.

Now, close the Settings window and the taskbar should hide now. It still keeps running in the background and only shows when you move your cursor to the bottom of the screen.
Method 3: By Changing the Taskbar Location On Screen and Back
Step 1: Right-click on the Taskbar and click on Taskbar settings.

Step 2: On the right side of the window, scroll down and change the Taskbar location on screen field to anything you wish and close the Settings window.
Now, go back to the Taskbar settings again and change the Taskbar location on screen option back to what it was earlier.

Now, exit the Settings window and check if your taskbar always on top issue is resolved.
Method 5: By Enabling the Cascade Windows Option
Step 1: Right-click on the taskbar and select Cascade windows to enable it.

Now, the taskbar should not always stay on top.
Alternatively, you can also try disabling the Hangouts extension from being Always on top in the Chrome browser (if Chrome is your default browser). Sometimes, the Hangouts extension can create the taskbar always on top issue on your Windows 10 PC.