Many Android devices come with Gboard as their default virtual keyboard application. Gboard is a very good keyboard with amazing features. However, just like with every other Android application, Gboard also runs into issues every now and then. One such major issue that literally drives the Gboard users nuts is the Unfortunately Gboard has Stopped issue. Once this error message starts to appear, it keeps coming back no matter how many times you dismiss it. That is, you get stuck in an infinite loop of Unfortunately Gboard has Stopped error messages. Sounds no fun, we know!
The error mainly happens because of issues like faulty application updates and corrupted app data. There are quick solutions that you can try to fix this issue and they are well-detailed in our article. However, the quick solutions can be tried only if you have access to your device. Let’s say you are locked out of your Android device and you need to enter a password to gain the access back, and because Gboard is the default keyboard and it keeps crashing, you cannot enter the password. Well, that’s a different scenario, altogether. Don’t worry though, we have answers to that tricky scenario as well. So what are you waiting for? Let’s jump in straight away, shall we?
Solution 1: Disable, Update and then Enable Gboard Back again
Sometimes you could get the Unfortunately Gboard has Stopped error when the Gboard application is missing some updates. Let’s now check for Gboard updates and get them installed, if there are any.
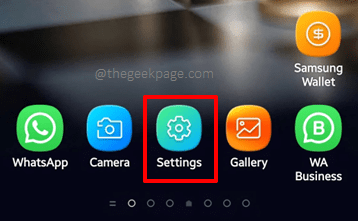
Step 1: Click on the Settings application to launch the settings application.
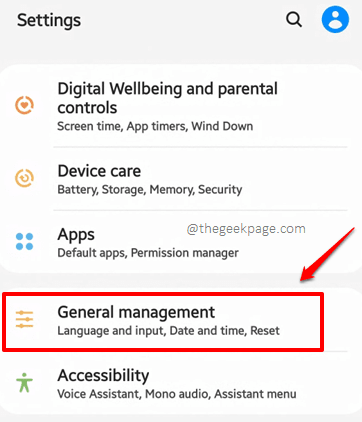
Step 2: On the Settings screen, scroll down and click on the General management tile.
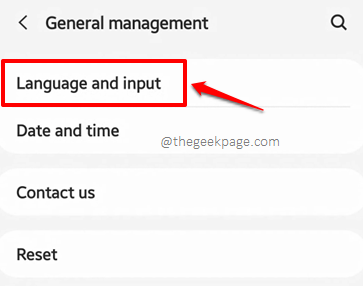
Step 3: As next, click on the Language and input option.
Step 4: On the screen that follows, click on the option named On-screen keyboard.
Step 5: As next, you need to find and click on the option named Manage keyboards as shown below.
Step 6: Now on the Manage keyboards screen, turn OFF the toggle button associated with the Gboard keyboard.
Step 7: Now that Gboard is disabled, you will not get the Unfortunately Gboard has Stopped error message anymore. It is time to go to Play Store for a quick visit and check whether there are any pending updates for the Gboard application.
Firstly, launch the Play Store application.
Step 8: As next, search for Gboard and click on the Gboard application from the search results.
Step 9: If you have any pending updates available, you will have the UPDATE button on the screen that follows. Click on it and download the updates.
Note: I don’t have the UPDATE button because my Gboard application is up-to-date.
Step 10: Once the updates are downloaded and installed, let’s enable Gboard back. For that, follow the same steps from Step 1 to Step 6. But in Step 6, instead of turning off the toggle button, turn it to the ON state, which is associated with the Gboard keyboard.
That’s it. Your Unfortunately Gboard has Stopped issue should be very well an old story now! Enjoy!
Section 2: Basic Troubleshooting Tips
There are some basic troubleshooting tips, as follows, that you can try before you go into the detailed solutions.
- Make sure you have a stable network connection. If you are on cellular data, try switching to a Wi-Fi network and vice versa.
- Force close all the running applications and see if the issue persists.
- DO NOT restart your Android device if the Unfortunately Gboard has Stopped keeps coming as you could get locked out of your device if your device has a password lock.
Solution 4: Force Stop Gboard Application
Step 1: On the applications drawer, long press on the Gboard application icon to view the app context menu associated with it. Click on the App info button from the buttons available.
Step 2: On the Gboard app info screen, click on the Force stop button at the bottom of the screen.
Step 3: When asked for confirmation, click on the OK button to proceed.
Check if your issue is resolved or not by opening any application that requires a keyboard.
Solution 5: Clear Gboard Application Data and Cache
Step 1: Just like in the previous solution, long press on the Gboard application icon and click on the App info button.
Step 2: On the screen that you land at, click on the Storage button.
Step 3: Now, at the bottom of the screen, click on the Clear data button and then on the Clear cache button to clear off the app data and app cache respectively. That’s it.
Solution 6: Re-install the Gboard Application
Step 1: Once again, long press on the Gboard application from the applications drawer. This time, click on the Uninstall button.
Step 2: When asked for confirmation, hit the OK button to go ahead with the uninstallation process.
Step 3: Now, let’s install the app again. For that, locate and click on the Play Store icon to launch the Play Store application.
Step 4: As next, type in gboard on the Play Store search bar and click on the Install button against the Gboard search result.
Step 5: Once the installation process is complete, you will have the Open button against the Gboard application. Click on it to open the application.
Step 6: You will now have the following screen in front of you, on which you have to click on the ENABLE IN SETTINGS button.
Step 7: From the list of keyboards available, turn ON the toggle button associated with the Gboard keyboard.
Step 8: As next, you will be taken to the Step 2 screen. Click on the SELECT INPUT METHOD button.
Step 9: On the Select keyboard screen, choose the radio button associated with the Gboard keyboard.
Step 10: That’s it. The Unfortunately Gboard has Stopped issue should no longer bother you.
Solution 7: Choose Another Keyboard as the Default Keyboard
If none of the above methods worked for you, you now have to think about forgetting all about having Gboard in your device and moving on with any other keyboard application. In the steps below, we have explained in detail how you can set a different keyboard as your default keyboard on your Android device.
Step 1: Once again, launch the Settings application.
Step 2: Scroll down, locate and click on the General management tile.
Step 3: As next, click on the Language and input option.
Step 4: On the screen that follows, click on the On-screen keyboard option.
Step 5: Now to change your default keyboard, go ahead and click on the Default keyboard option as shown below.
Step 6: Now from the list of keyboards available, you can choose the radio button associated with any other keyboard available, except the Gboard.
Note: If you do not have any other keyboards available on your device, you can go to Play Store and install any keyboard of your preference and then set it as your default keyboard.
Section 8: Steps to Follow if you are Locked Out of your Android Device
The above section applies if you have access to your device. What if you got locked out of your device and you need to enter a password to log back in and Gboard keeps crashing, making you unable to type in the password? Well, such a critical situation, isn’t it? Well, you wouldn’t say so if you read the solutions we have for this exact same problem!
Solution 8.1: Update Gboard from a PC Using a Web Browser
In case you are locked out of your Android device, from your PC, you just need to sign in to Play Store using the same Google account through which you have signed into the Play Store application on your Android device. Once you are signed in, you can control the Android Play Store using the Web Play Store. Let’s see how in the steps below.
Step 1: Firstly, click here to go to Google Play Store from your PC using any web browser. Log in using the same Google account as your Android device.
Once logged in, at the top right corner of the web page, click on the Search icon.
Step 2: Now type in gboard in the search bar and hit the Enter key. From the search results, hit the Gboard application from the search results.
Step 3: On the page that follows, click on the Install on more devices button. This button becomes active only if your device already doesn’t have the application you are trying to install or if the application has some updates to be installed.
Step 4: You will now have the option to choose your Android device if you have more than one Android device associated with the same Google account. Once the device is chosen, click on the INSTALL button.
Step 5: You will now be required to enter your login credentials.
Step 6: That’s it. Gboard updates will now be successfully installed on your Android device right from your PC. This should fix the issue as well. Sit back and relax.
Solution 8.2: Try Installing another Keyboard on your Android Device Using a Web Browser from a PC
If installing the Gboard updates does not fix the issue for you, you can go to Google Play Store once again from your PC and install any other keyboard using the same method as detailed in the solution above. Once a new keyboard is installed, you can use it instead of Gboard, and thus your problem will be fixed.
Solution 8.3: Attach a Physical Keyboard to your Android Device
If both the above solutions did not work for you and you are locked out of your Android device, you now have only one option, and that is to attach a physical keyboard to your Android device.
You will need a USB keyboard and an OTG adapter. Connect the USB keyboard to the OTG adapter and attach the OTG adapter to your Android device. Check if you can type using the physical keyboard. Once you have successfully logged in, you can follow the solutions listed under Section 1 to fix your issue of Unfortunately Gboard has Stopped.
Please tell us in the comments section which method did the trick for you. Also, stay tuned for more amazing technical tricks, tips, solutions, hacks, and how-tos.


