Roblox is an online gaming platform that helps to create games; users can play them from any part of the world. But a few users face issues while installing Roblox. One cannot successfully install the game, it just crashes during the installation process. The reasons might be because of a corrupted cache, DNS settings, firewall problems, maybe the system needs to install the latest updates, etc. In this article, we will discuss the different scenarios and methods one can use to resolve the issue. Let us start!
Method 1: Reset Microsoft Store Using Settings
Step 1: Open the Windows Settings using Windows + I keys together.
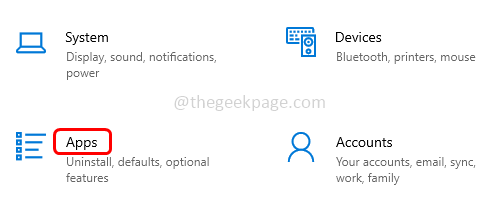
Step 2: Click on Apps
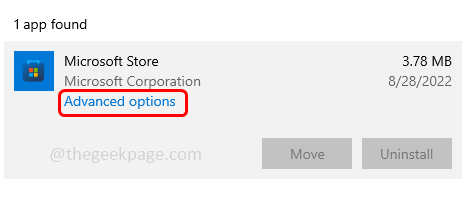
Step 3: On the right side, find Microsoft Store under Apps & features and select it
Step 4: Click on advanced options
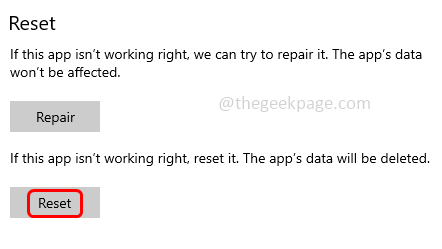
Step 5: Scroll down and click on the reset button. A pop-up will appear asking for confirmation, again click on reset. Once the rest is done, check if the issue is solved.
Method 2: Execute The Code In PowerShell
Step 1: Open the PowerShell as an administrator. To do that type PowerShell in the windows search bar
Step 2: Then hold Ctrl + Shift keys together and hit enter
Step 3: A user account control pop up will appear, click on yes
Step 4: Copy the below code and paste it in the PowerShell then hit enter. Then check if the issue is solved.
# Get all the provisioned packages
$Packages = (get-item 'HKLM:\Software\Microsoft\Windows\CurrentVersion\Appx\AppxAllUserStore\Applications') | Get-ChildItem

# Filter the list if provided a filter
$PackageFilter = $args[0]
if ([string]::IsNullOrEmpty($PackageFilter))
{
echo "No filter specified, attempting to re-register all provisioned apps."
}
else
{
$Packages = $Packages | where {$_.Name -like $PackageFilter}
if ($Packages -eq $null)
{
echo "No provisioned apps match the specified filter." exit
}
else
{
echo "Registering the provisioned apps that match $PackageFilter"
}
}
ForEach($Package in $Packages)
{
# get package name & path
$PackageName = $Package | Get-ItemProperty | Select-Object -ExpandProperty PSChildName
$PackagePath = [System.Environment]::ExpandEnvironmentVariables(($Package | Get-ItemProperty | Select-Object -ExpandProperty Path))

# register the package
echo "Attempting to register package: $PackageName"
Add-AppxPackage -register $PackagePath -DisableDevelopmentMode
}
Method 3: Change The DNS Settings
Step 1: Open the run prompt using Windows + R keys together
Step 2: Type ncpa.cpl in the run prompt and hit enter. This opens the network connections window in the control panel
Step 3: Right-click on your Wi-Fi connection or ethernet, then click on Properties
Step 4: Choose the Internet Protocol Version 4 (TCP/IPv4) and then click on Properties
Step 5: Enable Use the following DNS server addresses by clicking on the radio button beside it
Step 6: Type 1111 in the Preferred DNS server section
Step 7: Type 1001 in the Alternate DNS server section and then click on OK. Now check if the problem is solved.
Method 4: Update Windows
Step 1: Open Windows Settings using Windows +I keys together
Step 2: Click on Update & Security
Step 3: By default Windows update page will appear, click on the check for updates button on the right side
Step 4: If there are any updates it will install them. Once done, restart the system and check if the issue is solved.
Method 5: Clear Windows Store Cache
Step 1: Open the run prompt using Windows + R keys together
Step 2: Type WSReset.exe in the run prompt and hit enter. Once the reset is done, the Microsoft Store will open as normal with no errors.
Step 3: Restart the computer and check if the issue is solved.
Method 6: Check Date and Time settings
Step 1: Right-click on the date and time at the lower right corner on the display screen
Step 2: From the appeared list, click on the Adjust date/time option
Step 3: Enable the Set time automatically option by clicking on the toggle bar below it
Step 4: Enable the Set time zone automatically option by clicking on the toggle bar below it
Step 5: Click on Sync now button. Close the window and now check if the issue is resolved.
Method 7: Delete The Roblox Folder In AppData
Step 1: Open the run prompt using Windows + R keys together
Step 2: Copy the below command, paste it into the run prompt, and then hit enter. This will open the file explorer
C:\Users\%username%\AppData\Local
Step 3: Find Roblox folders and delete them. To delete, right-click on the Roblox file or folder and then select delete
Now check if the Roblox can be installed successfully.
Method 8: Disable The Antivirus And Windows Defender
Step 1: Click on the show hidden icons arrow at the lower right corner of the display screen
Step 2: Right-click on the installed antivirus icon and click on disable
Disable the windows defender
Step 3: Open the run prompt using Windows + R keys together
Step 4: Type windowsdefender: in the run prompt and hit enter
Step 5: On the windows security page, click on Virus & threat protection which is on the left side
Step 6: On the right side under virus & threat protection settings click on Manage settings
Step 7: Turn off the real-time protection and cloud-delivered protection options by clicking on the toggle bar below them a pop up will occur when you click on the toggle bar, choose yes
Step 8: Now select App & browser control option from the left side
Step 9: Click on Reputation-based protection settings on the right side
Step 10: Disable check apps and files by clicking on the toggle bar below it. A pop up appear click on yes. Now the Defender is disabled. Try and check if the issue is solved
Note: Revert the changes you made once the work is done.
Method 9: Run The RobloxPlayerLauncher As An Administrator
Step 1: Navigate to the location where you have the RobloxPlayerLauncher
Step 2: Find its .exe file and right-click on it. From the appeared list click on Properties
Step 3: Go to the compatibility tab in the opened window. Enable Run this program as an administrator by clicking on the checkbox beside it
Step 4: Uncheck Run this program in compatibility mode by clicking on the checkbox beside it. Click on Apply and OK.
Step 5: Now double click on the Roblox’s .exe file and check if it installs successfully.
Method 10: Allow Roblox in Windows Defender Firewall
Step 1: Open the run prompt using Windows + R keys together
Step 2: Type control firewall.cpl in the run prompt and hit enter. This will open the Windows defender firewall in the control panel
Step 3: On the left side click on Allow an app or feature through Windows Defender Firewall
Step 4: Click on the Change settings button on the right.
Step 5: Choose the Roblox file by clicking on the checkbox beside it
Step 6: Click on the allow another app button to allow the Roblox in the windows defender firewall.
Step 7: Then click on OK. Check if the issue is solved.
That’s it! I hope this article is helpful and let us know which of the above method worked for you. Thank you!!


