Mainly for Samsung devices, many complaints have been reported recently regarding the Moisture detected in the USB port issue, with a water drop icon. Most of the Samsung Galaxy devices have an inbuilt moisture detection sensor so that the device is protected from water damage. Just like Samsung devices, many other brands also have this sensor and they also might throw this same error. However, your device might not even have come in contact with water and you might still get this error. This can be quite confusing.
Sometimes this issue can happen because you live in a high-humid area. Some other times, you might get this error because your phone has actually come in contact with water. Whatever be the reason, if you get this error, your phone will stop charging, and without charging, it definitely is going to run out of power in some time. In this article, we have explained in detail what you need to do if you ever face this error. Don’t worry, the solutions are quite simple, you will find out super soon! So, let’s jump in straight away, shall we?
Solution 1: Make Sure the Device is Completely Dry
If you see the water drop icon and your device is not charging, there are some basic troubleshooting tips that you need to try before you head onto the more advanced solutions. Please try the below solutions listed below one by one first. After trying each solution, check if the water drop icon is gone or not.
- The very first thing you have to do is to let your device dry completely. Power off your phone and put it in a dry area and wait for at least 2 or 3 hours. Do not try to charge your device during this time.
- Unplug your device and using a dry cloth, wipe it.
- Shake your device gently around 5 to 10 times with the charging port facing downwards. This will release any moisture content present. Remember, vigorous shaking can damage your device.
- You can try placing your phone in a cloth in front of a table fan and let it dry as well.
Solution 2: Clear USBSettings Application Cache
If you are still seeing the water drop icon, the chances are huge that the issue is already resolved and that you are seeing the water drop icon just because it is not cleared off from the USBSettings application cache. Let’s now try clearing off the USBSettings application cache in the steps below.
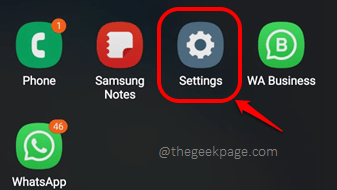
Step 1: From the applications drawer, click on the Settings application to launch it.
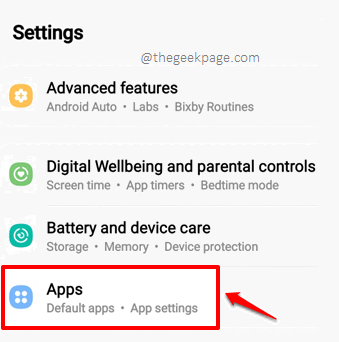
Step 2: Click on the Apps tile from the Settings screen.
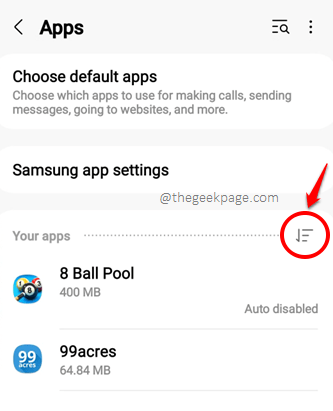
Step 3: As next, let’s enable the visibility of system apps using the Show system apps option, otherwise you will not be able to see the USBSettings application. For that, click on the More options icon associated with Your apps header.
Note: Please remember that this option greatly varies in appearance from device to device. For most devices, you get to find the Show system apps option right from the 3 vertical dots icon located at the top right corner of the Apps screen.
Step 4: On the Filter and sort pop-up screen, just enable the toggle button associated with the Show system apps option.
Step 5: Scroll all the way down to find and click on the USBSettings application.
Step 6: As next, click on the Storage option as shown below.
Step 7: Now, at the bottom of the screen, click on the Clear cache button.
Once the cache is cleared off, check if you are still facing issues with charging or not.
Solution 3: Check for Software Updates
Another reason why you might still be getting the water drop icon, indicating moisture, could be because your device is missing some important software updates. So it would be a good idea to check for system software updates.
Step 1: Launch the Settings application.
Step 2: Scroll down and click on the option Software update.
Step 3: On the Software update screen, click on the Download and install option.
Step 4: As next, on the Software update screen, at the bottom, click on the Download button if it’s available. If there are no pending downloads for you, you will not be able to see this button.
Wait patiently for the pending software updates to be downloaded. Once they are downloaded, you will be asked to restart your device to get them installed. Confirm the restart operation and wait for your phone to boot back to life to check if your issue is resolved or not.
Solution 4: Bypass the Moisture Detection Sensor
If none of the above methods worked for you, you can now try this workaround, which is to bypass the moisture detection sensor in your Android device and then get it to the charging state once again. But remember, if there is actually moisture in your charging port, it’s not recommended to try this solution.
What you need to do is to press and hold down the Power button and the Volume down button simultaneously till you see the logo of your device appear on the screen. Once you see the logo, you can release the buttons. Once your device boots back to life, it should charge normally. Enjoy!
Please tell us in the comments section which method did the trick for you, we are all ears.
Stay tuned for more and more astonishing technical tricks, tips, how-tos, hacks, and solutions!


