Not many Windows users are aware of all the features of Windows inbuilt applications. For example, most windows users think of the Microsoft Photos app for only photo editing and viewing. In contrast, this application also allows users to create, edit and view videos.
Nowadays, most users are finding problems while exporting any videos after creating them using the Microsoft Photos app on their Windows system. They are not able to export any kind of video, be it a huge video or a video made using basic functionalities of the application.
There could be various reasons behind this problem and they are listed down.
- Problem with the Microsoft Photos application on the system.
- Outdated Windows system.
- Not updated the display graphics driver on the system.
- The option called Use hardware-acceleration encoding is enabled.
Researching these possible factors mentioned above, we have gathered a bunch of solutions that might help users in resolving this issue. If you are also facing this kind of problem, you can find the fixes in the article explained below.
Fix 1 – Reset or Repair the Microsoft Photos application
If this issue is caused because of any problem related to the Microsoft Photos application on the system, then we can try resetting or repairing the Photos app. Many users have been able to resolve this issue by doing it.
Follow the steps below on how to reset the Microsoft Photos application.
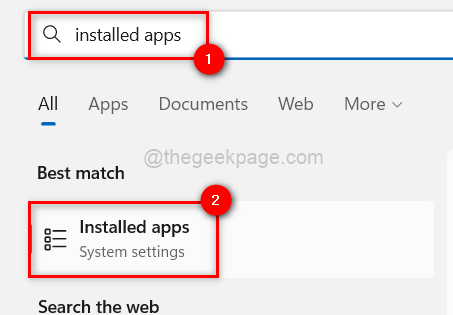
Step 1: Press the Windows key on the keyboard and type installed apps.
Step 2: Click Installed apps system settings from the search results as shown in the image below.

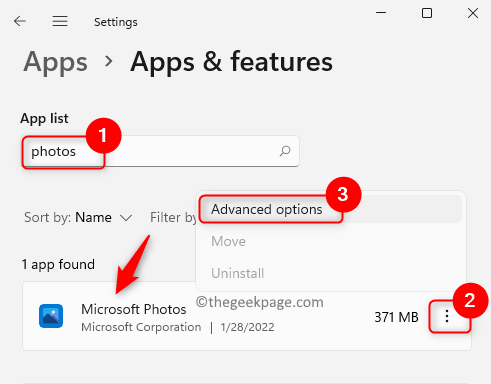
Step 3: Once the Installed apps page opens, type photos in the search bar to get all the results related to the photos keyword.
Step 4: Click the horizontal ellipsis icon of the Microsoft Photos app on the system and choose Advanced options from the list.

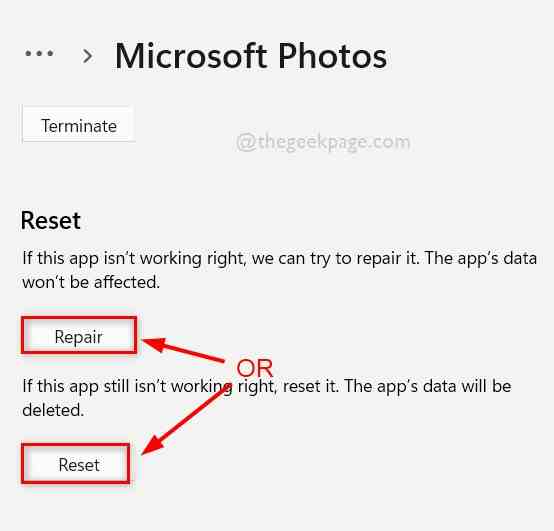
Step 5: Now you need to scroll down the advanced options page to the Reset section.
Step 6: The Reset section has two options available, either Reset or Repair.
NOTE – Reset button will reset the Microsoft Photos app completely and the user is going to lose all the data associated with the Photos app. Whereas, if the user selects the repair option, no data will be lost.
Step 7: Therefore, choose either Reset or Repair and wait till it finishes the task.

Step 8: Once done, you can close the Advanced options page.
Fix 2 – Turn Off the Use hardware-acceleration encoding option
There is an option called the Use hardware-acceleration encoding option in the Photos app. When this option is enabled while trying to export any video, it creates a problem as mentioned above in this article. So let us try disabling the User hardware-acceleration encoding option first and then export the video as explained in the steps below.
Step 1: First, open the Microsoft Photos app on the system by pressing the Windows key and typing photos.
Step 2: Select the Photos app from the search results as shown in the below image.

Step 3: Once the Photos app opens, try creating the video that you want as per your requirement.
NOTE – We highly recommend using the video of type MP4. Otherwise, convert it before using it.
Step 4: After you are done editing the video and ready to export it, click the Finish video button on the top right side of the Photos app.

Step 5: A small pop-up window appears inside the Photos application on your system.
Step 6: In the Finish your video window, click More options as shown in the below image.

Step 7: Next in the dropdown section, uncheck the Use hardware-acceleration encoding checkbox and click the Export button.

Step 8: This will start exporting the video created or edited by you without any problems.
Fix 3 – Reinstall the Microsoft Photos application
If none of the methods is working out for resolving this issue, you can always try uninstalling the application completely and then installing it back again. Many users claimed that this has fixed many issues regarding this.
Here are the steps on how to reinstall the Microsoft Photos app on your system.
Step 1: Open the Run box by pressing the Windows and R keys together on the keyboard.
Step 2: Type powershell in the run box and press Ctrl, Shift and Enter keys together at once.

Step 3: Accept the UAC prompt on the screen by clicking Yes to continue.
Step 4: Once the PowerShell window opens, type the below line and press Enter key.
get-appxpackage Microsoft.Windows.Photos | remove-appxpackage

Step 5: This removes the Microsoft Photos application completely from the system.
Step 6: After it is successfully uninstalled from the system, open the Microsoft Store app.
Step 7: To do so, press the Windows key and type microsoft store.
Step 8: Select the Microsoft Store app from the search results as shown in the below screenshot.

Step 9: Once the Microsoft Store opens, type Microsoft Photos in the search bar on top and click Microsoft Photos from the search results.

Step 10: This opens the Microsoft Photos page on the app.
Step 11: Click the Get button of Microsoft Photos and then it starts to download and then install it on the system.

Step 12: After it is done installing successfully, you can close the Microsoft Store app and start using the Photos app without any issues.
Fix 4 – Update the Graphics driver
If the display graphics driver is not updated, it creates a problem like this. So on a regular basis, it is always a good practice to update the graphics driver on the system.
Let us see the steps explained below on how you can update the graphics driver using the device manager app.
Step 1: Press the Windows key and type device manager on the keyboard.
Step 2: Click the Device Manager application from the search results as shown in the image below.

Step 3: This opens the device manager app on your system.
Step 4: Expand the Display adapters option by double-clicking on it.
Step 5: Then right-click on the graphics driver and select the Update driver from the context menu as shown below.

Step 6: This will pop up an update window.
Step 7: Click Search automatically for drivers option from the available list in the window.

Step 8: Once it is done updating, close the device manager window and restart the system.
Step 9: After the system starts, you can open the photos app and start editing the videos and export them without any difficulties.
Fix 5 – Keep the Windows system updated
Microsoft keeps releasing newer updates for the Windows system based on the feedback received from users regarding the faults and flaws. When these updates are not installed on our system, it might create some problems.
Well, here are the steps below on how users can update their Windows system.
Step 1: Press the Windows and I keys together to open the Settings app on your system.
Step 2: Choose the Windows Update option on the left panel of the Settings app.

Step 3: On the right-hand side of the Settings app window, click the Check for updates button on the top right corner of the page.

Step 4: Now it starts checking if there are any updates available.
Step 5: If there are any updates released and available for your windows system, please download and install them all one by one.
Step 6: Once the system gets updated, close the Windows Update page and restart the system for the changes to get applied.
Fix 6 – System Restore
When none of the things works out for you, unfortunately, you can always try restoring the system to the system’s last best-saved point where everything was working perfectly fine and smooth without any problems or errors.
So we recommend our users try restoring the system using system restore as shown in the steps below.
Step 1: Open the Run command box on the system by pressing together the Windows and R keys.
Step 2: Once the Run box appears, type rstrui in the textbox and press Enter key.

Step 3: This opens the System Restore window.
Step 4: Click Next to proceed.

Step 5: In the next window, it shows all the system restore points created earlier in the system.
Step 6: Select the one you want from the list and click Next to continue.

Step 7: Here, you need to confirm the system restore details like the Time, Description, etc.
Step 8: Once you are sure of the system’s restore point you selected, click Finish.

Step 9: It will then starts restoring the system and this might take a while for finishing the operation.
Step 10: When done, you are good to go!
Fix 7 – Ensure the video file is of type MP4
The problem could have been raised because the videos users trying to export were of .mov, .avi, .mkv files, etc. Some users claimed that when they converted their video files to MP4 type, it did not create problems while exporting them using the Photos application. So we suggest trying to convert the video file to MP4 before exporting