The settings app is the most crucial part of Windows OS. Even all the troubleshooters are inside the Settings app! So, if the Settings app fails what can you do? Don’t worry. Just like you, some other users have experienced this same problem with the Settings app. Enact these easy fixes to quickly solve the problem and have the Settings app working again!
Fix 1 – Run a file integrity check
If some crucial system files have gone missing, the Settings app may crash.
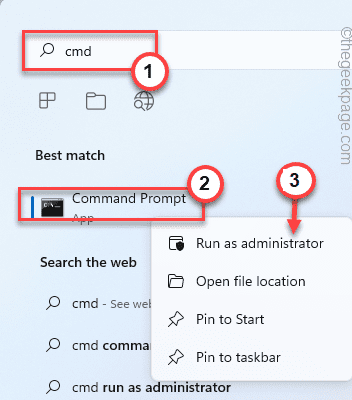
1. You have to tap the Windows key and type “cmd“.
2. Then, right-tap the “Command Prompt” and click on “Run as administrator“.
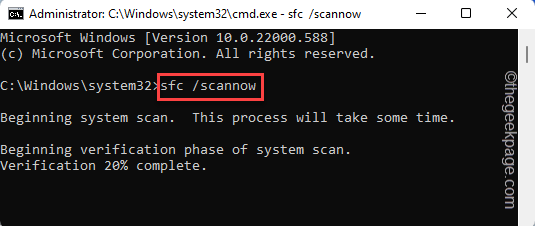
3. Now, run this file-checking command to scan all your system files.
sfc /scannow
4. Once the system file checking scan is complete, you should run the DISM scans as well.
DISM.exe /Online /Cleanup-image /Restorehealth
Once you have run both these scans, open the Settings utility and test if this works.
Fix 2 – Reset the app
You can reset the Settings app to the default settings from the Start menu. For the maximum number of users, this will solve the issue.
1. Press the Start button from your keyboard.
2. When the Start menu opens up, look for the “Settings” app.
[If you can’t find the app, you can click on the “All apps>” option to explore the complete list of apps. and find the Settings app there.]
3. Once you have found the Settings app, right-click that and tap “App settings” to open it.
4. This should open the Settings app page.
5. In the Reset section, you will notice two options.
6. Click on “Repair” to repair the app. Usually, repairing the app doesn’t remove any app settings, so it should be safe for you.
Wait until Windows repairs the Settings app.
Then, close the Settings app and open and try to access different settings menus. Test if this is working without crashing or not.
If this doesn’t solve your problem, you have to reset the Settings app –
1. At first, click on that Windows icon on the taskbar to invoke the Start menu page.
2. Right-click on the “Settings” app and further tap on “App settings“.
3. Just scroll down through the right-hand pane, and click the “Reset” option.
4. You may see the warning message on the same side of the screen. So, click “Reset” another time to reset the app.
Test if this solves your problem.
Fix 3 – Create & run a batch file
Create and run this batch file on your system to fix the issue.
[We have created the batch file for you. So, if you want to go to the end of this solution to directly download the batch file.]
1. Search for “Notepad” using the search box.
2. Then, tap “Notepad” from the search results to access it.
3. When a blank page opens up, just copy-paste these lines in that page.
echo off
taskkill /f /im explorer.exe
taskkill /f /im shellexperiencehost.exe
timeout /t 3 /NOBREAK > nul
del %localappdata%\Packages\Microsoft.Windows.ShellExperienceHost_cw5n1h2txyewy\TempState\* /q
timeout /t 2 /NOBREAK > nul
start explorer
@echo on
4. After that, click on the “File” option and then click the “Save as” option.
5. In the Save as window, choose a location to store the batch file.
6. Then, set the ‘Save as type:’ to “All files“.
7. Next, name the file “Setscript.bat” and tap “Save” to save the batch file there.
Once you are done, close the Notepad page.
8. Then, go to the place where you have just saved the batch file.
9. Now, right-click on the “Setscript” and tap “Run as administrator” to execute the batch file with administrative rights.
After running the batch file, press the Win key+I keys together to open the Settings page. Check if this resolves the issue.
Alternative method –
Just download the script from here, extract it and run the batch file.
1. Download the Setscript file on your system.
2. Extract the zip file to a location of your preference.
3. Now, just head on to the location where you have extracted the file.
4. Then, right-click the “Setscript” batch file and tap “Run as administrator“.
This way, you can find a quick fix for this issue.
Fix 4 – Re-register the app
Try executing these two PowerShell commands that will unregister and re-register the Settings app.
1. Press the Win key and type “powershell” in the box.
2. Then, right-click on the “Windows PowerShell” and click “Run as administrator“.
3. When you have opened the PowerShell terminal with administrative rights, paste this code and hit Enter.
Get-appxpackage microsoft.ui.xaml.cbs |? {($_.version -ne "2.62106.1002.0")} | remove-appxpackage
Add-appxpackage -Register -DisableDevelopmentMode -ForceApplicationShutdown C:\Windows\SystemApps\Microsoft.UI.Xaml.CBS_8wekyb3d8bbwe\AppxManifest.xml
4. After executing this code, copy this command and paste it in the terminal, and hit Enter.
Get-appxpackage microsoft.ui.xaml.cbs |? {($_.version -ne "2.62106.1002.0")} | remove-appxpackage
Add-appxpackage -Register -DisableDevelopmentMode -ForceApplicationShutdown C:\Windows\SystemApps\Microsoft.UI.Xaml.CBS_8wekyb3d8bbwe\AppxManifest.xml
Once you have executed both these commands, close the PowerShell terminal.
Then, restart the system so that this change can take effect.
Hope this resolves the Settings app problem you are facing.
NOTE –
There is another command that you may run to fix the problem. It is the command to re-register the Control Panel but has shown good effects on this issue.
1. Open the PowerShell terminal with admin rights.
2. Then, run this code to re-register the Control Panel.
Get-AppXPackage -AllUsers -Name windows.immersivecontrolpanel | Foreach {Add-AppxPackage -DisableDevelopmentMode -Register “$($_.InstallLocation)\AppXManifest.xml” -Verbose}
Restart the machine after executing the code. Test if this solves your problem.
Fix 5 – Install the latest Windows Update
If this is just a system bug, updating Windows to the latest version should solve the problem.
1. Press the Win key+X keys together.
2. Then, tap on “Windows Terminal (Admin)” on the context menu.
3. When the Windows Terminal page opens up, paste this code and hit Enter.
Install-Module PSWindowsUpdate
4. Once the command is successfully executed, copy-paste this command and hit Enter to download the update.
Get-WindowsUpdate
5. Finally, run this command to install the update on your system.
Install-WindowsUpdate
This way, Windows Update will install the latest version of Windows. Close the Command Prompt and restart your computer once.
Fix 6 – Restore the system
If nothing can fix the Settings page, restore your system using the System Restore point.
1. Press the Win key+R keys together.
2. Then, type this and click “OK“.
rstrui
3. Once the System Restore window appears, tap “Next“.
4. On the next screen, you should see the list of restore points.
5. But if you want to see more restore points, tick the “Show more restore points” box.
This will show additional restore points on your system.

5. Here choose the restore point by date before the Settings utility was working normally.
6. Then, click on “Next“.

7. At the final step of confirmation, tap “Finish“.
Now, the restoration process will start. Windows will revert to the original state. You may lose some recent apps and files.
The settings app should work now. This should solve the problem.


