Most users experience printing problems in Excel. Suppose you give an Excel sheet for a print and you see the print reports do not contain all the columns from the spreadsheet or it may have printed the half of the content in one sheet and another half in other sheets or there may be improper layout orientation due to which the full data is not in the single sheet etc. Likewise, there occur different printing problems which are frustrating for a user. But these can be easily solved by doing a few modifications before giving a print like using scale options or margin settings. So in this article, we will learn how to tweak the excel settings before printing the excel spreadsheets.
Tip 1: Check The Preview Of The Page
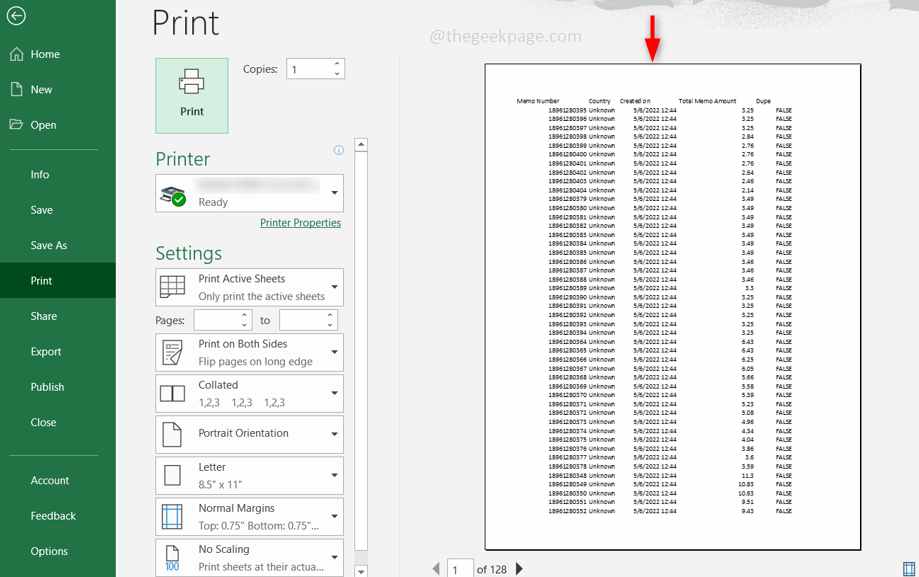
First of all, when you want to print the page, just before you hit the print button it is always recommended to check the preview of the page in the print preview.
Step 1: To see the preview use keys Ctrl + F2 simultaneously. Or you can also click on the File button present at the top of the spreadsheet and choose the Print option.
Step 2: Now you can view the print preview and check whether the report has an appropriate orientation.
Tip 2: Reduce The Page Margins
The orientation of the page is also important. Usually, if you have more columns in excel when you print, the report would be in landscape and you would expect it to be in portrait. So try to reduce the margins to consume less space.
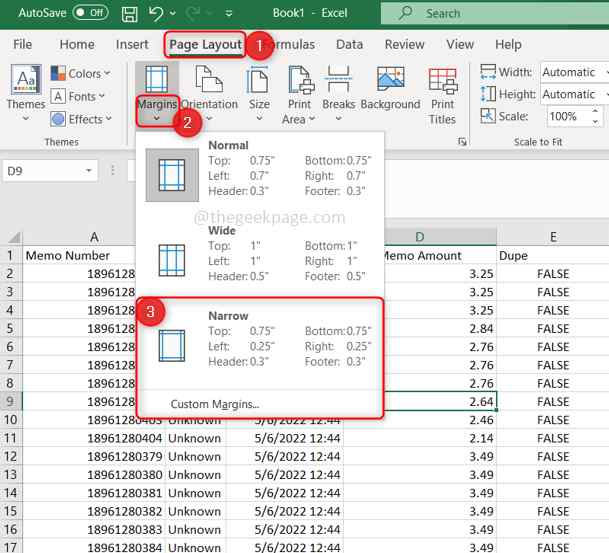
Step 1: In the excel ribbon click on the Page Layout tab. Under it, there is an option called Margins click on it.
Step 2: To reduce some space, click on the Narrow option which narrows down the margin space. Or to customize it by yourself you can click on Custom Margins.
Tip 3: Set The Print Area in Excel
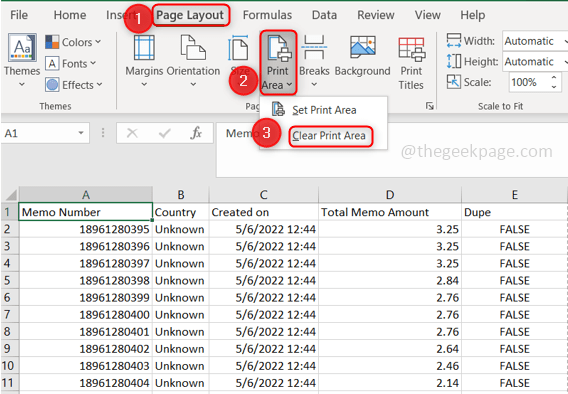
Select the only area which you want to print. Sometimes there would be areas that are wrongly printed, so clear the area first and then select the appropriate one.
Step 1: In the excel ribbon click on the Page Layout tab. Under it, click on the Print Area option and select the Clear Print Area. This will remove the selected area.
Step 2: Now select only the area which you want to print then click on the Print Area option under the Page Layout tab and select Set Print Area.
Tip 4: Add Page Breaks To Split In Parts
Suppose you have huge data with more rows and columns, then when you print the spreadsheet the data would be printed unevenly. So make sure you manually add the page breaks where you want a set of data to be in one single page.
Step 1: Select an entire row and an entire column where you want a break point to be added and click on the Page Layout tab. Select the Breaks icon and click on Insert Page Break.
Step 2: To remove the Page Breaks, click on the Page Layout tab. Select the Breaks icon and click on Remove Page Break.
Step 3: If you want to remove page breaks for more number of pages then click on the Page Layout tab. Select the Breaks icon and click on Reset All Page Breaks.
Tip 5: Use Excel Scaling Options
Use scaling options like adjusting the height, length, and width of the spreadsheet. You can also set a number of pages that needs to be printed and also you use options like fitting two pages into one frame etc.
Step 1: If you want to reduce the width of the page and adjust two or more spreadsheets on a single page then click on the Page Layout tab, in the Width option and select the option you need from the list.
Step 2: If you want to reduce the length of the page and adjust two lengthy spreadsheets on a single page then click on the Page Layout tab, in the Height option and select the option you need from the list. But note that it is difficult to read the data since the excel is shrunk to fit the data into one page.
Step 3: You can even resize the height and width of the page using the Scale option. To do this navigate to the Page Layout tab and in the Scale option enter some value in percentage like 60%.
Tip 6: Use Excel Page Setup Option
Using the excel page setup option, you can perform more actions with respect to page setting, and also all the above-discussed options can also be found under this page setup window.
Step 1: Go to the Page Layout tab, there you can see a small arrow mark at the bottom of the ribbon on the right side, click on it.
Step 2: It will open the Page Setup dialog box. Here you have different tabs like Page, Margins, Header/Footer, and Sheet.
Step 3: Page tab has the scaling options and you can adjust the paper size as well.
Step 4: The Sheet tab has several options like set the print area, set the order of the page, etc.
Step 5: Similarly Margins and Header/Footer tabs have various options to adjust the Margins like the top, left right, center, header, footer space, etc.
That’s it! Hope this article helped you and got your work done perfectly. Thank you and Happy Reading !!!


