Many iPhone users have complained that they are facing an issue where iPhone is not ringing when it is locked. Some other iPhone users have noticed that their iPhones do not ring at all sometimes.
This can be a serious issue and those iPhone users can miss any emergency calls and messages which can impact their work or personal life. The factors that can cause such problems with iPhones are listed below.
- iPhone connected to another Bluetooth audio device
- Silent mode is activated on the iPhone
- Focus mode Do No Disturb is enabled
- Physical Volume buttons must have lowered the iPhone’s ringing volume
- The incoming calls might have been forwarded
- Unknown callers are silenced
In this article, we have gathered a few fixes to assist the users to resolve this issue after researching the above factors in depth.
Fix 1 – Ensure iPhone is in Ringing Mode
Sometimes, users are unaware that they have turned their iPhones into silent mode. When the iPhone is in silent mode, it does not notify users of any incoming calls, messages, or other notifications even though the iPhone is not locked.
Therefore, we suggest our users try checking if their iPhone is in silent mode. If it is, then turn it into ringing mode by toggling the silent mode switch on the side of the iPhone.
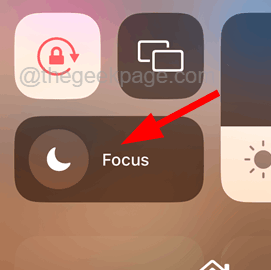
Fix 2 – Disable the Do not Disturb Focus Mode
The focus mode called Do Not Disturb behaves just like silent mode, this does not notify users regarding any calls or messages. Users generally activate the Do Not Disturb focus mode because it can be scheduled according to the user’s convenience.
So check if this focus mode is enabled. If yes, please turn it Off and see if your iPhone rings when locked.

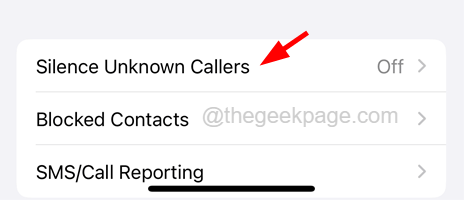
Fix 3 – Disable Silence Unknown Callers setting
There is a feature called Silence Unknown Callers, where any calls you get from unknown numbers will not be notified to you instead it goes to voicemail and will be reflected in the recent calls list. So if this feature is enabled on your iPhone, you might face this issue.
We recommend checking whether this feature is enabled or not. If so, please disable this setting as shown in the below steps.
Step 1: Open the Settings page on your iPhone.
Step 2: Tap on the Phone option by scrolling down the settings page.

Step 3: At the bottom of the Phone page, tap on the Silence Unknown Callers option once.

Step 4: Now disable this feature by tapping on the Silence Unknown Callers toggle button as shown in the below screenshot.

Fix 4 – Disconnect the Bluetooth device
When your iPhone is connected to any other Bluetooth device like AirPods, etc., you will not be able to hear the ringing tone from the iPhone, instead, it rings through the Bluetooth device connected. So it is better to disconnect it from your iPhone after use.
Here are the steps on how to do it.
Step 1: Open the Settings page on your iPhone.
Step 2: Next, tap on the Bluetooth option once.
Step 3: You can turn off the Bluetooth option by tapping on its toggle button which will eventually disconnect the Bluetooth device connected as shown in the below screenshot.

Step 4: If you want to keep your Bluetooth on and only disconnect the Bluetooth device, then just tap on the “i” symbol next to the Bluetooth device listed.

Step 5: Then select the Disconnect option which will disconnect the Bluetooth device from your iPhone.

Fix 5 – Turn Off the Call Forwarding feature
The Call Forwarding feature on any device makes sure that whenever you receive any calls, they will be just forwarded to another number provided by you. If this is activated on your iPhone, you will not get any calls, and hence your iPhone does not ring when locked.
To disable this feature as explained using the steps below.
Step 1: To open the Settings page, tap on the Settings icon from the iPhone home screen.

Step 2: Scroll down the Settings page and tap on the Phone option as shown in the below screenshot.

Step 3: Select the Call Forwarding option by tapping on it once.

Step 4: Wait for a second or two till it loads the page.
Step 5: Now disable the feature by tapping on Call Forwarding’s toggle button as shown below.

Step 6: This will deactivate the Call Forwarding and you will start noticing that your iPhone will ring when you receive any calls even when it is locked.
Additional Fixes
Restart your iPhone
This can also be simply fixed sometimes by just restarting the iPhone. To restart your iPhone, go to Settings > General > Shut Down and follow the onscreen instructions to shut down the iPhone.
After that, to start your iPhone, you need to press and hold the volume up and power buttons together till you see Apple’s logo sign on your screen. Check if the problem is fixed.
Update your iPhone
When the iOS of your iPhone is outdated, this can cause issues as discussed above in this article. So we recommend users try updating the iPhone using the steps explained below.
- This fix would be to check if there are any updates available for your iPhone.
- You have to go to Settings > General > Software Update and wait for a few seconds until it loads the page.

- If there are any updates available, please tap on Download and Install to update your iPhone.

- Once the update is done, check if the issue still persists or not.
Turn On the Airplane Mode and then turn it Off
Several users have claimed to have resolved this problem by just enabling the airplane mode feature and then disabling it on their iPhones. Therefore, we recommend doing it by using the steps explained below.
- Open the Control Centre by swiping down the screen from the top right side of the iPhone screen after unlocking it.
- Then tap on the Airplane mode in the top left corner to enable the Airplane mode.
- Wait for some time and then tap on the Airplane mode again to turn it Off.
- Once it is disabled, check if the problem gets resolved or not.

Reset All Settings
If any of the settings in the iPhone is changed, then this problem might tend to occur. When detecting which setting is causing this issue is impossible, resetting all settings is the only way to resolve it.
Here are the steps on how to do it.
- Navigate to Settings > General > Transfer or Reset iPhone > Reset.
- Then select Reset All Settings from the popped-up list.

- Confirm it by tapping on Reset All Settings.

- Once it is done resetting all settings on your iPhone, check if the fix worked or not.
Check if the incoming call number is blocked
Another simple fix would be to check if the incoming number is blocked by you by mistake. Sometimes, it happens to many users that they unknowingly block some numbers from the recent list if they are not saved or something.
So we advise our users to check all the numbers from the blocked numbers (Settings > Phone > Blocked Contacts) and remove them so that they receive calls from those numbers too.

Factory Reset your iPhone
When none of the methods mentioned above worked for you, all you have to do is the factory reset your iPhone and see if this helps.
NOTE – Please back up all your necessary personal data from the iPhone to your PC or iCloud because the factory reset will erase all contents and data from your iPhone.
- Browse to Settings > General > Transfer or Reset iPhone > Erase All Content and Settings.

- Tap on the Continue option and follow all the onscreen instructions on your iPhone.

- After your iPhone is factory reset, the problem should be resolved.
Please share your thoughts on this article and fixes in the comments section below!