Minecraft is a mine of issues after the recent update on their new launcher. One of these errors is the “Invalid IP address” error message appearing on the Minecraft home page. While this problem may occur while you try to connect to a particular Minecraft server, this also may happen in the case of reaching out to another Minecraft server.
Fix 1 – Restart Minecraft and/or the machine
The quickest fix for this issue is to restart the Minecraft game along with the device.
Step 1 – Close the “Invalid IP address” message box in Minecraft. Then, close the Minecraft app as well.
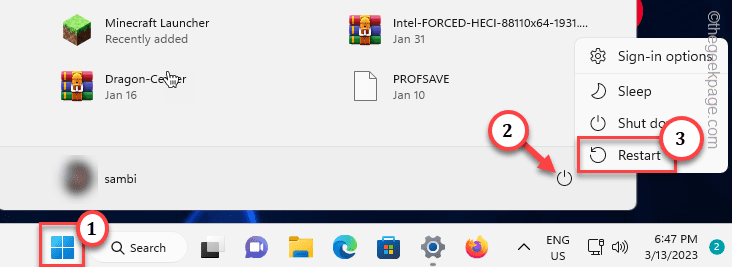
Step 2 – Once you have closed it, click the Windows icon. Then, right-click the Power button and tap “Restart” to restart the device.
Wait till the system restarts. Then, launch Minecraft and try to reach the specified server or any other server as well.
Fix 2 – Delete old Log files in Minecraft
Deleting the old log files in Minecraft should fix the issue.
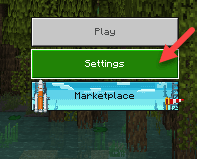
Step 1 – Open Minecraft. When you have opened up, click “Settings” to open Minecraft settings.
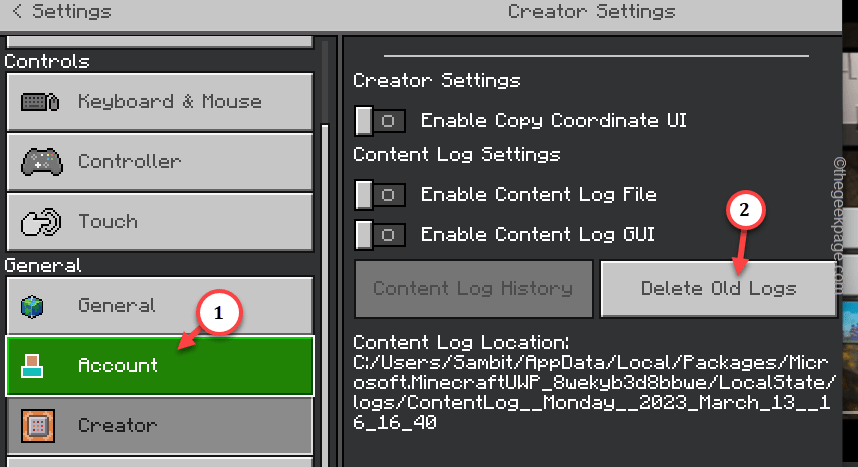
Step 2 – When you have opened it up, head on to “Creator“.
Step 3 – Then, on the right-hand side of the page, you will find an option regarding the log files. So, tap “Delete log files” to delete the older log files.
Once you are done, close and relaunch Minecraft. Check if this fixes the issue.
Fix 3 – Check the Minecraft server status
If the Minecraft servers are down, you may see this “Invalid IP error” message.
There are multiple ways to check whether Minecraft servers are down or not.
Way 1 – You can directly check out the Xbox Status page for more information on its services. As Minecraft is owned by Microsoft Studios, it will show you the exact server status.
Alongside that, you may expand several other items like the “Services” box to see whether there are any Minecraft-related issues.
Way 2 – There is another more detailed Minecraft status checker page, but it is unofficial. It shows all the components of Minecraft service and their status.
If the servers are down by any chance, except for them to go live in a few hours. So, give it another try in a while.
Fix 4 – Sign out of your Microsoft account
You have to sign out of your Minecraft account, clear the local Minecraft cache and sign in to Minecraft to check if this works.
Step 1 – Sign out of Minecraft
You can not sign out of the Minecraft app from within. This does fix the problem for your system.
Step 1 – Close Minecraft. Make sure to exit any Minecraft Launcher window that you have opened up.
Step 2 – Open Xbox on your computer.
Step 3 – There, you will see your account in the top-right corner. So, click that and tap “Sign out” in that context menu to sign out from the account.
You will be signed out of Xbox. Alongside, you will be logged out of Minecraft as well.
Step 2 – Clear Minecraft Caches and check
Now, you have to empty the Minecraft local cache. Don’t worry. None of your created world or Minecoins will be lost clearing the Minecraft cache from your system.
Step 1 – Open Settings.
Step 2 – Then, switch to the “Apps” tab.
Step 3 – On the other hand side of the Settings page, open the “Installed apps“.
Step 4 – On the same side of the page, you may search for “Minecraft” using the search box.
Step 5 – Then, click the three-dot menu of Minecraft and click “Advanced options“.
Step 6 – On to the next step, if you just go down, you shall find the “Reset” option. Tap it once.
Step 7 – When the warning message shows up, tap “Reset” once again to reset the Minecraft app.
Now, as you have reset Minecraft, close Settings.
There is another thing you have to do – clear the Temp folder. If there is any corruption, it will get fixed by this.
Step 1 – After resetting Minecraft, press the Win key+R keys together.
Step 2 – Next, type this code. Then, click “OK“.
%temp%
Soon, you shall reach the Temp folder in File Explorer.
Step 3 – Select all the files and folders at once. So, tap the Delete key to empty the Temp folder.
Close File Explorer.
Step 3 – Sign in to Minecraft
The last step is to open Minecraft and sign in to the app.
Step 1 – Open Minecraft.
Step 2 – Wait till it loads up. Now, click “Sign in” to sign in to the app.
Wait for the Xbox Live console to load up.
Step 3 – It shall show you the Minecraft account that you have used before. So, there are two options.
Step 4 – To proceed with the existing account, tap “Let’s Play“.
Step 5 – If you want to use another account, click the “SWITCH ACCOUNT” tab to opt for another account.
Now Minecraft will sign you into your account. Wait until it loads up the Minecraft home page. Then, you can test whether you can reach the specified Minecraft server or not.
Fix 5 – Stop using VPN, proxy servers
If you are using a VPN or any kind of proxy server, Minecraft may block your access. Using the VPN, or proxy servers you may get access to region-restricted maps, and worlds, but it may sometime throw up the “Invalid IP address” error message.
Step 1 – Open Settings using the Win key+I keys together.
Step 2 – Switch to the “Network & internet” setting.
Step 3 – Inside the Network & internet page, tap “VPN” settings to open it.
Step 4 – On the right-hand side of the screen, you will find the VPN. Expand it and click “Remove” to remove it from the VPN.
Exit Settings after this.
Try to reach the Minecraft server once more.
Additional Points –
1. Try using the Minecraft Launcher. Download, and install the Minecraft Launcher, and try to use Minecraft from within the launcher. Check if this works.
2. If nothing works, uninstalling Minecraft and installing Minecraft should fix the issue.


