Windows users can open the .zip file directly from the File Explore without resorting to any third-party app. But some users have reported a weird issue where they couldn’t access the compressed files. Whenever they are trying to open such a file, Windows is throwing up the “The compressed (zipped) folder is invalid” error message on the system. This can be a simple one-time glitch or bug, or maybe the address you are extracting to has exceeded the maximum character limit.
Workarounds –
1. If this is the first time you are facing this issue, just restart the system once and check further.
2. If you are facing this issue with a particular compressed file, try opening it on a different machine.
If you face the same issue on another system, the compressed file itself is corrupt.
Fix 1 – Change the compressed path
If you are decompressing a file along a path that exceeds Windows MAX_PATH, you can face this issue.
1. At first, press the Windows key+E keys together.
2. When the File Explorer opens up, go to the location of the zipped folder.
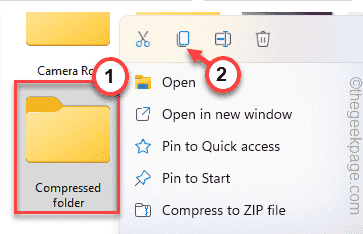
3. Now, right-click on the folder and tap on the copy sign to copy the folder.
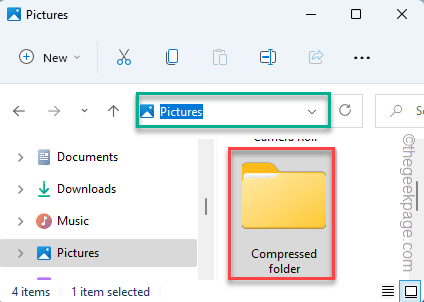
4. Now, paste the folder into a higher directory.
Like these locations –
C:\Users\%username%\Desktop
C:\Users\%username%\Pictures
We have pasted the folder in Pictures.
Now, you can open or extract the contents of the compressed file.
This will solve the issue.
Fix 2 – Uninstall and reinstall the compression client
If you are using any third-party compression client on your system, try to uninstall and reinstall the compression client.
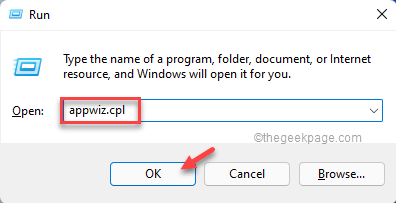
1. At first, press the Windows key+R keys together.
2. Then, write “appwiz.cpl” and click on “OK“.
3. You will see the list of installed apps in the Settings window.
4. Just, scroll down and tap on the three-dot menu of the “WinRAR” app and tap on “Uninstall” to uninstall the app from your system.
After that, follow these steps to complete the uninstallation process.
5. Then, open the WinRAR download section.
6. After that, tap on “WinRAR 6.02” to download the setup file.
7. Next, when you have downloaded the setup file, double-tap on the “winrar-x64-602” to run the setup file.
Just follow the on-screen setup to complete the process.
Fix 3 – Enable and disable ZIP compressed folders
Enabling and disabling the compressed folder view in File Explorer may help you resolve the issue.
Step 1
1. At first, download the Enable and Disable_ZIP_Compressed_Folders on your system.
2. After downloading the zip file, extract the contents of the “Enable and Disable_ZIP_Compressed_Folders” file on your system.
3. You will notice two registry scripts.
4. Just, right-click on the “Disable _ZIP_Compressed_Folders” file and tap on “Show more options“.
5. Next, tap on “Merge” to merge the registry script with your system.
6. Just, tap on “Yes” to confirm the action.
After that, close all the windows and restart the system.
This will disable the compressed Zip file view on your system.
Step 2
Now, you just have re-enabled the view of zip files on your system.
1. Open the location where you have extracted the folder.
2. Then, right-click on the “Enable_ZIP_Compressed_Folders” registry script and tap on “Show more options“.
3. Now, tap on “Merge” to merge the registry script.
4. If you see a prompt, tap on “Yes” to confirm your action.
Finally, restart your system.
This may solve your problem.
Fix 4 – Repair the zip
You can’t access or decompress the zip file if is it is corrupt. You have to repair it first.
1. Open the File Explorer and go to the location of the zip file.
2. Then, copy the address of the file from the address of the file.
Now, close the File Explorer.
3. After that, press the Windows key and type “command“.
4. Further, right-click on the “Command Prompt” and tap on “Run as administrator“.
5. Now, use the change directory command to go to the location of the zipped file.
cd path of the zip file
[Simply, alter the “path of the zip file” with the path that you have noted before.
Example – The path of the zip file on our system is –
C:\Users\sambi\Pictures\Compressed folder
So, the command is –
cd C:\Users\sambi\Pictures\Compressed folder
]
5. Then, type & modify this code and hit Enter.
"C:\Program Files\WinZip\wzzip" -yf name of the file
[
Replace the “name of the file” with the name of the zip file that you want to repair.
Example – The file we want to repair is named as “test file“.
So, the code will be –
"C:\Program Files\WinZip\wzzip" -yf test file
]
After doing this, wait for a while as the WinZip repairs it. Now, you can easily access the compressed file without any issues.
Alternate Method –
If you run into any error repairing the compressed file using the terminal commands, try this direct approach.
1. At first, open the WinRAR app on your system.
2. Once it opens up, navigate to the location of the problematic zip file.
3. Then, tap on “Tools” in the menu bar.
4. After that, click on “Repair archive” to repair the file.
5. Next, you can use the “Browse” option to set a new location to save the repaired file.
6. After that, tap on “OK” to save the file.
Now, Winzip will repair and save the file in the location that you have preferred.
Finally, you can access the compressed file.
Fix 5 – Use another client
The default compressing tool on Windows has a particular size limit that it can handle. So, you can use any other third-party tool (like WinZip, 7z).
1. At first, open this link and download the 7-zip installer file on your system.
2. After that, double-click on the “7z2106-x64” installer setup.
3. Next, tap on the “Install” button to install the 7zip app.
Once you are done, try to access the problematic compressed file once more. You should be able to do so.
Fix 6 – Transfer the file to an NTFS drive
Another cool workaround you can try where you have to move the file to an NTFS drive.
If you are trying to compress a file that is over 4 GB in size, you have to use the NTFS partition. The FAT32 (like a USB device) partition type only supports the compression of the file type up to 4 GB only.
1. Just press the Windows key+X keys together.
2. Then, tap on the “Disk Management” to access it.
3. In the Disk Management window, you can see the disk types of the various drives.
Simply, move the compressed file to C: drive or any drive of NTFS format.
Then, you can easily access the compressed file again.


