Is your WiFi adapter crashing continuously on your Windows system? In this case, the WiFi adapter gets disabled and enabled endlessly, offering inconsistent WiFi coverage for your system. There are several reasons this can happen, one of the main ones being the wrong WiFi driver installed on your system.
Initial Workarounds –
1. Quickly reboot the router your system is connected to. If this occurs due to the router, it should be fixed by this.
2. Don’t stray away far from the router access point. If you have weak WiFi coverage, you may lose the WiFi coverage again and again. The primary remedy to this issue is to go near the access point or use a WiFI range extender.
Fix 1 – Don’t permit the adapter to sleep
Your computer is turning off the network adapter to save power continuously. Windows does this in specific scenarios to save power (usually for laptops).
Step 1 – You can find the WiFi card driver in Device Manager.
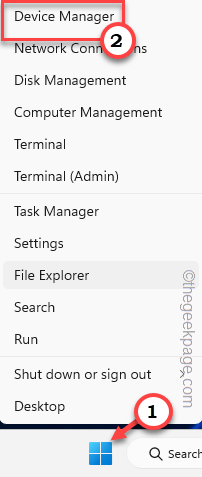
Step 2 – Press the Windows key+X keys together. Then, tap “Device Manager” to open that up.
Step 3 – Upon reaching that page, you have to expand the “Network adapters“. This way, you can open the complete list of network drivers.
Step 4 – Find out which WiFi driver you are currently using and tap “Properties“.
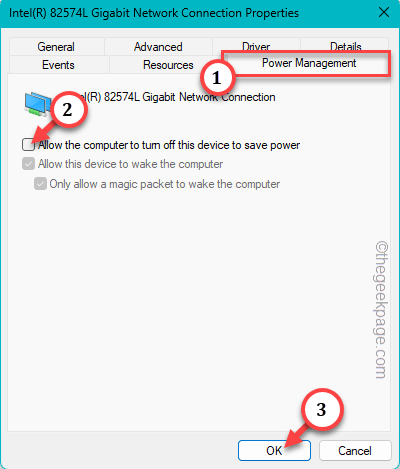
Step 5 – Go to the “Power Management” tab.
Step 6 – There you will see this option –
Allow the computer to turn off this device to save power
Step 7 – After that, tap “OK” to save this change.
This change doesn’t take effect until you restart the computer. After the system restarts, the WiFi driver won’t disconnect again and again.
This way, you can take care of the issue.
Fix 2 – Update the network card
If the problem isn’t there in the Power Management of the WiFi card, you need to update the device driver.
Way 1
Step 1 – You have to open a Run box using the Win key and the R hotkeys.
Step 2 – Then, write this down and click “OK“.
devmgmt.msc

Wait until the Device Manager opens up.
Step 3 – On the Device Manager page, click “Device Manager“.
Step 4 – Then, right-tap the network adapter and tap “Update driver“.
Step 5 – On the following prompt, you shall see the option of whether to update the driver.
Step 6 – Here, click “Search automatically for drivers” to let Windows take full control over the process.
Windows will install the latest driver for the network card adapter. After this, make sure to exit Device Manager and restart the system.
Way 2
Take a look in the Optional Updates in Settings to see whether you can find the latest driver update for the card, download and install the driver.
Step 1 – Open Settings.
Step 2 – Head on to the Windows Update which you shall find on the left-hand side.
Step 3 – After this, click “Advanced options” to open that up.
Step 4 – Now, on the next page of Settings, click “Optional updates” to access that.
Step 5 – All the device driver updates are channeled through here. So, you may find the network card driver in this place.
Step 6 – Check all the updates and click “Download & install” to download and install the driver.
Wait till the drivers are downloaded and installed.
Step 7 – Final stage of this process is a system restart. You can only do this when your system completes the process.
Step 8 – So come back to Windows Update. Click “Restart now” to restart the system.
Way 3 – If you can’t update the WiFi device driver in any way, the final option is to download the latest driver from the WiFi manufacturer’s website. Usually, if you are using an inbuilt WiFi card or a laptop, you can easily find the latest driver.
Here we have mentioned a few steps to download and install the latest WiFi driver.
Step 1 – Go to the device manufacturer’s website. For your ease, we have listed all the popular device manufacturer’s websites –
Step 2 – Head on to the Drivers & Downloads page.
Step 3 – There, search for the device using the model number from the search box.
This way, you can find all the driver updates there.
Step 4 – There you can find the WiFi driver and tap “Download” to download the driver.
After downloading the setup file, use it to install the latest driver for the WiFi card.
Restart your system after installing the latest driver. Check if this solves the issue.
Fix 3 – Use the Internet Connection troubleshooter tool
You can run the Internet Connection troubleshooter to identify the real cause behind the issue and fix it accordingly.
Step 1 – Open Settings.
Step 2 – There, go ahead to “System“.
Step 3 – Next, go down through the right-hand pane and tap “Troubleshoot“.
Step 4 – Go to the “Other troubleshooter” option to open the list of troubleshooters in one place.
Step 5 – Identify the “Internet Connection” troubleshooter among other troubleshooters.
Step 6 – Then, click “Run” to run the troubleshooter.
This Internet Connection troubleshooter will identify the issue and fix it for you.
Fix 4 – Separate other electronic objects
If you are using an external WiFi adapter alongside other electronic items, electronic interference can cause the WiFi adapter to go berserk. This actually happens as all the adapters use the same 2.4 GHz bandwidth. You can do several things like moving away the adapter using a hub connector.
Otherwise, you can set the WiFi to 5 GHz bandwidth (all the latest WiFi devices come with dual-band support.
Step 1 – Open the router configuration page. It is usually given behind your router.
Step 2 – Log in with the credentials.
Step 3 – Go to the “Wireless” settings. There, you will find the option to create the access point for the 5 GHz bandwidth.
Now, use this new network to connect. Your WiFi won’t get disconnected again and again.
Fix 5 – Uninstall & reinstall the network driver
If your WiFi is still getting disconnected again and again, you should uninstall and reinstall the network driver.
Step 1 – Use the search box and type “device” there.
Step 2 – Then, tap “Device Manager” to open it up.
Step 3 – Once the Device Manager loads up, find the WiFi network adapter. You can find it in “Network adapters“.
Step 4 – Then, right-tap the network adapter and click “Uninstall device” to uninstall it.
Step 5 – There will be a warning message. Tap “Yes” there to uninstall it from the system.
Wait until the system uninstalls it. You can’t use the WiFi adapter for now.
So, exit Device Manager. Then, close all the opened windows and restart the system.
This way, Windows automatically installs the default driver for the WiFi adapter.
Once the system restarts, check whether you can use the WiFi or not. If the adapter doesn’t work properly, you have to install the old driver for it.
Step 1 – Open Device Manager.
Step 2 – Then, click “Action“. Further, tap “Scan for hardware changes“.
Step 3 – Now, again look for the WiFi driver.
Step 4 – Then, right-click that and tap “Update driver“.
Step 5 – We are going to install an older driver for the device. So, choose the “Browse my computer for drivers” option.
Step 6 – On the next screen, choose the “Let me pick from a list of available drivers on my computer” option.
Step 7 – Finally, you shall see the list of drivers under the Model section. Select the appropriate driver and tap “Next“.
This way, you can directly install an older driver for the WiFi card. This way, it will begin to function normally.
Once again you can connect to the WiFi and check if that works for you.
Fix 6 – Run some network-related codes
Renewing the IP configuration should fix the WiFI disconnect issue.
Step 1 – Write down “cmd” in the “Search” box.
Step 2 – Wait until you see the “Command Prompt“. After seeing that, right-tap the “Command Prompt” and further tap “Run as administrator” from the context menu.
Wait till the CMD terminal opens up.
Step 3 – When it does, input these netsh codes to reset the firewall, IP, and windows sockets.
netsh int IP reset
netsh advfirewall reset
netsh winsock reset
Step 4 – When you are finished with those netsh codes, run these commands to release and renew the IP configuration.
ipconfig /flushdns
ipconfig /release
ipconfig /renew
After running these codes, exit the CMD terminal screen.
Restart your system after this. Now, after the system restarts, observe the WiFi connection.
Fix 7 – Reset the network adapter
Resetting the network adapter is the last option you should try. Resetting the network adapter should fix the issue once and for all.
NOTE – Resetting the network configuration deletes all the stored-up network configurations and saved network passwords.
Step 1 – Open Settings.
Step 2 – Go to “Network & internet” settings. Next, open the “Advanced network settings“.
Step 3 – Going down the same page, you should find the “Network Reset” option.
Step 4 – Finally, click “Reset now” to reset all the network settings, configurations, etc.
Step 5 – Finally, click “Yes” to reset the issue.
After this, do make a system restart. You won’t face any issues regarding your WiFi disconnecting again and again.


