While running a flutter framework, you may have noticed the OpenJDK Platform Binary is eating up too much RAM (sometimes even 90%) of your system. This problem seems to be occurring even when the main editor is closed. There are some solutions that may help you fix the issue.
Fix 1 – Stop the Gradle Daemon from running in the back
Gradle Dameon tool continues to run in the background for another 3 hours! You must stop the Gradle Daemon from running manually from the command line.
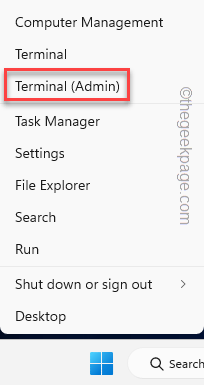
Step 1 – Just open a terminal. You can right-click the Win key and tap “Windows Terminal (Admin)” to open it with administrative permissions.
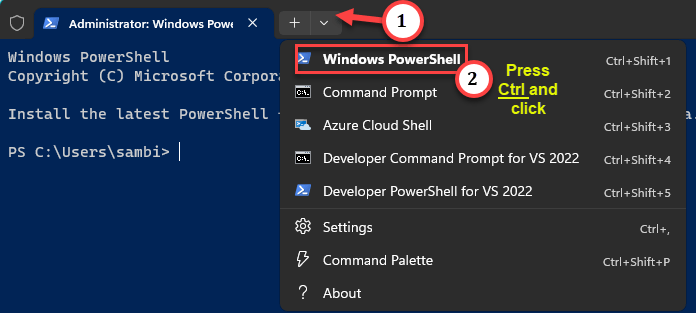
Step 2 – Check whether the PowerShell terminal has opened. Otherwise, press & hold the Ctrl key and click “Windows PowerShell“.
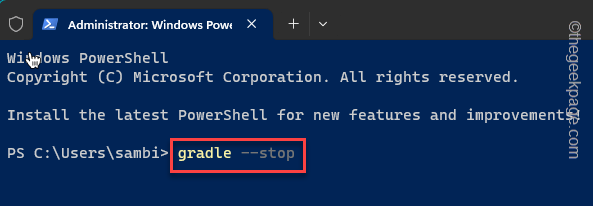
Step 3 – On the Administrator: Windows PowerShell page, input this line and hit Enter to put stop to the Gradle Daemon process.
gradle --stop
This will end the subsequent Gradle Daemon processes running in the background.
As these Daemon processes will stop, releasing all the holder memory, and CPU resource points.
Check the results on the Task Manager page.
Fix 2 – Run the SFC tool and DISM scan
System File Checker scan and DISM tool mend any corruption in the system files.
Step 1 – As a system administrator, type “cmd” in the ” 🔎Search” box.
Step 2 – Next, right-tap the “Command Prompt” and you have to click the third option from the context “Run as administrator“.
Step 3 – The first command you have to write on the terminal is this and then, hit Enter.
sfc /scannow
Step 4 – Once you are finished running the SFC code, run these DISM scanning commands as well.
DISM.exe /Online /Cleanup-image /Scanhealth
DISM.exe /Online /Cleanup-image /Restorehealth
Close the Administrator: Command Prompt terminal.
Check if this solves the issue on your system or not.
Fix 3 – Update the game
If you are facing this issue while playing Minecraft and experiencing over 90% RAM usage by OpenJDK Platform Binary, make sure to update the game. This is a known bug that has caused the issue for various users. This problem is solved in the latest version of the game. So, updating the game should help you fix the issue.
Fix 4 – Reduce the Rendering distance in Minecraft
This seems to be the problem with the render distance parameter in the Minecraft settings. Too much render distance can cause this issue.
Step 1 – Launch Minecraft.
Step 2 – When it opens up, go to “Settings” to open the Minecraft Settings.
Step 3 – On the Minecraft Settings page, head on to the “Video” pane.
Step 4 – Then, scroll down through the right-hand pane and get to the Classic section.
Step 5 – Now, slide down the slider of “Render Distance” to the 20 or below value. As a matter of fact, if you have previously set this setting to a higher value.
After this, minimize Minecraft Settings.
Now, track the memory consumption from Task Manager. Check if this solves the issue.
Fix 5 – Disable the integrated GPU from BIOS
If your system has an integrated GPU and a dedicated GPU (like NVIDIA 3060) the game might be using the integrated one. You can disable the integrated GPU from the BIOS page.
Step 1 – Go to the Settings. Open “System“.
Step 2 – There, if you scroll down, you should find the “Recovery” settings.
Step 3 – Once you have reached that place, go to the “Advanced Startup” section and tap “Restart now” to restart the system.
This will restart your system into Recovery Mode.
Step 4 – Tap “Troubleshoot“.
Step 5 – Now, click “Advanced options” to view the full list of troubleshooting items you have on your system.
Step 6 – Tap “UEFI Firmware” settings to open that.
Step 7 – Next, tap “Restart” on the next screen that does restart and open the BIOS settings.
Step 8 – When you have opened up the BIOS page, head on to the integrated video card setting. There, you have to find VGA under Integrated Peripherals.
You may find this in On-Board Devices or Built-in Devices in some devices.
Make sure to save the settings and exit BIOS.
Your system will restart. After this, run the flutter-based code or play Minecraft, whichever you are facing this problem with, and test if this works.


