Google Chrome is one of the most widely used browsers, but sometimes the users face issues like Chrome running slowly, not responding, crashing, etc. The most common issue is “Google Chrome has stopped working”. It may be due to various reasons like corrupted files, cache, cookies, high CPU usage, etc. But this issue can be solved. If you are thinking how? then in this article, we will discuss different methods to solve Google Chrome has stopped working issue, and with these simple steps, you will be able to get rid of the problem.
Method 1: Restart The Chrome Browser
Firstly try to restart the browser then check if the issue still persist. If yes, then continue trying with other methods. To restart the chrome, just press Ctrl + Shift + Q keys together to exit from chrome and then reopen it by double clicking on the chrome icon. Or, follow the below steps
Step 1: Open the new tab in the browser
Step 2: Copy the below command and paste it in the address bar.
chrome://restart
Step 3: Hit enter. Chrome will close and then immediately reopen. Check if the problem is solved.
Method 2: Rename the Chrome File
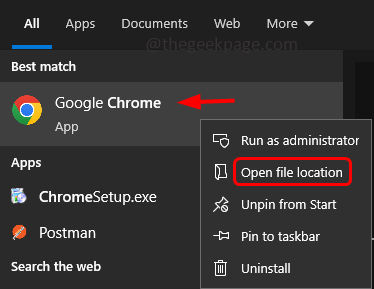
Step 1: In the windows search type Google Chrome and right click on the best match
Step 2: From the list, click on Open file location
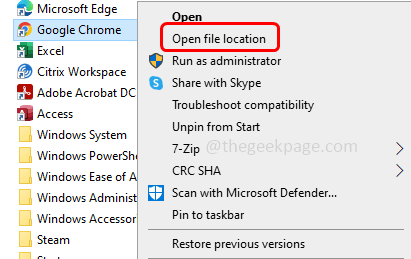
Step 3: A File explorer window will open where you can find Google Chrome shortcut. Now right click on it and select Open file location
Step 4: The actual location where Chrome file is present will be opened. Right click on the chrome file and select Rename
Step 5: Put a dot (.) after chrome. Now the filename would be “chrome.” like shown in the below image and hit enter
Step 6: Now right click on the renamed chrome file and select Create shortcut
Step 7: A pop up will appear to create shortcut is desktop click on yes
Step 8: Now, rename the newly created shortcut on Desktop and Try opening chrome again from that shortcut. And the browser works without any issues.

If you already have a shortcut in the task bar below, right click on it and click on unpin from taskbar
Now back in the explorer right click on the Chrome file and click on Pin to taskbar
Method 3: Delete Preferences File
Step 1: Open the run prompt using Windows + R keys together
Step 2: Copy the below command and paste it in the run prompt then hit enter
%USERPROFILE%\Local Settings\Application Data\Google\Chrome\User Data\
Step 3: This will open the file explorer. Find for Default folder and double click on it
Step 4: Find for Preferences file and right click on it
Note: Take a backup of Preferences file before deleting it
Step 5: From the appeared list click on Delete. Restart the computer and check if the issue is solved.
Method 4: Clear The Cookies And Cache
Step 1: In the Chrome browser, click on the three dots at the top right corner of the browser. Click on More tools
Step 2: Then from the fly out option, select Clear browsing data
Step 3: In the appeared window, select All time from the Time range dropdown
Step 4: Select the checkbox beside, browsing history, cookies and other site data, cached images and files.
Step 5: Click on the Clear data button. Now check if the problem is still present.
Method 5: Disable Browser Extensions
Step 1: In the Chrome browser, click on the three dots at the top right corner of the browser. Click on More tools
Step 2: Then from the fly out option, select Extensions
Step 3: Disable all the extensions by clicking on the toggle bar. The blue color from the toggle bar should disappear.
Step 4: If there are unnecessary extensions, then remove them by clicking on the remove button
Step 5: Restart your system and check if the error is disappeared.
Method 6: Check For Conflicting Software
Step 1: Open the chrome browsers and type chrome://conflicts/ and hit enter
Step 2: In the results, if it says there are any conflict software, then uninstall those software
Step 3: To uninstall, open the run prompt using Windows + R keys together. Type appwiz.cpl and hit enter
Step 4: Right click on the conflicting software and click on uninstall.
Method 7: Restart The Computer
If there is any glitch in the server or any minor issues, just a re-start will solve it. So before experimenting with different solutions, restart your system once and check if Chrome works properly. If not, then try the below methods. To restart the system,
Step 1: Click on the Windows Start button at the bottom left corner of the display screen
Step 2: Click on The Power button and select Restart. It might take a few minutes to finish the process.
Method 8: Run The Program In Compatibility Mode
Step 1: Go to the path where the chrome.exe file is present. Here it is the following path, copy and paste it into the file explorer address bar and hit enter.
C:\Program Files (x86)\Google\Chrome\Application
Step 2: Find for chrome.exe file and right click on it
Step 3: From the appeared list, click on properties
Step 4: In the properties window, go to the Compatibility tab and enable “Run this program in compatibility mode for” option by selecting the checkbox beside it.
Step 5: Once the checkbox is marked then the drop down below it will be enabled. From the dropdown select Windows 8 or Windows 7
Step 6: To save the changes click on Apply and OK
Step 7: Now restart your computer and check if the issue is resolved.
Method 9: Reset The Chrome Browser
Step 1: Open the chrome browser and click on the three dots which is at the top right corner
Step 2: From the appeared list click on Settings
Step 3: On the left side, find for Reset and clean up and click on it
Step 4: Click on Restore settings to their original defaults at the right side
Step 5: Hit the Reset settings button to reset the browser. Now check if the issue is resolved.
Method 10: Clean Up The Computer
Step 1: Open the chrome browser and click on the three dots which is at the top right corner
Step 2: From the appeared list click on Settings
Step 3: On the left side, find for Reset and clean up and click on it
Step 4: Select Clean up computer from the right
Step 5: In the opened window click on Find to find the harmful software from the computer and remove it
Step 6: Restart the computer and check if there is no problem in Chrome
Method 11: Scan The System Files In Your Computer
Step 1: In the Windows search bar, type cmd and hold Ctrl and Shift keys together and hit enter. This will open the command prompt as an administrative
Step 2: Copy the below command and paste it in the command prompt. Then hit enter to execute it
sfc /scannow
Step 3: It will take a few minutes to scan the system files.
Method 12: Re-install Google Chrome
Step 1: Firstly uninstall the Chrome from your computer. To do that, open the run prompt using Windows + R keys together, type appwiz.cpl and hit enter
Step 2: This will open Programs and features window, under uninstall or change a program find for Google Chrome
Step 3: Right click on the Google Chrome and click on uninstall
Step 4: To install it, go to the chrome website and click on Download chrome
Step 5: Once the download is completed, double click on the .exe file to install
Step 6: Wait for the Chrome to be installed and then use it. The issue should be resolved.
That’s it! I hope this article is helpful and let us know which of the above method you tried and worked for you. Thank you!!


