While transferring files from a drive to another driver in the File Explorer, you may have encountered this error message saying “Error x800701B1: A device which does not exist was specified“. Though many users have reported this issue while copy-pasting big files on a USB device, a handful of them have also encountered this issue while trying to install Windows on an HDD/SSD connected to a USB port.
Fix 1 – Plug the drive into another port
As you may know, there are several types of ports present on your system. But, some newer external SSDs/HDDs work only with USB 3.0. So, if you have plugged into the USB 2.0 port, this error may appear.
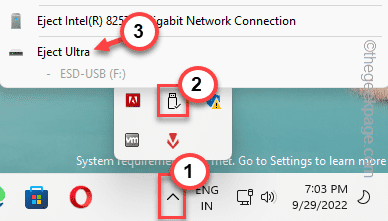
1. You have to eject the USB drive. So, tap the arrow icon to view the hidden system icons.
2. Here, look for the USB eject icon. Now, click it once to view all the USBs connected to your system.
3. Now, just right-tap the external drive and tap “Eject” to eject the drive safely.
4. Just unplug the device from an existing USB port.
5. Then, take a good look at the USB ports on your PC/laptop. You will find a USB 3.0 port on all the latest laptops. Whereas if you are on a PC, there are several USB ports at the back.
6. Plug in the USB drive to a new port of your machine.
Then, test by transferring some files from the drive to your computer or vice-versa. Check whether you are still seeing the Error Code 0x800701B1.
Fix 2 – Rescan the entire drive
Try rescanning the drive from Disk Management to solve the problem.
1. You can rescan the drive using the Disk Management tool.
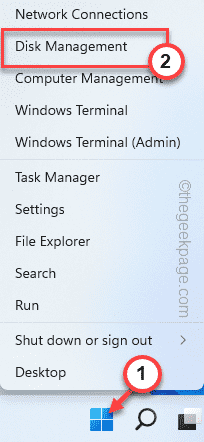
2. Press the Win key along with the X key to open the context menu.
3. Then, tap the “Disk Management” tool to open that.
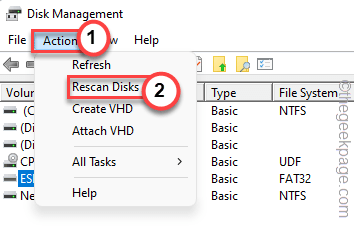
4. In the Disk Management tool, you can view the complete list of drives in the main pane.
5. Just, click the “Action” menu and tap “Rescan disks” to rescan the drive.
Once the drive is rescanned, you may close the Disk Management tool. After this, try to copy-paste or transfer the file.
You won’t see the error message again.
Fix 3 – Own the problematic drive
If you don’t have proper permission for the drive, you need to give sufficient permission to it.
1. At first, open the File Explorer by pressing the Win key+E keys together.
2. Now, tap “This PC” on the left pane.
3. Locate the drive there. Now, right-tap the drive and click “Properties“.
4. After this, right-tap the drive and head on to the “Security” tab.
5. Here, in this tab, click “Advanced” to open the Advanced Security settings.
5. Next, beside the ‘Owner:’ option, tap “Change“.
6. On the next screen, tap the “Advanced” option.
7. Later, click the “Find Now” button to find the complete list of user groups.
8. Among these groups, select your user name and double-click that.
9. To confirm this, tap “OK“.
10. Once you are back on the main page, check the “Replace All Child Object Permission Entries with Inheritable Permission Entries from This Object” box.
11. Then, to save the change, tap “Apply” and “OK“.
Now, try to transfer the file you were trying to before.
Fix 4 – Uninstall and reinstall the disk drives
Uninstall and reinstall the disk drives on your computer.
1. At first, press the Win key along with the R key.
2. Then, type this and hit Enter.
devmgmt.msc
3. On the Device Manager page, expand the “Disk Drives” drop-down list.
4. Here, just right-click the disk drive and tap “Uninstall device“.
5. Confirm the uninstallation again. Tap “Uninstall” once more.
This way, uninstall the disk drive from your computer. Don’t worry. This just uninstalls the current driver.
Restart your computer. This way, Windows does replace the uninstalled driver with the default driver. After restarting you can easily transfer files without any issues.


