The error 0x80041003 has been in windows operating from the version 7 and still comes up in the latest windows 10 OS. Users come across this error in the event viewer program. It has been annoying windows users from many years but it is quite easy to solve, we have found some solid solutions for you to resolve the error. Follow the instructions below and get rid of the error.
Solution 1 – Disable user account control
User account control is a security program that prevents users without administrator privileges changing anything that can mess up the system. It is a great feature for security but sometimes it causes error and glitches, many users have found that disabling it solves this error.
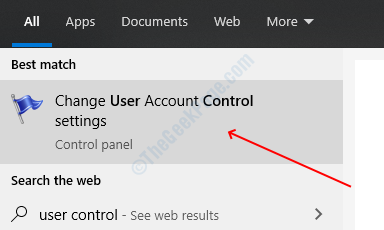
STEP 1: Press Windows + S and search for user control, open the first result that says Change user account control settings.

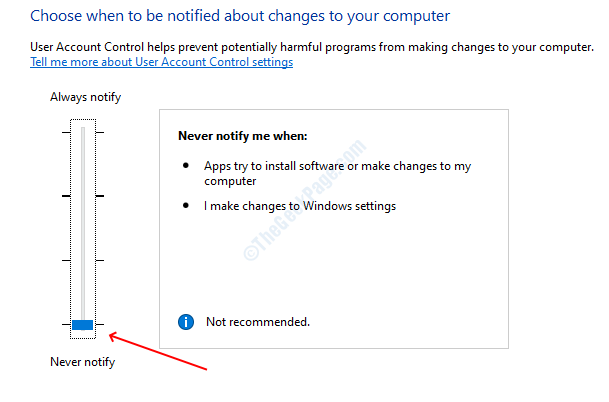
STEP 2: In the user account control window, you will find the slider which says always notify on one side and never notify on the other side. Move the slider all the way down towards never notify.

STEP 3: Click OK to save your settings.
User account control has been disabled now and with it, your error also should be resolved.
Solution 2 – Run VBS script
In this method, you have to make a VBS script file and then run it. This solution has provided by Microsoft for Windows 7 but it also works with new versions. Follow the steps below to make and run the script.
STEP 1: Press Windows and search for the notepad, and then press enter.
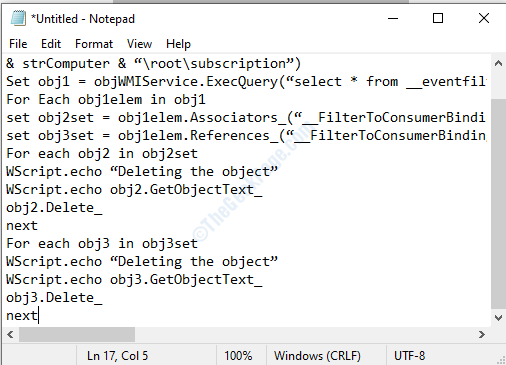
STEP 2: Paste the following code into the notepad window:
strComputer = “.”Set objWMIService = GetObject(“winmgmts:” _
& “{impersonationLevel=impersonate}!\\” _
& strComputer & “\root\subscription”)
Set obj1 = objWMIService.ExecQuery(“select * from __eventfilter where name=’BVTFilter’ and query=’SELECT * FROM __InstanceModificationEvent WITHIN 60 WHERE TargetInstance ISA “”Win32_Processor”” AND TargetInstance.LoadPercentage > 99′”)
For Each obj1elem in obj1
set obj2set = obj1elem.Associators_(“__FilterToConsumerBinding”)
set obj3set = obj1elem.References_(“__FilterToConsumerBinding”)
For each obj2 in obj2set
WScript.echo “Deleting the object”
WScript.echo obj2.GetObjectText_
obj2.Delete_
next
For each obj3 in obj3set
WScript.echo “Deleting the object”
WScript.echo obj3.GetObjectText_
obj3.Delete_
next
WScript.echo “Deleting the object”
WScript.echo obj1elem.GetObjectText_
obj1elem.Delete_
Next

STEP 3: Click on the File in the main menu and then select save as option from the drop down.
STEP 4: In the save as window, choose all types in the file type option and then type the name of the file as myscript.vbs.

STEP 5: Choose a saving location as the Desktop and then click on the Save button.

You have successfully made the VBS script, now you have to run it.
STEP 5: Press Windows + X and then select Command Prompt (Admin). If you can’t find command prompt then select Windows Powershell (Admin).

STEP 6: Click Yes button on the user access control prompt.
STEP 7: In the command prompt window, type the following command and press enter:
cd %userprofile%\Desktop

STEP 8: Type the following command and hit enter button
cscript myscript.vbs

This command will run the script you just made, after running the script error resolves automatically.
Solution 3 – Run a bat script
Note: To use this method you need the admin user privileges if you are on a limited user account then log in from the administrator user account.
Bat script is helpful when you have to run multiple commands in Windows. We have found a bat script that will be helpful to you for resolving the error 0x80041003. Follow the steps below:
STEP 1: Press Window + R to open the Run program, type, and hit enter. 
STEP 2: Paste the following code into the notepad window:
@echo on
cd /d c:\temp
if not exist %windir%\system32\wbem goto TryInstall
cd /d %windir%\system32\wbem
net stop winmgmt
winmgmt /kill
if exist Rep_bak rd Rep_bak /s /q
rename Repository Rep_bak
for %%i in (*.dll) do RegSvr32 -s %%i
for %%i in (*.exe) do call :FixSrv %%i
for %%i in (*.mof,*.mfl) do Mofcomp %%i
net start winmgmt
goto End
:FixSrv
if /I (%1) == (wbemcntl.exe) goto SkipSrv
if /I (%1) == (wbemtest.exe) goto SkipSrv
if /I (%1) == (mofcomp.exe) goto SkipSrv
%1 /Regserver
:SkipSrv
goto End
:TryInstall
if not exist wmicore.exe goto End
wmicore /s
net start winmgmt
:End

STEP 3: Press Ctrl + Shift + S to open save as window. Select all files in file type and type script.bat as the file name.

STEP 4: Set Desktop as file destination and then click on the save button.

STEP 5: Close the notepad window. Go to the Desktop, right click on the script.bat icon and select run as administrator.

STEP 6: Click on the yes button in the prompt.
Solution 4 – Delete the repository folder
For many users the error has caused by the problem in the Windows Management Instrumentation and it can be possible that the your WBEM repository is corrupted. The solution for this problem is to reset the corrupted repository so that issue gets resolved.
STEP 1: Open run dialogue box by pressing Windows + R, type services.msc and hit enter.

STEP 2: Scroll down and locate the Windows Management Instrumentation service the services window. Right click and select properties option.

STEP 3: Press Stop button in the properties window, if you get any warning prompt select yes and close the services window.

STEP 4: Open the Windows File Explorer and paste the following path in the address bar.
C:\Windows\System32\WBEM

STEP 5: Scroll down and find the repository folder, copy and paste it in some safe location for backup so you can get it from there if something goes wrong.
STEP 6: Now, delete the repository folder from the original location.
STEP 7: Restart your computer and leave it idle for at least 15 minutes. In this time, your operating system will recreate the repository folder the WBEM folder.
STEP 8: Restart your computer after waiting for fifteen minutes. You will find that the repository folder has been recreated.