If you are experiencing a pink or purple color screen on your desktop, this might be because of various reasons like incorrectly connected cables, no proper installation of windows updates, outdated drivers or you may need to do some background settings. So in this article let us see different methods on how can we solve this issue. Let us start!
Method 1: Make Sure The Connector Cable Is Firm
If your connector cable is not firm, sometimes the monitor may cause discoloration. so make sure you have connected the cable correctly and firmly into the port. Also, check if the cable is defective or damaged, if so use a new cable and check if the problem is resolved. Try checking the connector cable into another device and test it
Method 2: Turn Off The Color Filters
Step 1: Open the Windows Settings using Windows + I keys together
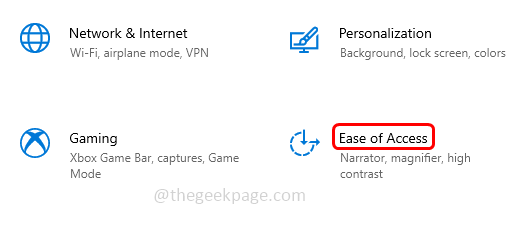
Step 2: Click on Ease Of Access
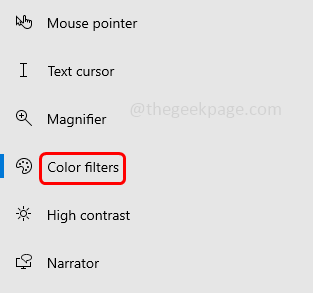
Step 3: On the left, click on Color Filters
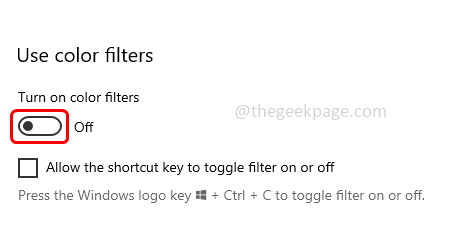
Step 4: On the right side under Use color filters, if the color filter is on that means if its toggle bar is in blue color then turn off the color filters. This can be done by clicking on the toggle bar.
Method 3: Roll back The Driver To The Old Version
If you are facing the issue after the latest windows update then try to roll back to the previous version
Step 1: Press Windows + X keys together, there appears a list of options, click on Device Manager
Step 2: Expand the display adapters option by clicking on the arrow beside it
Step 3: Right-click on the driver and click on Update driver
Step 4: Click on the “Browse my computer for drivers” option
Step 5: Then select “Let me pick from a list of available drivers on my computer” and click on Next
Step 6: From the Model section select the previous old driver and click on Next
Step 7: Follow the onscreen instructions to install it and once done restart your system
Method 4: Update The Graphics Driver
Step 1: Press Windows + X keys together, there appears a list of options, click on Device Manager
Step 2: Expand the display adapters option by clicking on the arrow beside it
Step 3: Right-click on the driver and click on Update driver
Step 4: Select the “Search automatically for drivers” option
Step 5: Follow the on-screen instructions to complete the process and then restart the system
Method 5: Use Compatibility Mode
Step 1: If you are facing the issue while playing a game then right-click on the game and select properties from the list
Step 2: This will open the game properties, go to the Compatibility tab
Step 3: Make sure the options Disable Visual Themes and Disable Desktop Composition are selected. If not, select them by clicking on the checkbox beside them
Method 6: Perform A Clean Boot
Step 1: Open the run prompt using Windows + R keys together, type msconfig, and hit enter
Step 2: This will open the System Configuration window
Step 3: Under the General tab choose selective startup by clicking on the radio button beside it
Step 4: Select the Load startup items option by clicking on the checkbox beside it
Step 5: Click on the Services tab and select the checkbox beside “Hide all Microsoft services”
Step 6: Select all other services by clicking on the checkbox beside them. Then click on Disable all button
Step 7: Select the Startup tab and click on Open Task Manager which will open the task manager window
Step 8: Choose all the items that startup automatically and click on Disable. For example, in the below image I have shown one application. Similarly, repeat for all other applications. Close the task manager window
Step 9: To save the changes click on Apply and OK
Step 10: Restart your computer and this should clean boot your system. Now check if the pink color display is disappeared
That’s it! I hope this article is helpful. Do share your thoughts on which of the above methods solved your problem.


