Many Windows users have reported an issue on their windows 11 PC where the desktop screen is completely black with high contrast. This is very much unappealing to the eyes. Also, all the icons and folders which were present earlier on the desktop screen were missing and not to be seen by the users. Not only is the desktop screen black, but even the search and start menu also looks dark.
The Windows users are not sure why this is happening and what can be done to resolve it. There could be many reasons for this black screen issue on the system. The main reason is because of the contrast theme which might have been changed or the graphics card’s driver may be outdated on the system.
Don’t worry if there is a similar kind of problem with your system. We have gathered more information on this issue and came up with a few solutions which will assist the users in fixing them.
Fix 1 – Using Contrast Themes settings
When contrast theme settings are enabled and if the dark theme is selected, then these types of problems tend to occur on any windows system. So we suggest changing the contrast theme settings on your system and see if this works for you.
Follow the steps on how to do it.
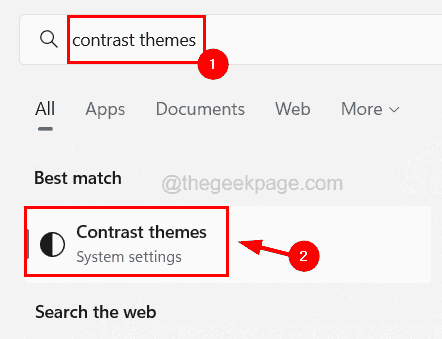
Step 1: Press the Windows key on your keyboard and type contrast themes.
Step 2: Select the Contrast Themes system settings from the search results as shown in the below image.

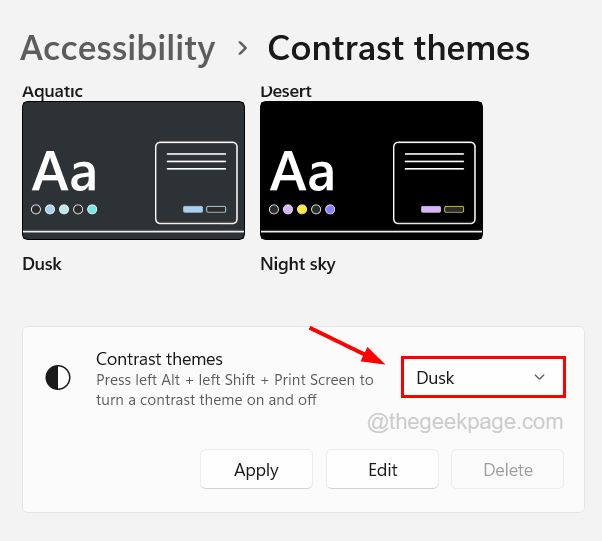
Step 3: This opens the Contrast Themes page on your system.
Step 4: Click on the Contrast Themes option to view its dropdown menu.

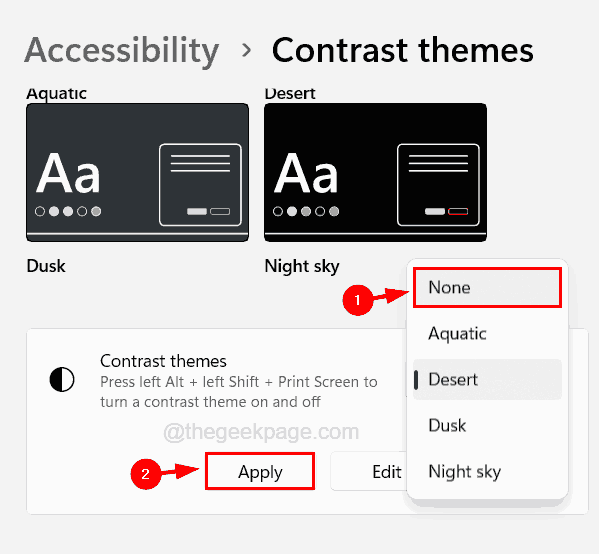
Step 5: Select None from the dropdown menu and then click Apply to make the changes.

Step 6: After the contrast themes settings are changed, close the contrast themes page.
Fix 2 – Update the Graphics card driver in Safe mode
Some users claimed that they were able to resolve this problem by updating their graphics card driver in the safe mode environment on their system. So let us also try updating the graphics card driver in safe mode.
Here are the steps on how to do it.
Step 1: Enter into the system’s safe mode using different methods.
Step 2: After you enter the system’s safe mode, open the device manager.
Step 3: To do so, press the Windows + X keys together and then press the M key on the keyboard once to open the device manager.
Step 4: In the Device Manager window, expand the Display adapters option by double-clicking on it.
Step 5: Then right-click on the Graphics card from the list and select Properties from the context menu as shown in the below image.

Step 6: In the properties window, select the Driver tab and then click Update driver as shown below.

Step 7: In the Update driver window, click Search automatically for drivers which will automatically search online for the latest driver.

Step 8: After updating the card if the problem still persists, you need to roll back the driver update by clicking Roll Back Driver.

Step 9: After that, click Uninstall Device which uninstalls the device.

Step 10: Then while restarting the system, it will install the graphics card driver on the system.