You must have noticed a difference in colors between different devices which is due to the different graphics cards used by the monitors. So, the color profile on one monitor may make an image look better than on another one. Using the Windows Color Management tool you can make an image on one display monitor look the same as another one. This tool is one of the most essential tools needed by users who work in a color-managed environment like graphic designers and photographers. On Windows, this tool can be used to assign the required color profiles for the different monitors and in turn, provide a good color experience to its users.
Possible reasons for the Color Management Tool to stop working in Windows 11 are
- Outdated Windows version or GPU software
- An inconsistent Color Profile component
- The inability of the application to retrieve the color profile
- Incompatibility of the Color Management Scheme with Windows 11
There have been reports by Windows 11 users that they are unable to modify their display’s color profile as the Color Management tool has stopped working. If you are stuck with this issue on your Windows 11 PC, then you have landed in the right post. Read below to find a list of troubleshooting strategies that have helped other users facing this issue to successfully resolve it.
Method 1 – Update Windows 11 to Latest Version
If there are any pending updates to Windows 11 that have been released by Microsoft but you have not installed them, then follow the steps mentioned below to update Windows 11 to the latest build available.
Step 1. Press Windows + I to open the Windows Settings app.
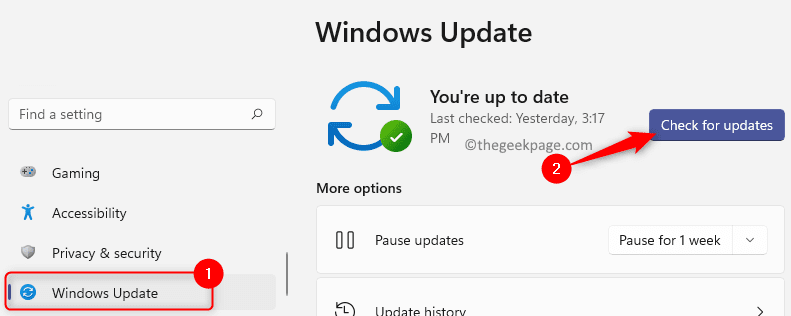
Step 2. In the left pane, select the Windows Update tab.
Step 3. On the right side, click on the Check for updates button.
Step 4. Wait until Windows checks for any updates to the Windows 11 build on your PC.
Step 5. You can then download and install the updates if there are any available.
Step 6. Restart your system and check if the Color Management tool is working and you are able to make changes to the monitor’s color profile.
Method 2 – Reinstall Graphics Card Drivers
Step 1. Press Windows + R to open the Run box.
Step 2. Type devmgmt.msc and hit Enter to open the Device Manager.
When prompted by UAC for permissions, click on Yes.
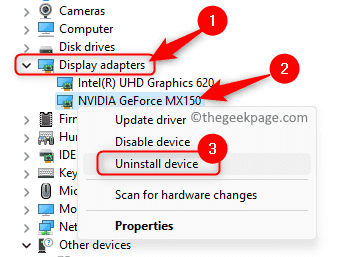
Step 3. In the Device Manager, click on the arrow next to Display adapters to expand it.
Step 4. In the list of display adapters, right-click on the GPU device you are using and choose Uninstall device in the context menu.
Step 5. On the dialog that opens, check the box next to Attempt to remove the driver for this device.
Then, click on the Uninstall button.
Step 6. Wait for the GPU driver to be uninstalled from your PC.
Restart your computer.
Step 7. On system startup, Windows will check for missing drivers and automatically install drivers to replace the old ones.
Step 8. Now, download and install the proprietary software for your GPU device so that the drivers will be automatically updated with the most recent version.
Given below are the driver upgrading tools for some of the common GPU drivers used.
Nvidia – GeForce Experience
Intel – Intel Driver
AMD – Adrenalin
Step 9. Once your drivers are updated to the latest version, reboot your PC and check if the problem with Color Management is fixed.
Method 3 – Reinstall the Color Profile
Step 1. Open the Run box using the Windows + R key combination.
Step 2. Type ms-settings:display and hit Enter to open the Display page in the Windows Settings app.
Step 3. On the System Display page, scroll down to the Related settings section and click on Advanced display.
Step 4. You will be taken to the Advanced Display settings window.
Here, click on the “Display adapter properties for Display 1” link in the Display information section.
Step 5. In the Display adapter Properties window, go to the Color Management tab.
Step 6. Here, click on the Color Management button.
Step 7. In the Color Management window, go to the Devices tab.
Step 8. Use the dropdown next to Devices and choose the monitor for which you want to reinstall the color profile.
Note: If you have multiple monitors, then click on Identify monitors button to confirm the monitor.
Step 9. Now, check the box next to the option Use my settings for this device.
Step 10. Then, click on the Add… button.
Step 11. In the Associated Color Profile window, click on the Browse button.
Note: You need to download the correct color profile for your monitor by going to the manufacturer’s website for your display.
Go to the downloads section and use your monitor’s model number to look for the latest monitor driver and not the graphics driver.
Download the file on your computer and extract it. You will see a .icm file which is the color profile for your monitor.
Step 12. Go to the location that has the folder containing the color profile extracted by you.
Step 13. Choose the color profile .icm file in this folder and click on Add to install the color profile.
Step 14. Close the Color Management window.
Check if the issue is resolved.
Method 4 – Reset the Problematic Application Unable to retrieve the Color Profile
Step 1. Hit the Windows key on your keyboard and type installed apps in the Windows search bar.
Step 2. Select Installed Apps in the search results.
Step 3. On the Installed apps page, search for the application that is having an issue retrieving the Color Profile.
Step 4. Click on the three-dot menu associated with the app and choose Advanced options.
Step 5. On the Advanced options page for the app, locate the Reset section.
Step 6. Click on the Reset button.
Step 7. On the confirmation prompt that appears, click on Reset again.
Step 8. Wait until the resetting process completes. After the reset operation, the application will revert back to the state it was in after being installed on your PC.
Step 9. Open the application and perform the operations causing the issue and check if the problem is resolved.
Method 5 – Perform Clean Install or Repair Install
There are two options to reset your Windows to correct the corruption in system files that is affecting the color profile of your PC.
1. Perform a Clean Install by following the steps mentioned in the linked article. While performing a clean install, everything on your system is deleted before the installation begins. Unless you have created a backup, you will lose all the personal data, apps, games, and preferences.
2. Use Repair Install to repair or install Windows by creating a bootable installation media like a USB or DVD. The advantage of this method is that you will not lose any of your data, apps, or preferences in the installation process.
Method 6 – Revert to Windows 10
If you are not able to resolve the issue with Color Management Scheme on Windows 11 after trying the methods above, then it is better to revert back to Windows 10 to resolve it.
After upgrading to Windows 11, you have a grace period of 10 days to switch back to Windows 10 if required. Use the steps below to revert back to Windows 10 on your PC.
Step 1. Open the Windows Settings app by using the Windows + I key combination.
Step 2. Select the System tab on the left pane.
Step 3. Move over to the right pane and select the option Recovery from the list.
Step 4. If you are in the 10-day grace period, you will see a Go back option that allows reverting back to Windows 10.
Here, click on the Go back button.
Step 5. You will see a Go back to Windows 10 screen.
Select an option indicating the reason for going back and click on Next.
Step 6. On the screens that appear now, click on Next to proceed to the next steps.
Step 7. Finally, on the last screen, click on Go back to Windows 10.
Step 8. Your system will now restart automatically and attempt to recover the installation.
Step 9. Wait until your system is restored to the previous version of Windows.
This restoration will take time depending on the data and storage capacity of your system.
Step 10. The system will reboot after the restore process and you will see the Windows 10 boot screen.
Step 11. Login to Windows 10.
Check if the problem with Color Management is fixed.
If you are not in the 10-day grace period for reverting back, then you will need to make a fresh install of Windows 10 to resolve the issue.
That’s it!
Thanks for reading.
We hope the problem with the Color Management tool not working on your Windows 11 PC is resolved. Did you find this article informative enough in fixing the problem? Comment and let us know the method that worked for you.


