The screensaver and Display functions of the system on Windows may stop working if the laptop battery is low. Windows do that to conserve battery. But, what if the Screensaver and other display functions stop working on your Windows device, even when the device is plugged in or the battery is full? Follow these easy solutions to solve the problem quickly.
Fix 1 – Check the Sleep settings
Check , If the system is configured to sleep/turn off the screen before the screen saver kicks in.
Step 1 – Check the Screen saver time
You should check the time limit that you have set after which Screen Saver kicks in. Skip this if you already know.
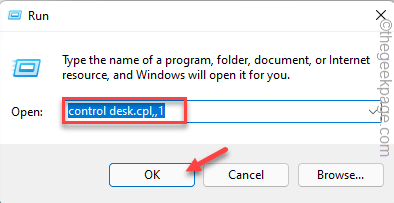
1. Open a Run box. So, press the Win key+R keys together.
2. Then, paste this and hit Enter.
control desk.cpl,,1
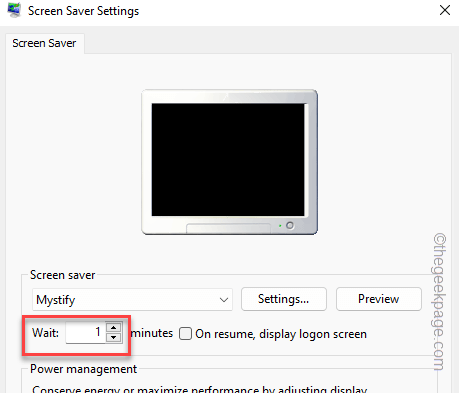
Screen Saver Settings page will appear.
3. Now, check the number beside the “Wait” box.
On our computer, it is set to 1.
Close the page after this.
Step 2 – Adjust the Sleep time to be greater than screensaver time
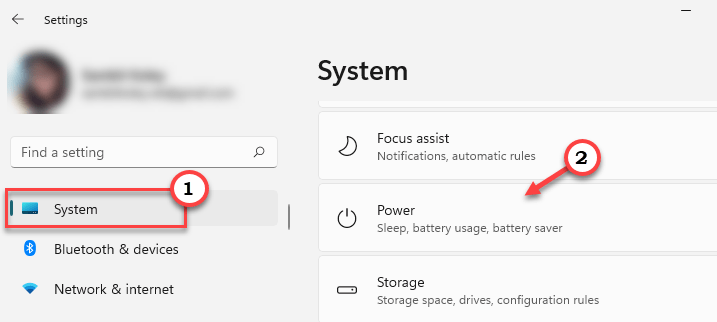
1. Hit the Win+I keys together.
2. Then, go to the “System” tab.
3. On the right-hand pane, go to the “Power” settings.
4. On the right-hand pane, expand the “Screen and sleep” settings.
5. Now, set the “When plugged in, turn off my screen after” setting to “5 minutes“.
If you have a laptop, set the same settings for battery mode as well.
You have to set this value higher than the value that you have noticed on the Screen Saver page.
[Example – Suppose, you have set the screen saver to 1 minute, you have to set the screen saver time to a larger value, 3 or 5 minutes.]
Now, close the Settings page and check. Test whether the Screen saver is working correctly.
Fix 2 – Place the mouse on a rough surface
Screen savers cancel as quickly as it detects any motion (input) from any HIDs like the mouse. So, if you have placed your mouse on a very smooth, polished surface or at an angle, it may automatically slip and generate some motion that can cancel the screen saver. So, place the mouse on a normal, rough mouse pad and then check. Besides this, if you are using a wired mouse, make sure to keep the wire untangled.
Along with that, keep the mouse clean. A dirty, old mouse can cause this issue as well. So, keep it clean with a piece of cloth.
Fix 3 – Check the ScreenSaver options
If you have set the ScreenSaver wait time too long, then the screensaver may appear late on the screen, deferring into this scenario.
1. At first, right-tap the Windows icon and tap “Settings” from the context menu.
2. In the Settings page, go to the “Personalization” tab.
3. Then, tap “Lock screen” settings to open that.
4. Here, if you scroll down, you can see the “Screen Saver” to explore it.
A separate Screen Saver Settings would appear.
5. Check whether the screen saver is set to ‘None’. This means that currently there aren’t any screen savers set on your computer.
6. Set the “Wait” time to “1“. This means the Screen Saver shows up if the computer remains idle for 1 minute.
You can manually increase this time limit any time you want.
7. After this, tap “Apply” and “OK” to save this setting on your computer.
Now, just leave the computer alone for 1 minute and check. You can also press the Win+L keys to lock the computer and test whether it is working while the system is locked.
Fix 4 – Disable Wake power for the mouse
As we have mentioned, you should disable the devices that have the power to wake the system.
1. If you right-tap the Windows icon, you can view a context menu.
2. Tap “Device Manager“.
3. When you reach the Device Manager page, expand the “Mice and other pointing devices“.
4. Now, right-tap the mouse and tap “Properties“.
5. There should be a “Power Management” tab on the Properties page. Go there.
6. Once you are there, make sure the “Allow this device to wake the computer” box is unchecked.
7. Then, tap “OK“.
After this, close the Device Manager.
Fix 5 – Detach adapters
External devices have a feature where that can keep the system awake, causing the screen saver problem.
1. At first, turn off your computer. It will be better if you disconnect the system from the power source.
2. Once it is turned off, detach all the unused external devices one-by-one from your computer.
These external devices can be external HDD/SSD, USB hubs, unused WiFi dongles, etc.
3. Now, once you have removed all those, make sure there aren’t any old CDs/DVDs left in the optical drive.
4. Then, connect the machine to the power outlet and start the system.
Once the system boots up, wait for a while and test to check whether the screen saver is working or not.
Fix 6 – Restore the Power settings
Restoring the Power Settings to the default setting may resolve the screen saver problem.
1. At first, using the Windows key+R keys together, you can access the Run box.
2. Then, type this in the box and click “OK“.
powercfg.cpl
3. This should open Power Settings.
4. Then, check which power setting your computer is currently using. Then, tap “Change plan settings“.
5. Next, tap “Restore default settings for this plan” to restore the default plan configuration.
6. This will put warning message may appear on the screen. So, tap “Yes” to restore the plan.
After that, close the Control Panel page. Wait for the computer for a minute and test it out.
Fix 7 – Troubleshoot the Power settings
You can troubleshoot the Power settings and find a quick resolution for the Screen saver issue.
1. At first, open Settings.
2. Then, click on the “System” settings on your left-hand pane.
3. Next, tap “Troubleshoot” in the following pane to open that.
4. Now, click on “Other troubleshooters” to access the complete list of troubleshooters.
5. Scroll to find the “Power” setting.
6. Click “Run” to run the power troubleshooter on your computer.
If there are some issues that are creating the screen saver problem, the Power troubleshooter will automatically fix it.
Fix 8 – Update the graphics driver
The old, corrupted graphics card driver may create this situation.
1. Open the Device Manager.
2. You can use the Win key and the R key.
3. Then, type this in the “OK“.
devmgmt.msc
4. You can see the “Display adapters“.
5. Expand it to view the display adapter. Then, right-tap the adapter and tap “Update driver“.
6, Now, “Search automatically for drivers” to access that.
Patiently wait for the display driver to be updated.
Restart your computer when the adapter driver is installed. Test if this works.
NOTE –
If Windows determines the best driver is already installed, you will see this message –
The best drivers for your devie are already installed
1. In that case, tap “Search for updated drivers on Windows Update“.
This will take you to the Windows Update page.
2. If there can’t find any display driver downloading, tap the “Advanced options“.
3. Coming to the next page, expand the “Optional updates” option to open that.
Upon expanding the ‘Optional updates’ section,
4. Check those boxes and click “Download & install” to install those updates.
After this, let the computer remain idle and test the screen saver function as well.


