These days everyone wants to try out Windows 11. However, for a few of them, the underlying hardware does not support Windows 11. Few others do not want to risk replacing a beta version of the operating system with their stable paid version of OS. In any case, one can try dual Booting Windows 11 in their system. This way the stable version of the OS remains in the system. Also, if the hardware requirements are not met, one can simply bypass the checks with registry tweaks and still get a flavor of Windows 11.
To Dual Boot Windows 11 in your system, follow the below steps carefully.
Step 1: Download the Windows 11 ISO File
To download the Windows 11 ISO File, refer to the link,
How to download Windows 11 ISO from the official Microsoft website
Step 2: Download Rufus Bootable Media
1. Visit the link Download Rufus Page
2. Scroll down and click on the Latest version.
3. Now the application will start downloading.
4. Ensure the download is complete.
Step 3: Convert the iso file to Bootable media
1. Insert the USB Drive into the laptop.
2. Double-click on the Rufus application(.exe) file.
3. If you see a UAC popping up, click on Yes.
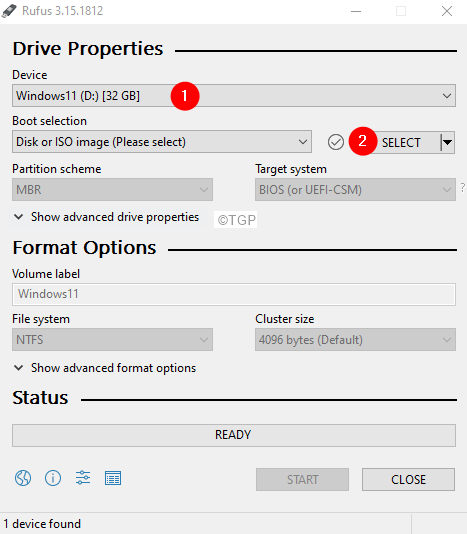
4. In the Rufus window, under the Device section, check if the inserted USB is listed.
5. Click on the Select button.
6. Browse and select the Windows 11 ISO file that you had downloaded in Step 1.
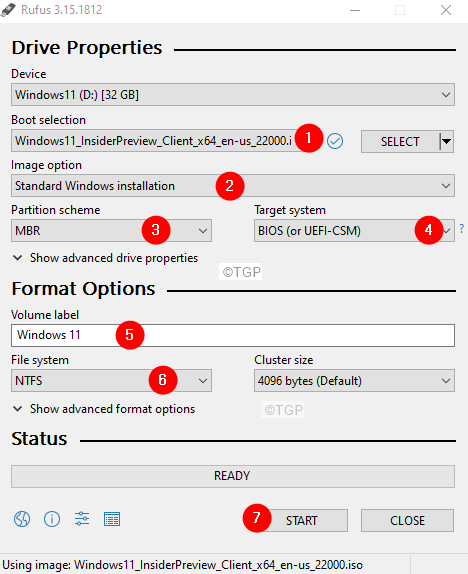
7. Under the Boot Selection section, verify if the selected ISO file has been reflected.
8. Choose Standard Windows Installation from the Image Option drop-down.
9. Choose MBR from the Partition Scheme drop-down.
10. Choose BIOS(or UEFI-CSM) from the Target system drop-down.
11. Under the Volume label, give a suitable name for the Volume.
12. Under File System, choose NTFS.
13. Finally, click on the Start button.
Step 4: Create a Disk Partition
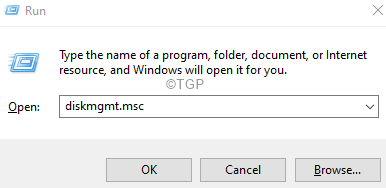
1. Open Run Dialog using Windows+R.
2. Type diskmgmt.msc and then hit Enter.
3. In the Disk Management window that opens, right-click on the required hard disk partition and then choose Shrink Volume from the Context menu.
4. In the Shrink Window that opens, Under the Enter the amount of space to shrink in MB, specify the volume you want to shrink in MBs.
NOTE: Specify at least 64.5 GB
5. Click on the Shrink button.
6. Right-click on the unallocated space on the hard disk.
7. Choose New Simple Volume from the context menu.
8. You can see that New Volume Simple Wizard opens up.
9. Allocate required volume at least 64GB.
10. Assign a driver letter of your choice. Eg G.
11. Select the File System as NTFS.
12. Finally, click ok Finish.
Step 5: Enter Boot Menu while the system is Powering On
1. Insert the USB Bootable media.
2. Restart the system.
3. When you see the logo of the manufacturer, start pressing the key that takes you to Boot Menu.
NOTE: Every manufacturer uses a different key to enter the boot menu. Visit your manufacturer’s page and check the key
For Lenovo users, it is either Fn+F12 or just F12.
4. Once, you enter Boot Menu, you will see the name of your Bootable device listed.
5. Navigate using the arrow keys to your Bootable Media and hit Enter.
Step 6: Install Windows 11
1. You should see a windows logo, and the Windows installation process starts.
2. If you see an error stating This PC can’t run Windows 11, hold the keys Shift+F10 to open the cmd prompt.
3. In the command prompt window, type regedit and hit Enter.
4. In the registry editor window that opens, navigate to the following location
HKEY_LOCAL_MACHINE\SYSTEM\Setup
5. Right-click on the Setup folder on the left-hand side.
6. Choose New and then choose Key.
7. Name the newly created Folder or key as LabConfig
8. Double-click on LabConfig
9. On the right-hand side, on an empty area, right-click on New and then choose DWORD(32-bit) Value
10. Name the newly created DWORD as ByPassTPMCheck
11. Double-click on the ByPassTPMCheck and set the value to 1.
12. Repeat the steps 9, 10, 11, 12 and create the following DWORDs and set the below values :
- BypassRAMCheck – Set the value to 1
- BypassSecureBootCheck – Set the Value to 1
13. Close the registry editor window.
14. You will see the command prompt window. Enter the command exit and hit Enter to close the command prompt window.
15. Now, you will be able to see the message ‘This PC can’t run Windows 11’.
16. Click on the back arrow mark at the top left corner of the window.
17. Now, you should be able to install Windows.
18. You will see the following window, choose the language you prefer, and click on Next
19. Click on the Install Now button.
20. In Activate Windows window, click on the I don’t have a product key option.
21. From the appearing window, choose the Windows 11 edition of your choice and click on the Next button.
22. You will see a license agreement, tick on I accept the Microsoft Software License Terms, and click on the Next button.

23. Click on the Custom: Windows Only(advanced) option.
24. In the appearing window, Choose the drive and click on Next
25. You will see that windows start installing. Please be patient and sit back as this would take some time.
26. Follow the wizard to complete the setup process.
27. Setup your account for Windows 11 following the instructions.
28. Once, that is done, log in to Windows 11
That’s All!
We hope this article has been informative. Kindly comment and let us know if you found this helpful.
Stay tuned for more tips and tricks.


