One of the most fascinating features of Windows 11 is its new Snap Assist feature. But some of the users are not becoming very fond of this feature in Windows 11. There is no way you can disable this integrated feature from the Settings. But there is a way you can disable or enable the Snap Assist feature in Windows 11 using the Registry Editor.
What is a Snap Assist feature?
The Snap Assist feature allows the user to use their screen to multi-task
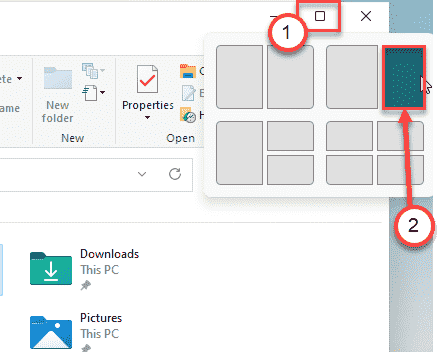
After opening an app, if you hover your mouse pointer on the maximize button on the app, will notice several split layouts. Just, click on the particular layout you want.
The app will be split according to the layout you have chosen.
This new improved split-screen even allows you to split up to four apps on your screen.

If you don’t like it, you can easily do it.
How to disable the Snap Assist feature in Windows 11
You have to create a simple registry key to do this.
1. At first, right-click on the Start icon and click on the “Run“.
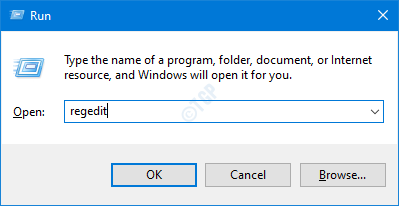
2. Once the Run terminal appears, type “regedit” and hit Enter.

IMPORTANT–
Before you do any certain changes in the Registry Editor, we recommend you make a backup of the registry keys.
a. Once you have opened the Registry Editor, you will need to click on the “File” and then click on “Export“.
b. Save the backup in a secure place.

If anything goes wrong, you can easily restore the registry to its original state.
3. Now, on the left-hand pane, go here –
HKEY_CURRENT_USER\Software\Microsoft\Windows\CurrentVersion\Explorer\Advanced\
4. Then, on the right-hand side, right-click on the space and click on “New>“.
5. After that, click on “DWORD (32-bit) Value“.

6. Once you have created this new key, name the key as “EnableSnapAssistFlyout“.
7. Then, double click on it to modify it.

8. Now, choose the ‘Hexadecimal‘ base.
9. Just set the value as “0” and click on “OK“.

After that, close the Registry Editor window. Then, restart your computer to save this change on your computer.
That’s it! This way, you can disable the Snap Assist feature on your system.
How to enable the Snap Assist feature in Windows 11
Once you have disabled the Snap Assist, you won’t see the Snap Assist layouts even if you hover your mouse over the maximize button.
But, what if you ever want to enable the Snap Assist feature, again? Just follow these easy steps.
1. Open the Registry Editor.
2. Then, go to this location –
HKEY_CURRENT_USER\Software\Microsoft\Windows\CurrentVersion\Explorer\Advanced\
3. On the right-hand side, double click on the “EnableSnapAssistFlyout” key to modify it.

4. Set the value to “1“.
5. Finally, click on “OK” to save it.

Once you are done, close the Registry Editor window. Don’t forget to restart the system.
Once you do, you will see the Snap Assists layout on your computer, again. This way, you can toggle the Snap Layout simply by tweaking the key anytime you want.