Microsoft Office versions 2019/2016/2013 versions come with several built-in features that are handy for the users while they work on a task. However, they also come with their set of problems.
For instance, having so many features in one app can often cause it to collapse, crash, or slow down. And, apparently, the root of this problem is the hardware graphic acceleration. While this feature allows your device hardware to carry out graphic functions for boosted performance, it can also cause some of your apps to slow down, and one of them is MS Office.
Let us see How to Disable Hardware Graphics Acceleration for MS Office products such as Ms Word, excel or Outlook
Method 1: Through MS Office Options
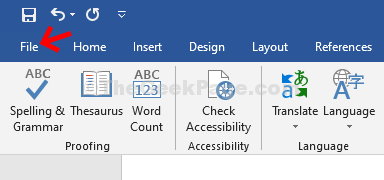
Step 1: Open any MS Office app. For instance, we opened MS Word here. Now, click on the File tab on the top left.

Step 2: From the context menu that opens, select Options towards the bottom.

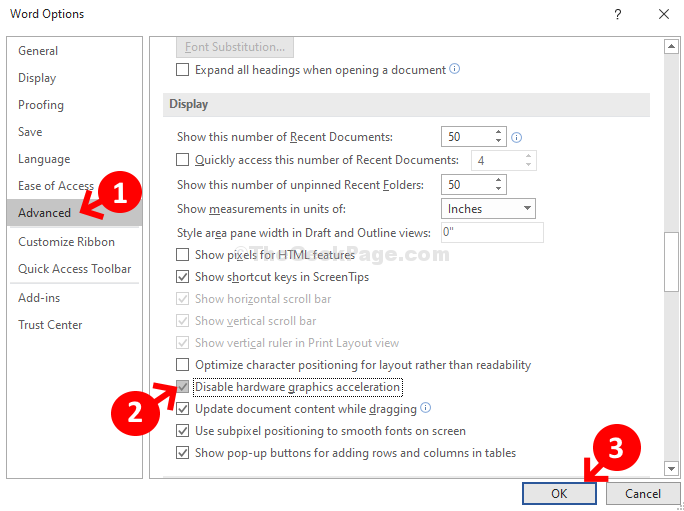
Step 3: In the Word Options window, select the Advanced tab on the left. Now, on the right side of the pane, go to the Display section and check the box next to Disable hardware graphics acceleration.
Click OK to save the changes and exit.

Restart your PC for the changes to be effective and your MS Office should be running smoothly now. If the problem persists, try the 2nd method.
Method 2: Using Registry Editor
Step 1: Press the Windows key + R to open the Run box. Now type Regedit in the search field and hit Enter to open the Registry Editor window.

Step 2: In the Registry Editor Window, navigate to the below path based on your Office version:
For MS Office 2016 and Newer Versions go to the path below
HKEY_CURRENT_USER\Software\Microsoft\Office.0\Common\Graphics
For MS Office 2010
HKEY_CURRENT_USER\Software\Microsoft\Office.0\Common\Graphics
For MS Office 2013
HKEY_CURRENT_USER\Software\Microsoft\Office.0\Common\Graphics
Here we are using Office 2016 and so, we entered the 3rd path as above:

*Note – If the Graphics key is missing under the Common folder, follow the below steps to create the key and the DWORD (32-bit) Value under it.
Step 3: Right-click on the Common folder, select New, and click on Key.

Step 4: Now, rename the new Key as Graphics.

Step 5: Now, right-click on the empty space on the right, click on New, and then select DWORD (32-bit) Value from the sub-menu.

Step 6: Next, rename the new DWORD (32-bit) Value field as DisableHardwareAcceleration.
Step 7: Now, continue from Step 2. Double-click on the DisableHardwareAcceleration on the right.
Step 8: In the Edit Value box that pops up, change the value from 0 to 1 in the Value data field, and press OK to save the changes and exit.

Now, restart your PC for the changes to be effective. Any issues with the MS Office app should be resolved now.