Usually, most iPhone users keep exploring different applications from the App Store by downloading and installing them on their iPhones. What happens is they keep getting notifications from many apps very often on their iPhones.
This makes them very irritated at times when they are busy and sometimes just don’t want to be bothered by some unnecessary notifications from apps. So there is a way to silence these notifications on your iPhone altogether.
If you are also looking for a way how to do it, you have come to the right place. We are going to show you how to disable all notifications on your iPhone easily in the article below.
Method 1 – By enabling Do Not Disturb Mode or Silent Mode
Enabling Do Not Disturb Mode or Silent Mode is the quickest and easiest way to turn off all notifications on your iPhone when you are in a hurry. This makes sure you are not bothered by any notification alerts from anybody on your iPhone.
Step 1: To enable the Do Not Disturb Mode, you have to open the control center screen first.
Step 2: To do so, you have to swipe down the iPhone screen from the top right side.
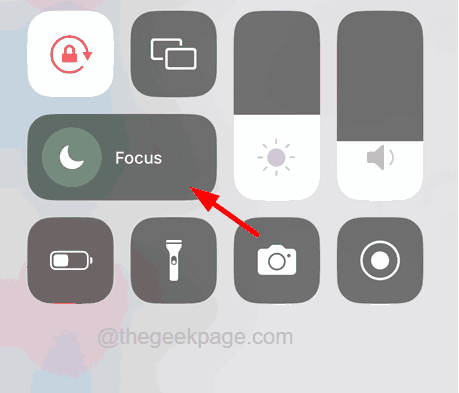
Step 3: Once the control center screen appears, click on the Focus option as shown below.

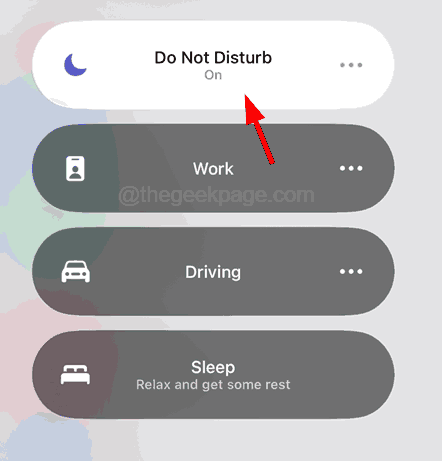
Step 4: After that, tap on the Do Not Disturb option to enable it.

Step 5: You can also silence all notifications by turning on the silent switch on the side of the iPhone above the volume buttons.
Method 2 – Using Notifications Settings
Step 1: Open the Settings app on your iPhone.
Step 2: Once the Settings page is open, select the Notifications option from the list as shown below.

Step 3: Scroll down the Notifications page and choose any app whose notifications you want to turn off by clicking on it.

Step 4: Now turn off the Allow Notifications option’s toggle button by tapping on it as shown in the image below.

Step 5: Repeat the same for all the applications you want to turn off all notifications.
This can be tedious work to do if there are a lot of applications installed on your iPhone. If this is the case, you can try the next method called Scheduled Summary explained below.
Method 3 – Applying the Scheduled Summary option
Step 1: To do so, launch the Settings app on your iPhone.
Step 2: After the Settings page opens, scroll down and select the Notifications option.

Step 3: On the Notifications page, choose the Scheduled Summary option as shown in the below screenshot.

Step 4: Tap on the Scheduled Summary option by tapping on the toggle button.
Step 5: Under the Schedule section, click Add Summary option to add the time when the summary has to be displayed on the iPhone.

Step 6: Change the time accordingly by tapping on the time as shown below.

Step 7: You can also choose the apps to show the summary at the bottom of the page and turn it off by tapping on its toggle switch.