mpcache.exe file is an executable file on your computer’s hard drive. Microsoft Defender’s mpcache files help to run different types of scans. But at the same time, it increases in size and eats up more space due to which many users want to delete them. Users prefer disk clean-up to delete the mpcache files, but sometimes if it does not work, they have no clue what to do next. Do not worry, in this article we have two different methods by which these files can be deleted easily. Let us start!
Method 1 – Delete mpcache Files Manually
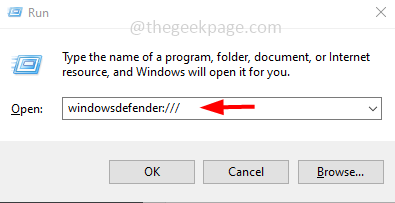
Step 1 – Open the run prompt using Windows + R keys together
Step 2 – Type windowsdefender:/// in the run prompt and then hit enter. This will open the windows defender
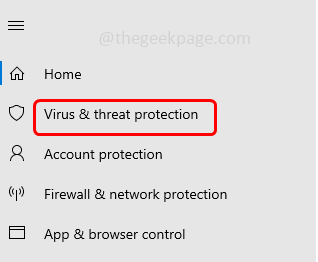
Step 3 – From the left side click on Virus & threat protection
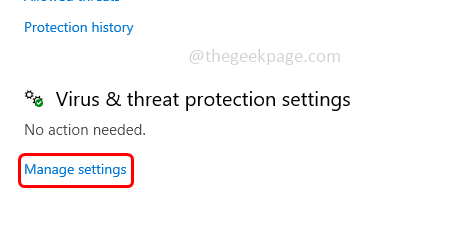
Step 4 – On the right side, under virus & threat protection settings click on manage settings
Step 5 – Disable the real-time protection by clicking on the toggle bar below it (a blue color should disappear from the toggle bar)
Step 6 – A pop up will appear click on yes
Step 7 – Also disable cloud-delivered protection. by clicking on the toggle bar below it (a blue color should disappear from the toggle bar)
Step 8 – Right click on the taskbar and from the appeared list click on Task manager
Step 9 – In the task manager, find the processes related to Windows defender like SecurityHealthHost.exe, SecurityHealthService.exe, Windows Security, etc
Step 10 – Right click on those processes and click on end task
Step 11 – Once all the processes related to Windows defender is closed then navigate to the following path in the Windows explorer (Windows + E)
C:\ProgramData\Microsoft\Windows Defender\Scans\
Step 12 – Now delete all the files related to mpcache. To do it select all the mpcache files right click on it and then click on delete.
Method 2 – Delete The mpcache Files Using Commands
Step 1 – Open the command prompt as an administrator. To do this, type cmd in the windows search then hold Ctrl + Shift keys together and hit enter
Step 2 – A user account control window will open. Click on yes
Step 3 – Copy and paste the below commands in the command prompt one by one and hit enter. These commands will disable the Windows defender tasks
schtasks /Change /TN "Microsoft\Windows\Windows Defender\Windows Defender Cache Maintenance" /Disable > NUL 2>&1schtasks /Change /TN "Microsoft\Windows\Windows Defender\Windows Defender Cleanup" /Disable > NUL 2>&1
schtasks /Change /TN "Microsoft\Windows\Windows Defender\Windows Defender Scheduled Scan" /Disable > NUL 2>&1
schtasks /Change /TN "Microsoft\Windows\Windows Defender\Windows Defender Verification" /Disable > NUL 2>&1
Step 4 – After the commands are executed successfully, now copy and paste the below command in the command prompt window then hit enter. This command will delete Windows Defender mpcache files
del "C:\ProgramData\Microsoft\Windows Defender\Scans\mpcache*" /s > NUL 2>&1
Step 5 – Now you can check if the mpcache files are deleted. To cross verify you can go to the Widnows explorer by pressing Windows + E keys together. Then navigate to the following path
C:\ProgramData\Microsoft\Windows Defender\Scans
Step 6 – Here, before you could see all the mpcache files. Now after executing the above commands the mpcache files would have been deleted.
That’s it! I hope the above provided information is helpful. Let us know which method you applied to get the issue solved. Thank you and happy reading!!


