Things could get very frustrating if you can’t get to delete the file/folder that you have been trying to delete for a long time. You might have tried restarting the machine even! Fret not, this is a very common issue that has been reported by many of the Windows users. Mostly this happens with locked files or folders that you do not have passwords for. However, the solution is definitely not difficult to achieve.
In this article, we explain how you can solve the issue of not being able to delete a file or folder in Windows 11, through some very simple methods that you can try one by one.
Method 1: By Taking Ownership of File / Folder
A very useful command that has been present since Windows 7 is the takeown command, using which you can take ownership of a file or a folder to delete it successfully afterwards.
Step 1: Firstly, we need the name of the file that is refusing to get deleted, with its full path.
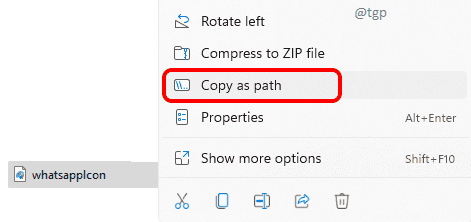
For that, right click on the file and then click on the Copy as path item from the right click context menu.
Step 2: Next, click on the Search icon in the taskbar.
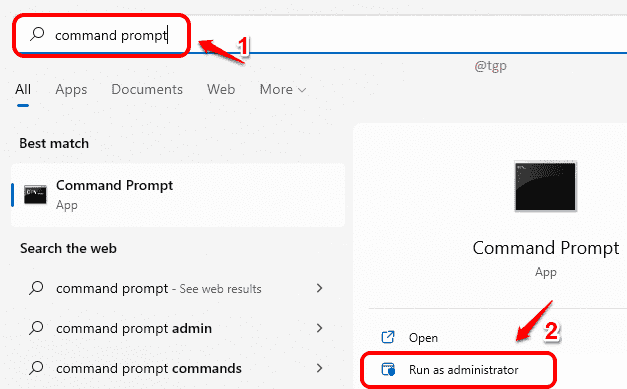
Step 3: In the search bar, type in command prompt and then choose Run as administrator option as shown below.
Step 4: As next, copy paste the following command in the command prompt and hit Enter key. Replace <file-name-with-path> with the path that you copied in step 1.
takeown /F "file-name-with-path"
Eg: takeown /F “E:\The Geek Page\whatsappIcon.png”
Step 5: Now if you want to delete a complete folder but it is not getting deleted with right click & delete, just follow the same steps as in step 1 to get the complete folder path.
Right click on the folder that is not getting deleted and then click on the option Copy as path.
Step 6: The command to take ownership of folders is the same as that of taking ownership of files. But here we have to recursively traverse through each subfolder and subfile inside the selected folder. Hence we have to add a few more arguments to the takeown command.
Please make sure to replace <folder-name-with-path> with the actual folder path that you copied in Step 5.
takeown /F "folder-name-with-path" /R /D Y
Eg: takeown /F “E:\The Geek Page” /R /D Y
That’s it. Now you have successfully taken ownership of the folder and all its subfolders and subfiles. You can try deleting the file/folder again. If it’s still not working, please move on to the next step.
Method 2: Through Process Explorer
Sometimes the reason why you can’t delete a file or a folder is that some other processes are holding handles for the file or folder in question. In that case, you have to delete all such handles and then attempt the delete operation again. Process Explorer helps you identify which process is preventing the delete operation that you are trying to perform.
Step 1: First of all, we need to download Process Explorer from the official Microsoft store. You can straight away get to the download page here.
Once you are at the download page, simply click on the link that says Download Process Explorer.
Step 2: Extract the zip file that you downloaded. Enter inside the folder and double click on the executable file procexp64.
Step 3: When asked to agree to the license terms, click on the Agree button.
Step 4: When the Process Explorer window opens, click on the File tab and then click on Show Details for All Processes.
Step 5: As next, click on the Find tab and then click on Find Handle or DLL.
Step 6: In the process explorer search bar, type in the name of the file or the folder that you are trying to delete. Hit the Search button.
Now, click on the first search result.
Now, in the bottom window, you will see one entry highlighted in grey.
Step 7: Right click on the grey highlighted entry and click on Close handle option.
Step 8: When asked for confirmation, click on the Yes button.
You have to close handles for all the entries in Step 6. Once you have closed all the handles, you can try deleting the file or folder again. If it’s still not working, please move on to the next step.
Method 3: By Booting in Safe Mode
If you still can’t delete the file/folder, you can try booting into windows through the safe mode option. In the safe mode option, only the essential programs and processes would run and hence deleting a file or folder should happen straight away.
Step 1: First of all, click on the Windows icon in the taskbar.
As next, click on the Power icon.
Now hold down the SHIFT key and then click on the Restart option.
Step 2: Your system would now shut down and then restart. During the restart process, you would be taken to the following blue screen.
Click on the option Troubleshoot.
Step 3: In the Advanced options window, click on the option Startup Settings.
Step 4: As next, click on the Restart button at the bottom right corner.
Step 5: Now you can press the number key 4 to boot into your machine in safe mode.
Note: If you would like to boot into safe mode with networking, press number key 5 or if you would like to boot into safe mode with command prompt, then press number 6.
Once you have successfully booted into your machine in safe mode, you can attempt to delete the file or folder again and see if it’s working.
Please tell us in the comments if you are still facing issues with deleting the file.


