The Start Menu in Windows 11 is quite different from the one you have seen in Windows 10. The new and improved Start menu feels a lot less bulky and fluent compared to its previous counterpart. But that doesn’t compromise with the customization capabilities of the most used feature of the OS.
Customizing the Start menu
The new and improved Start focuses on the user choice most. So, you will see the ‘Pinned Apps’ on the front page of the Start. You can pin your favorite apps anytime.
How to pin apps in Start
How do you pin your favorite apps on the first page of Start? Follow these steps.
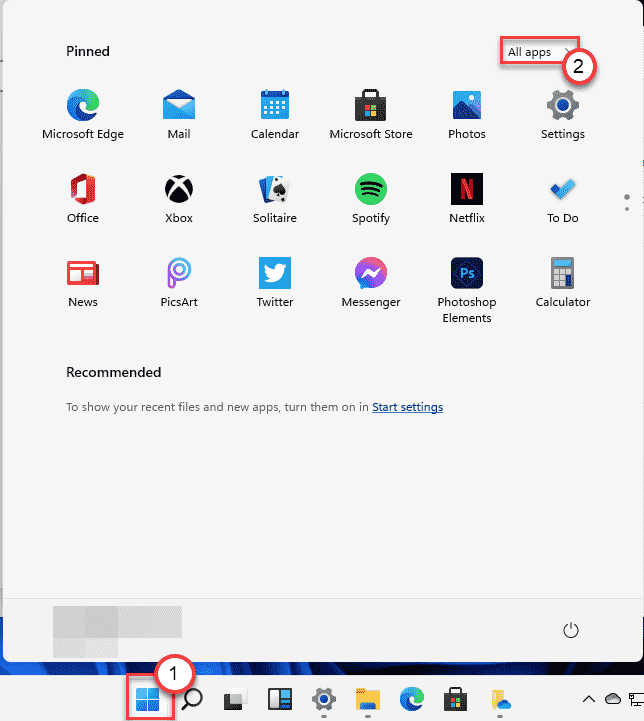
1. Press the Windows key or click on the Windows icon on the Taskbar.
2. You will see the ‘Pinned Apps’ page. Now, click on the “All apps>” on the top-left corner.

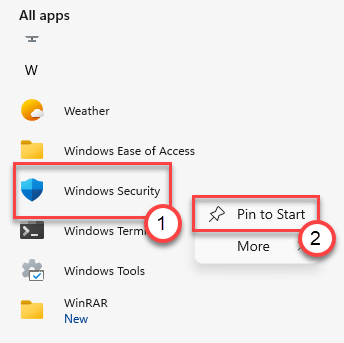
3. Now, scroll down and locate the app you want to pin.
4. Once you have found the app, just right-click on it and click on “Pin to Start“.

This will pin the app to the Start Menu. You can access it simply by clicking on it.
How to unpin apps in the Start
You will notice some bloatware and unnecessary apps on the Start menu. You can unpin those apps very easily.
1. Open the Start menu.
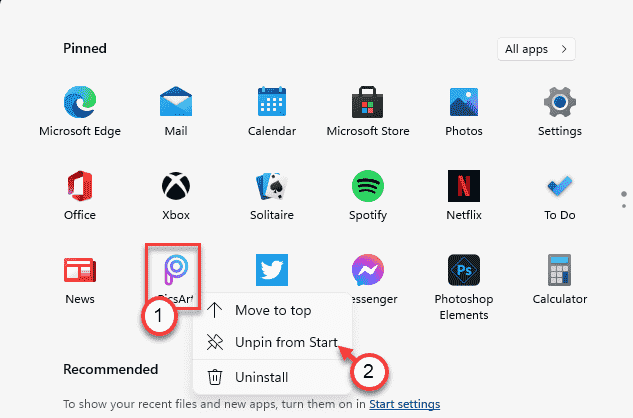
2. In the ‘Pinned’ sections you will notice all the pinned apps.
3. If you want to unpin an app, right-click on it and click on “Unpin from Start“.

This way you can unpin useless items from the Start menu front page and make it look clean.
How to organize the Pinned apps
The new ‘Pinned’ section is the front page of the Start Menu. But if you pin your app it may go to the second page that you have to scroll down after opening the Start menu. Now, if you want to arrange the pinned apps, follow these steps –
1. Open the Start menu.
2. Then, scroll up or down through the pinned apps to find the app you want to move.
3. Right-click on it and click on “Move to top“.

The moved app icon will now appear at the initial position ‘Pinned’ section.
There is no option to change the order horizontally or vertically which was possible in ‘Tiles’ of the Windows 10 Start menu.
How to show the recent files, folders in the Start
Another significant change in the Start menu of the Windows 11 is that it can show your recent files directly on the Start. But, at first, you have to enable the settings to allow that.
1. At first, press the Windows key+I keys together.
2. Then, click on the “Personalization” settings.
3. On the right-hand side, tap on the “Start” settings.

4. Then, on the same side, just toggle the “Show recently opened items in Start, Jump Lists, and File Explorer” settings to “On“.

Open the Start menu simply by pressing the Windows key once. You will notice the recent files in the ‘Recommended’ section.

5. Now, scroll down and click on the “Folders“.

4. Next, toggle the ‘On‘ button beside the particular items you want in the Start menu.
5. Similarly, turn ‘Off’ those folders you don’t want to see on the Start menu.

Close the Settings.
The new Start Menu will appear like this on your screen –

How to REMOVE your important document in Recommended
Windows 11 Start menu shows the file, folders in the recommended settings that you have opened recently. But, what to do if you want to remove some private ones from the Start menu? Follow these instructions –
1. At first, click on the Start icon or press the Windows icon on the Taskbar.
2. Then, click on the “More>” on the ‘Recommended‘ tab on the left-hand side.

3. Here you will find a list of documents from the OneDrive and local files on your computer.
4. Now, right-click on the particular file and click on the “Remove from list” to remove the item from the list.

This will remove the particular file from the Start menu.