Is the error code – 0x8007000d showing while installing the newest Windows Update on your computer? The error code – 0x8007000d shows up when the regular Windows Update process is hindered by some application running on the system. We have detailed a few easy but pinpoint solutions for this problem. Follow those minutely and the problem will be solved in no time at all.
Workaround –
1. If you are facing this issue while installing Windows 10 from a DVD or any other removable storage device, the bootable installation media you are using may be corrupt.
We recommend you create a new bootable media with MCT.
Fix 1 – Uninstall the Mixed Reality Portal
It seems that the Mixed Reality Portal is closing with the regular Windows Update process and throwing up the error code.
1. At first, press the Windows key+I keys together.
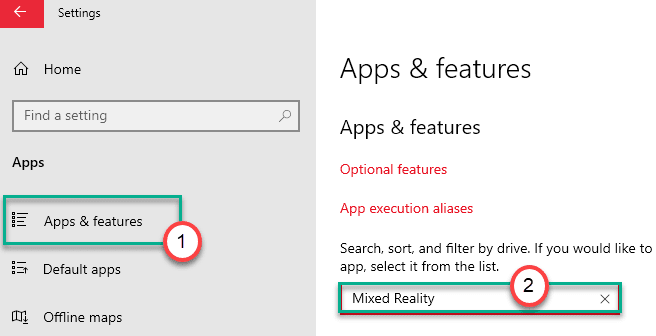
2. Then, click on the “Apps“.

3. Next, on the left-hand pane, click on the “Apps & Features“.
4. Now, on the right-hand side, type “Mixed Reality” in the search box.

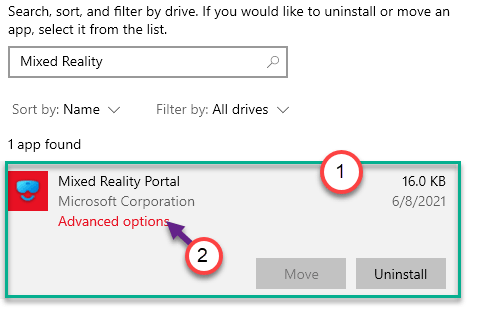
You will see the ‘Mixed Reality Portal’ has appeared in the search results.
5. Afterwards, click on the “Mixed Reality Portal” in the search result.
6. Then, click on the “Advanced options“.

7. Again scroll down to find the “Uninstall” option.
8. Click on it to uninstall the Mixed Reality Portal from your computer.

After that, close the Settings window.
Then, reboot your computer. Once it boots up, follow these steps –
1. Open the Settings window again.
2. Then, click on the “Update & Security“.

3. On the left-hand side, select the “Windows Update“.
4. After that, click on the “Check for Updates“.

Windows will detect the update and install it on your computer.
5. Click on “Restart now” to restart and install the update on the system.

This should install the Windows Update without the Error Code – 0x8007000d.
Fix 2 – Run DISM scan
DISM scan can detect and fix the problem.
1. Click on the search box and start to write “cmd“.
2. Further, right-click on the “Command Prompt” and click on “Run as administrators“.

3. Paste this code into the terminal. Thereafter, hit Enter to run the scan.
sfc /scannow

SFC scan will commence.
4. Following the SFC scan, write these commands one by one in the CMD terminal and then hit Enter.
DISM.exe /Online /Cleanup-image /Scanhealth

DISM.exe /Online /Cleanup-image /Checkhealth

DISM.exe /Online /Cleanup-image /Restorehealth

Close the terminal after scanning the system. Don’t forget to restart the computer.
Fix 3 – Create and run a batch file
Create a new batch file and run it on your computer.
[We have created and uploaded the batch file for your convenience. If you don’t want to create the batch file on your own, scroll down to the NOTE at the end of this solution and follow the instructions mentioned there.]
1. At first, you need to search for “Notepad“.
2. Then, click on “Notepad” in the elevated search result.

3. After opening the Notepad, just copy these commands and paste them on the Notepad page.
net stop bits
net stop wuauserv
net stop appidsvc
net stop cryptsvc
Ren %systemroot%SoftwareDistribution SoftwareDistribution.bak
Ren %systemroot%system32catroot2 catroot2.bak
Del "%ALLUSERSPROFILE%\Application Data\Microsoft\Network\Downloader\qmgr*.datregsvr32.exe /s atl.dll
regsvr32.exe /s urlmon.dll
regsvr32.exe /s mshtml.dll
regsvr32.exe /s shdocvw.dll
regsvr32.exe /s browseui.dll
regsvr32.exe /s jscript.dll
regsvr32.exe /s vbscript.dll
regsvr32.exe /s scrrun.dll
regsvr32.exe /s msxml.dll
regsvr32.exe /s msxml3.dll
regsvr32.exe /s msxml6.dll
regsvr32.exe /s actxprxy.dll
regsvr32.exe /s softpub.dll
regsvr32.exe /s wintrust.dll
regsvr32.exe /s dssenh.dll
regsvr32.exe /s rsaenh.dll
regsvr32.exe /s gpkcsp.dll
regsvr32.exe /s sccbase.dll
regsvr32.exe /s slbcsp.dll
regsvr32.exe /s cryptdlg.dll
regsvr32.exe /s oleaut32.dll
regsvr32.exe /s ole32.dll
regsvr32.exe /s shell32.dll
regsvr32.exe /s initpki.dll
regsvr32.exe /s wuapi.dll
regsvr32.exe /s wuaueng.dll
regsvr32.exe /s wuaueng1.dll
regsvr32.exe /s wucltui.dll
regsvr32.exe /s wups.dll
regsvr32.exe /s wups2.dll
regsvr32.exe /s wuweb.dll
regsvr32.exe /s qmgr.dll
regsvr32.exe /s qmgrprxy.dll
regsvr32.exe /s wucltux.dll
regsvr32.exe /s muweb.dll
regsvr32.exe /s wuwebv.dll
netsh winsock reset
netsh winsock reset proxy
net start bits
net start wuauserv
net start appidsvc
net start cryptsvc
3. After pasting this script, click on “File” and then, click on “Save as“.

4. Now, set the File name: as “fix_update.bat” and click on ‘Save as type:‘ and set it as “All files“.
5. Finally, click on “Save” to save the batch file.

Once you have saved the file, close the Notepad window.
7. Go to the location where you just saved the batch file.
8. Now, right-click on “fix_update.bat“, and then, click on “Run as administrator“.

This will run the batch file on your computer.
9. You will see the ‘DllRegisterServer in alt.dll succeded’ message. Click on “OK“.

Keep on clicking on “OK” on various prompt until the batch file completely run on the system.
Once the script is done running, close everything and restart your computer.
[
NOTE –
a. Download the “fix_update” zip file on your computer.
b. Extract it in a location of your choice.

c. Then, run the “fix_update” batch file following the aforementioned instructions.
]
This should reset all the Windows Update components on your computer and
Fix 4 – Update the computer using the MCT
The error code – 0x8007000d can be solved by updating your PC using the Media Creation Tool.
1. You have to download the tool. Visit the Microsoft Software Download page.
2. Under the Create Windows 10 installation media section, click on the “Download tool now“.

3. After that, click on “Save” to save the package.

Once the downloading process completes, close the browser.
4. Next, go to the file location.
5. Then, double click on “MediaCreationTool2004“.

6. “Accept” the terms and conditions of the tool.
7. Now, select the “Upgrade this PC now” on the screen.
8. Finally, click on “Next“.

This will download the latest version of Windows for your computer. After downloading the update, it will automatically install it.
This process will take a while to complete. You may see this error message while updating – “This PC can’t be upgraded.”, follow these steps –
a. Right-click on the Windows key and the “R” keys together.
b. Then, type or paste this command and hit Enter.
C:$WINDOWS.~BT\Sources\Panther

c. Then, right-click not the “compatscancache.dat” file and click on “Delete” to remove the file.

Once you have deleted the file from your computer, restart the system.
Then try to update the computer with the MCT again following the steps mentioned before.
Fix 5 – Use Windows Update troubleshooter
1. First of all, press the Windows key along with the I key.
2. After the Settings window opens up, click on the “Update & Security” settings.

3. On the left-hand pane, you need to click on “Troubleshoot“.
4. After that simply click on “Additional Troubleshooters“.

5. Next to that, click on “Windows Update“.
6. After that, click on “Run the Troubleshooter“.

Let the Windows Update troubleshooter will now detect if there is any problem with the Windows Update process.
Fix 6 – Use the compatibility troubleshooter
[For standalone installers only]
If you are facing this problem while trying to run an update on your old computer with a standalone installer, try to troubleshoot the compatibility.
1. Go to the location of the standalone installer.
2. Then, right-click on the installer and click on “Properties“.

3. Go to the “Compatibility” tab.
4. Then, click on the “Run the compatibility troubleshooter“.

5. Next, click on the “Try recommended settings”.

This will apply recommended compatibility setting to the installer.
6. To test out the applied setting, click on the “Test the program…“.
7. Then, click on “Next“.

As the installer runs, try to install the update again.
8. Finally, click on the “Yes, save these settings for this program“.
This will save the settings for the installer.

If you are still facing this issue, click on the “No, try again using different settings“.

9. Now, check the box beside the problems you are noticing with the installer.
10. Then, click on “Next“.

11. After applying the settings, click on “Test the program...”.
12. Then, click on “Next“.

This should fix the problem.
Try to update the computer using the standalone installer and you won’t see the ‘Error Code – 0x8007000d’. Your problem should be solved.