It doesn’t matter which Microsoft Office product you use, if you are using the Office products on a day-to-day basis, you might definitely have a set of favorite functionalities in each of these products. For example, you might be using copy and paste commands a lot and a lot when it comes to MS Word. Similarly, you might be using some particular formulae quite often when it comes to Excel, and so on.
Whatever be the Office product you are using, wouldn’t it be extremely convenient for you if you get to add the shortcut of the commands that you use frequently to some quickly accessible location? Well, that’s exactly where customizing the quick access toolbar comes into the picture.
Read on, to learn how you can easily and quickly customize your quick access toolbar, in any of the Office products, to organize your work efficiently. Hope you enjoy reading!
Section 1: Quick Access Toolbar – What is it and Where is it?
You can open any Office product of your choice. In the example below and in this article throughout, I have used Microsoft Word to explain the steps.
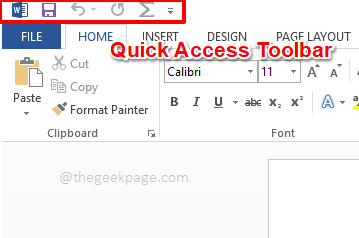
The quick access toolbar is the toolbar that is located at the very top of your Microsoft Office product window. It is even on top of the tabs ribbon that contains tabs like FILE, HOME, INSERT, etc. By default, the quick access toolbar contains only the basic options like Save, Undo, and Redo. In this article, we will discover how we can add more items to this quick menu, and remove items from it, if required.
Section 2: How to Customize Quick Access Toolbar
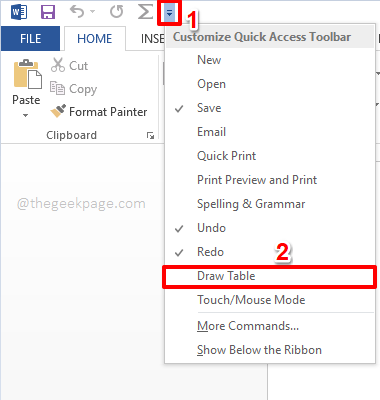
Step 1: Click on the small dropdown arrow located at the end of the quick access toolbar.
Now, you can straight away click on an item present on the quick dropdown to quickly add it to the quick access toolbar. For example, you can click on the Draw Table option as shown below to add it straight to the quick access toolbar.
Step 2: The moment you click on a command from the quick access dropdown, it gets added to the quick access toolbar as shown below.
Step 3: But not every time will you have all the commands, that you need to be added onto the quick access toolbar, right on your quick access dropdown. In that case, click on the More Commands option to find the command that you require.
Step 4: On the Word Options window, you will, by default, be at the Quick Access Toolbar tab on the left pane of the window.
On the center pane of the window, by default, Popular Commands will be chosen and you can click on any of the popular commands listed underneath it.
Once the command is selected, you need to click on the Add button located at the center of the window to add the selected command to the quick access toolbar.
Once the Add button is clicked, you can see that the command is successfully added to the right pane 0f the window.
Step 5: Now, if you cannot find the command that you are looking for under the Popular Commands, then you need to click on the dropdown button associated with the option Choose commands from. From the options, click on the one that says All Commands.
Step 6: This will list all the commands that the particular office product you have opened, has. you can use the scroll bar to scroll up and down to find and select the command that you need to be added to the quick access toolbar.
Once the command is found, you can click on it and then hit the Add button to add it to the quick access toolbar.
You can repeat the same process for adding as many number of commands as you prefer.
Step 7: And if you would like to delete a command that is already added to the quick access toolbar, simply click on the command to be deleted and then hit the Remove button as shown below.
Once you are all done with the additions and the removals, hit the OK button to proceed.
Step 8: That’s it. Your quick access toolbar is now all customized, ready to steal the show! Enjoy!
Please tell us in the comments section how simpler your life has become now that your quick access toolbar is all customized.
Stay tuned for more cool hacks, tips, tricks, how-tos, and many more.


