The Address Resolution Protocol (ARP) is used to map MAC addresses to IP addresses. All hosts on a network will have their own IP address, but Network Interface Card (NIC) will have MAC addresses instead of IP addresses. ARP is the protocol that is used to associate the IP address to a MAC address. All these entries are collected and placed in the ARP cache. The mapped addresses are stored in the cache and they often do not cause any harm. But if there are incorrect entries or if the ARP cache is damaged then there occur connectivity issues, loading issues, or errors. So you will need to clear the ARP cache and fix the error. In this article, we will look into different methods of how to clear the ARP cache.
Method 1: Using Windows Services
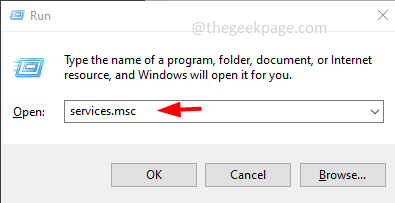
Step 1: Open the run prompt using Windows + R keys together. Type services.msc and hit enter
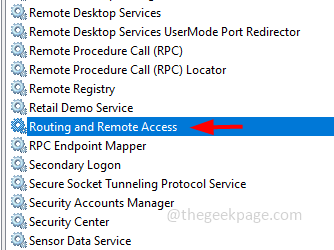
Step 2: This will open the Services window. Find for Routing and Remote Access, double click on it to open it
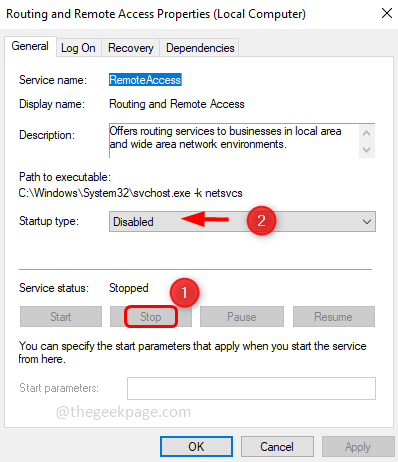
Step 3: Stop the service by clicking on the Stop button
Step 4: Disable the service, by clicking on the startup type drop-down and selecting disabled from the drop-down list
Step 5: To save the changes, click on Apply and OK
Step 6: Restart the computer
Method 2: Use The Command Prompt
Step 1: Open the command prompt as an administrator. To do that type cmd in the windows search bar, hold the ctrl and shift keys, and hit enter
Step 2: A User Account Control window will appear, click on yes
Step 3: In the command prompt window type netsh interface IP delete arpcache and hit enter
Step 4: The command will execute and the response you would get is OK
Step 5: Restart the computer
Alternatively, if you want to check the ARP cache and then delete it, you can use the below commands
Step 1: To display all the caches copy the below command and paste it into the command prompt. Then hit enter. Here –a flag displays all the ARP cache
arp –a
Step 2: To delete the cache copy the below command and paste it into the command prompt. Then hit enter. Here the -d flag deleted all the ARP cache
arp -d
Step 3: Restart the system
That’s it! I hope this article is helpful. Thank you!!


